Level 14: The Dockyard Hideout
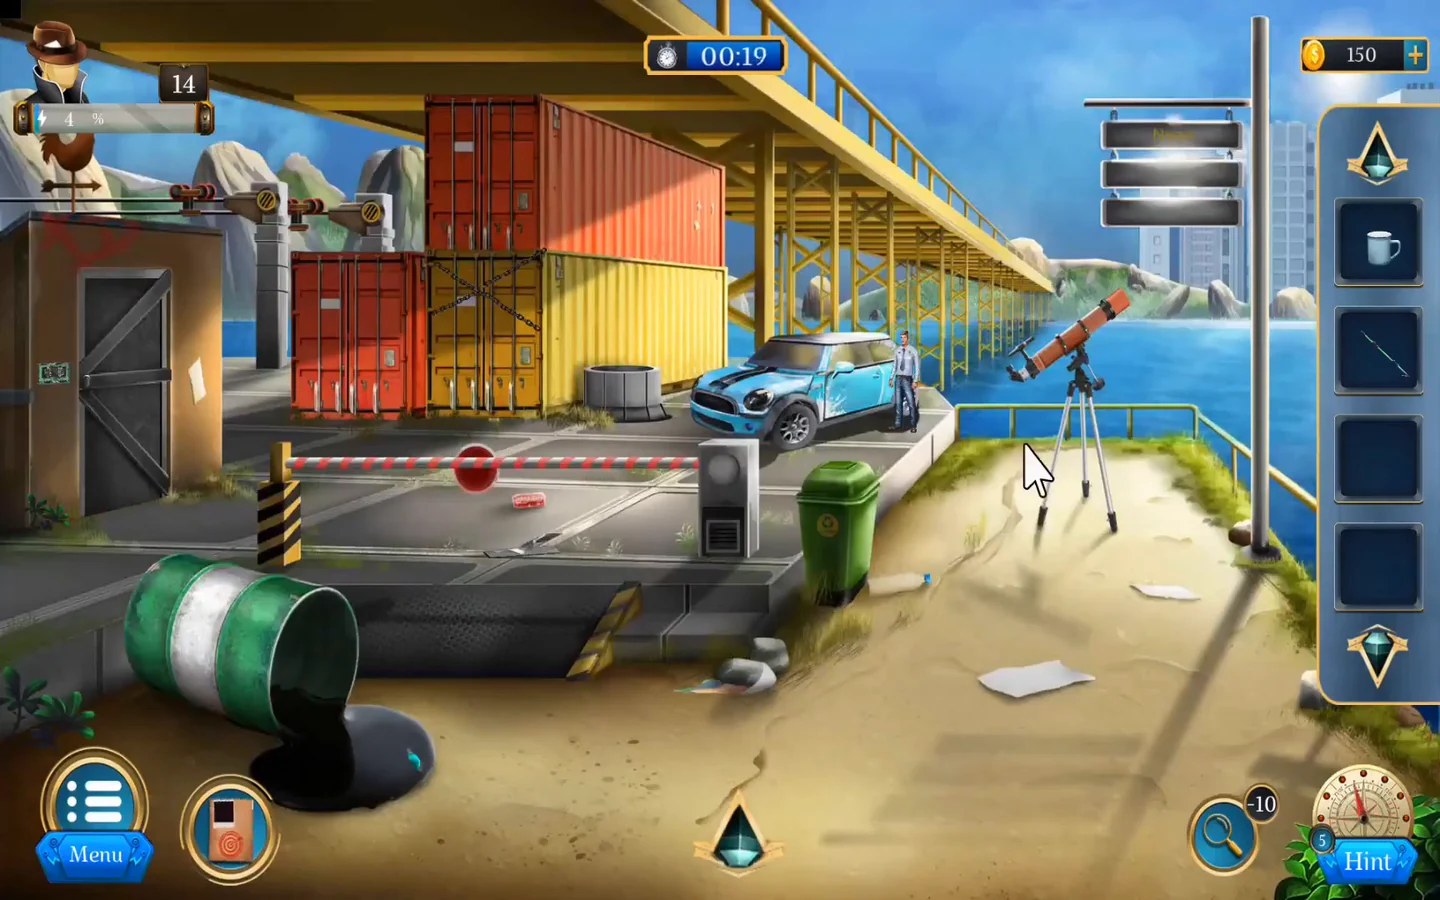
The powder deliveries lead to a dockyard. Open the locked shipping container, assemble a gas mask and get into the ventilation duct.
- On the dock, take the Spear Hook and the Cup from the ground on the right. Go right to the scrapyard and take the red Can from the work area by the barrier. Take the Round Blade from the stack of tyres and cut the ropes on the tarp-covered scrap heap.
- Tap the scrap heap to start a search. Find every object shown in the bar at the bottom to receive the Burner.
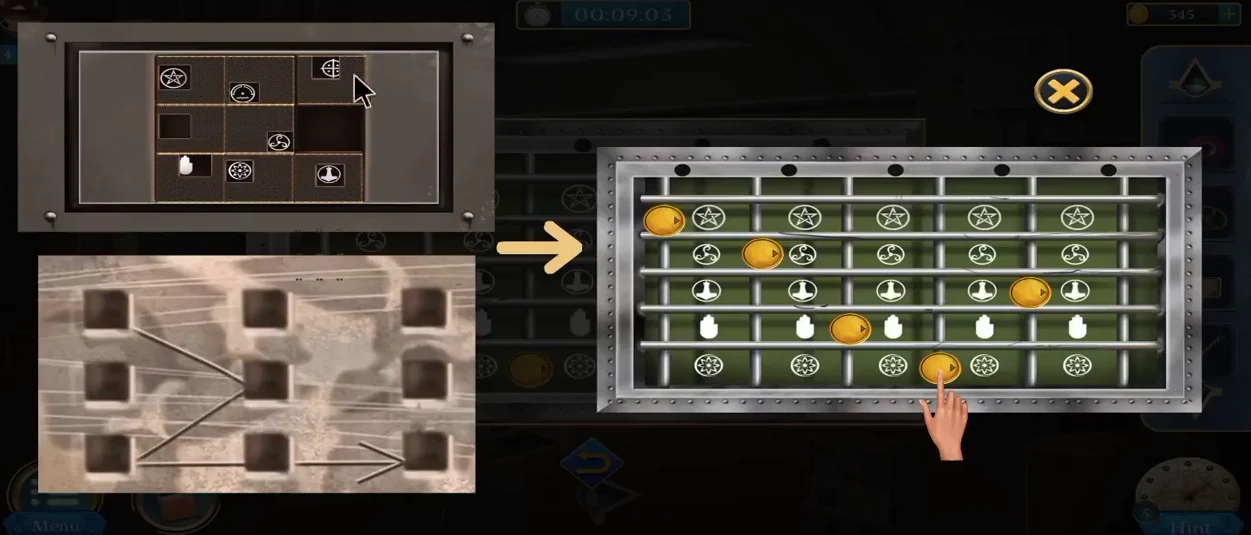
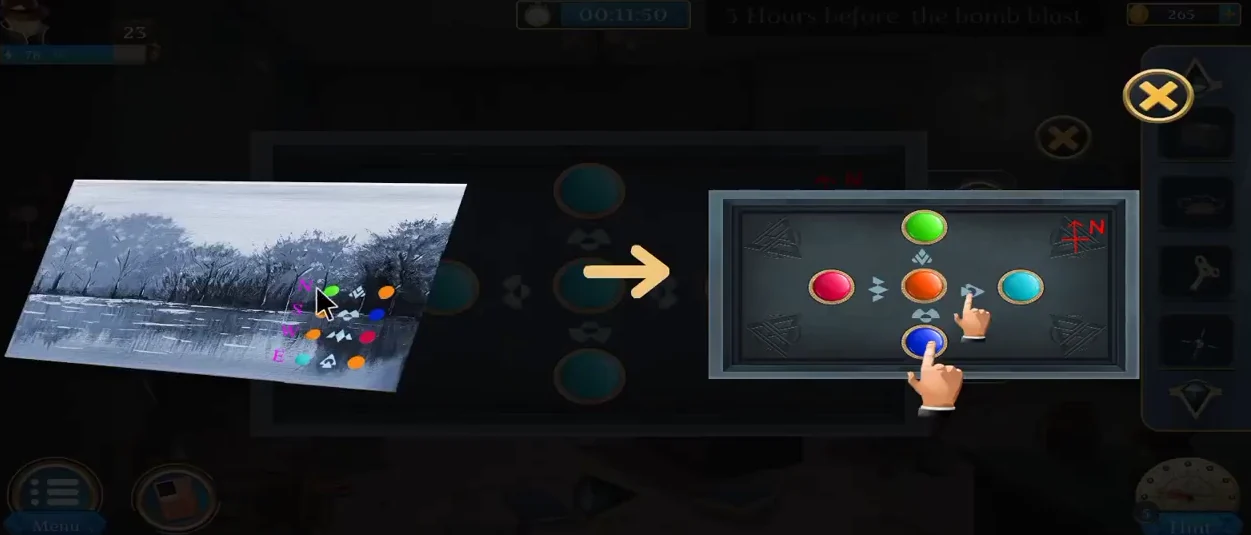
- Pull the lever on the crane control panel behind the red car to lower the tow truck. Pick up the torn paper beneath it to see a route linking car icons. Open the red car's glove box lock and use the triangle and round buttons to set the four symbols from the route, as shown in the solution image. Take the Lighter.
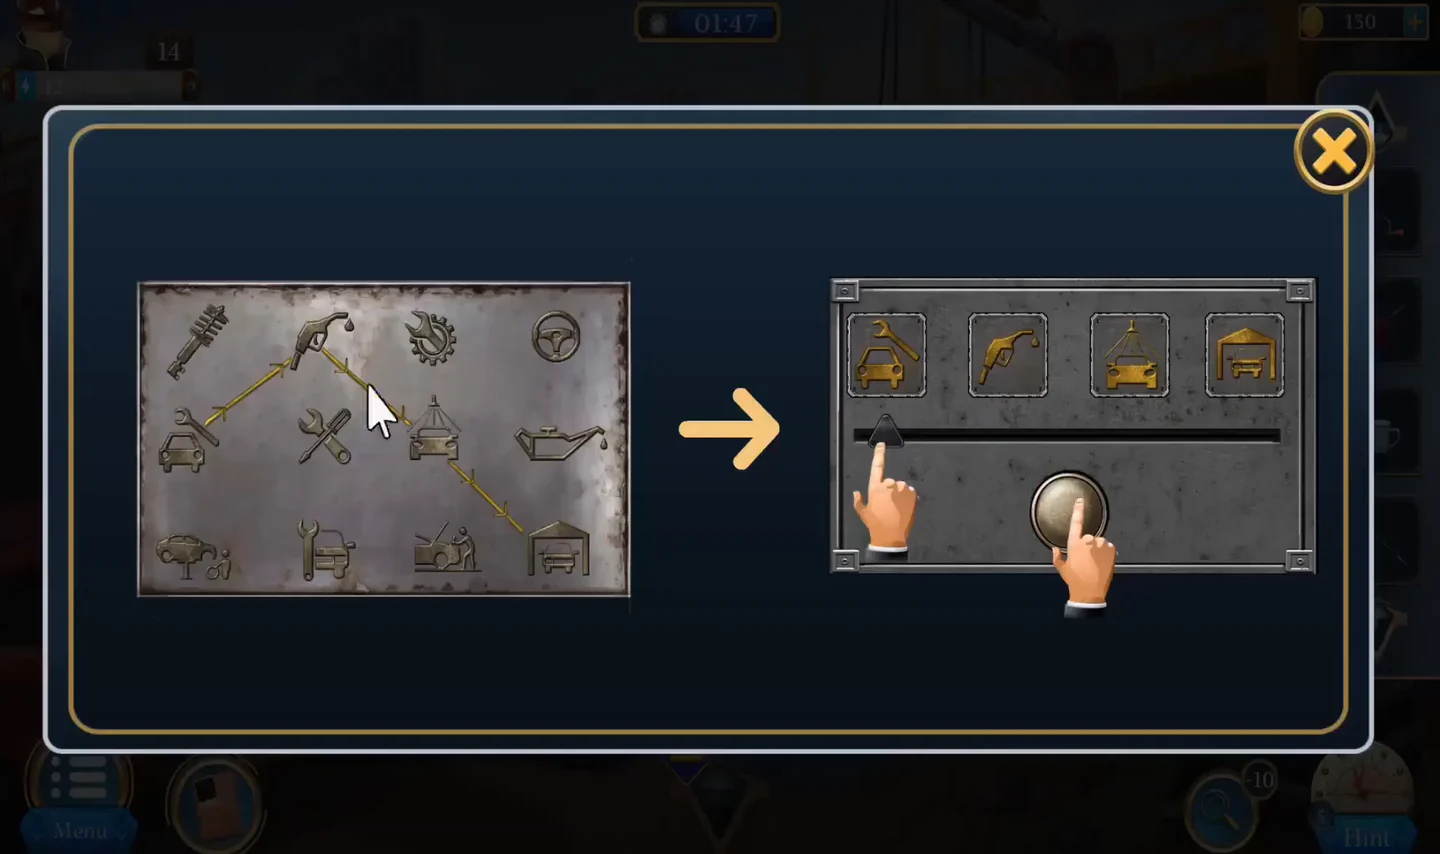
Glove box lock: set the four symbols from the torn route paper. - Fill the Cup at the water puddle and tap it to take the Water. Place the Spear Hook beside the puddle and tap the water to pull out a bag, then tap the Fire Torch canister from the bag to take it. Select the Fire Torch in your inventory, pour in fuel from the Can and attach the Burner and the Lighter, then tap the prepared Fire Torch to take it back.
- Back on the dock, tap the tar by the overturned barrel and place the Fire Torch beside it, then use the Lighter on the torch to melt the tar. Cool the hot object with the Water and take the Solving Piece.
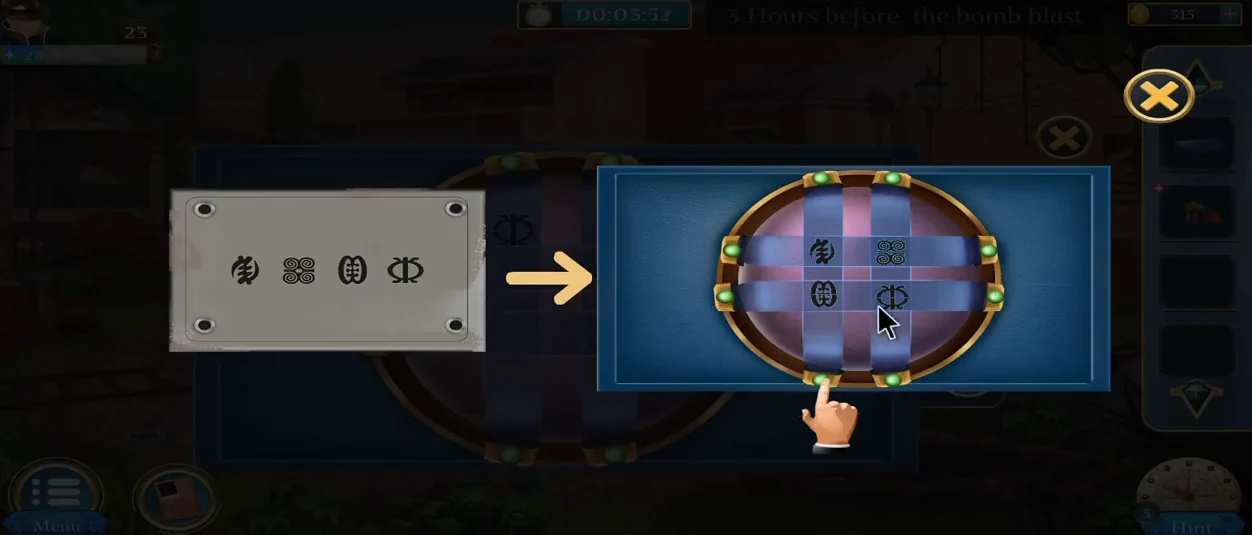
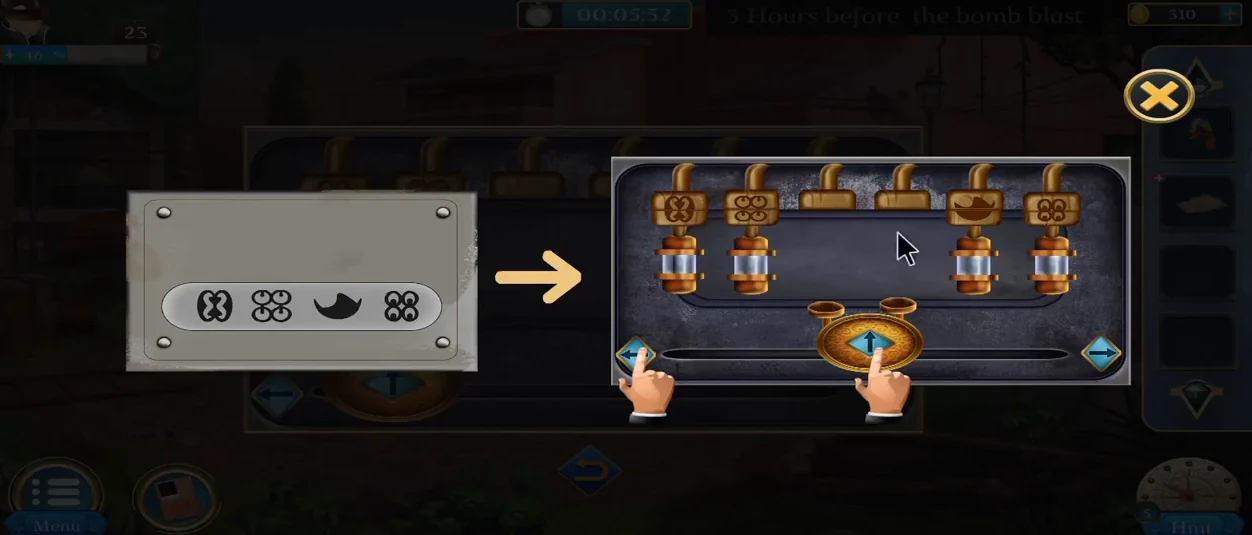
- Look at the two dials of the lock box beside the guard booth door to see the target symbols. Insert the Solving Piece into the middle of the green recycling bin's puzzle. Rotate each wheel and use the swap button to exchange symbols between them until both wheels match the booth dials. Take the Cutter.
- Cut the chains on the yellow shipping container with the Cutter and open its doors, completing the first task.
- Inside, take the QR Cards from the workbench with the wig stands and from the papers on the floor. Take the Bag from the box labelled 'solo' and open it for an Air Filter, the Goggles and the Mask. Take the second Air Filter from the clothes on the left wall, the red Box marked 24 by the wire spool and the Tool Box from the middle shelf.
- Open the Tool Box: flip cards to find matching sets of three until the board is clear, then take the Acid. Pick up the orange hazard Container (a small cylinder on a trolley) from the top-left area of the shipping container. Examine it in your inventory, pour the Acid on it to melt the top, then turn it over and take the Watch from inside.
- The Watch shows coloured numbers: blue 7, red 9, cyan 5 and green 3. Open the red Box and turn each column until the matching coloured frame holds its number. Take the T-Spanner, then assemble the Mask with both Air Filters and the Goggles, and tap the completed Mask to take it.
- Join the QR Cards to read 28465. Enter it on the turquoise wall safe and take the Hammer and the Nails.CODE28465
- Back outside, the duct's fan is spinning. Unbolt the Rope Pulley from the truck bed with the T-Spanner. Take the Lens from the orange telescope and the Plate from the road plate by the barrier. Fit the Plate to the Lens to see four rows of green and red lights.
- Open the electrical panel at the lower left of the duct and reconnect the wires so each row's lights match the Lens. The fan stops. Fix the Rope Pulley beside the fan with the Nails and Hammer, then put on the Mask and tap the duct. Kyle climbs into the vent and the level is complete.
Level 15: The Poison Gas Hideout
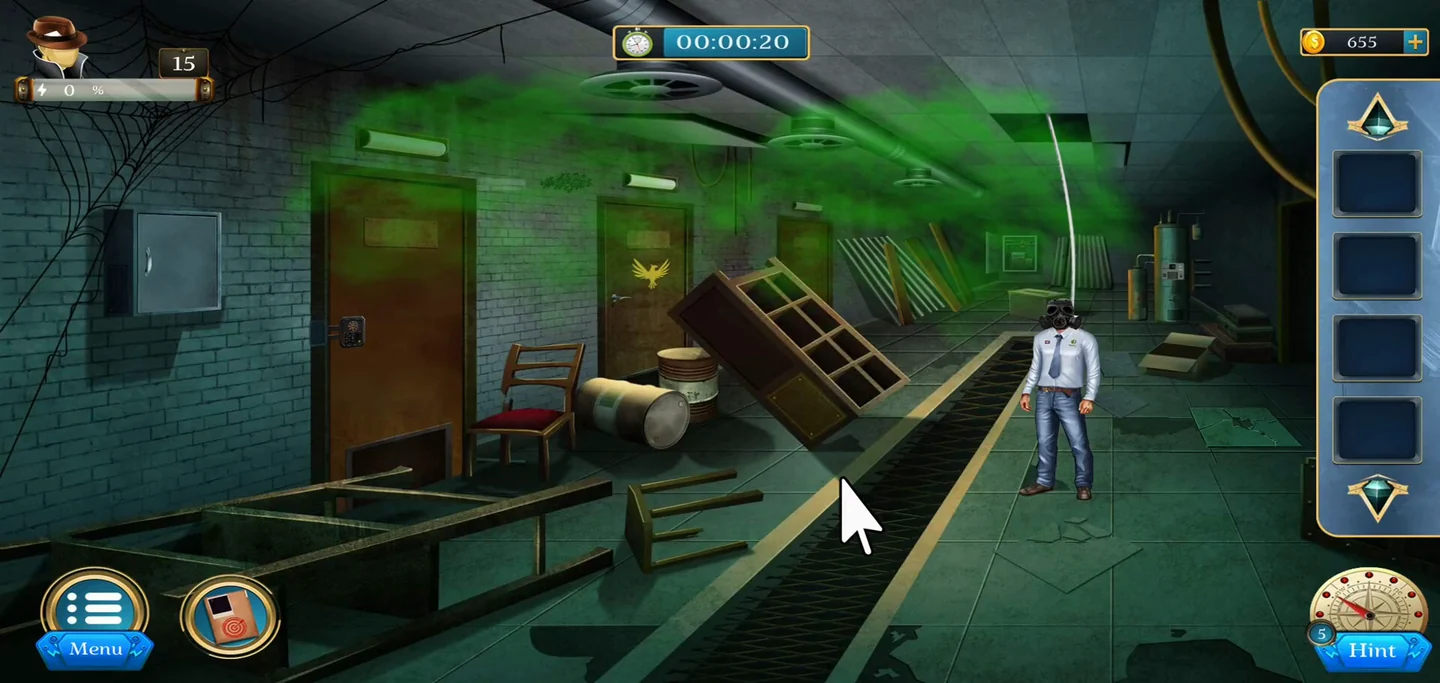
Kyle enters the hideout through the vent, but the room is filling with poison gas. Shut off the gas, unlock the door, then collect the film and the pendant to find the Black Spider's trophies.
- Take the Torch Handle from the overturned drum and the Bag from behind the metal sheets on the right. Open the Bag in your inventory and take both the Steel Cutter and the Torch Head from it. Fit the Torch Head to the handle and tap the finished Torch Light to take it.
- Cut the mesh of the floor grating with the Steel Cutter and shine the Torch Light into the dark pipe to find the Key. The floor tiles nearby show symbols in a grid.
- Unlock the controller box on the wall with the Key. Slide the symbol tiles so they sit in the same positions as on the floor tiles. The gas shuts off, completing the first task.
- Take the Fire Extinguisher from the grey locker on the left and spray the spiders off the brick wall beside the door to reveal five faces. On the round door lock, combine eye and mouth pieces into each face in the order shown on the wall: happy, sad, doubtful, angry and blank. The door opens.
- In the darkroom, take the Crayons from the table on the right and the Portrait from under the cloth in the centre. The portrait's three animal sketches are numbered 38, 61 and 75. Take the Steel Rope from the wall by the vent, hook it to the dumbwaiter pulley and pull the lever to reveal a safe with a hanging balance.
- In the machinery room, take the Steel Pipe from the floor by the drum, a Pendant Key from under the silver pot and the Paper from the central console. Examine the symbol machine on the left: it has an inner, a middle and an outer ring of symbols. The two arrow buttons on the right rotate the middle and outer rings, and the three arrows on the left exchange symbols between the rings along their line. Arrange the rings so the middle and outer symbols on every spoke match the inner ring. The wall safe opens; take the extra Crayon. Put the Paper on the carvings above the left counter and rub it with the Crayons to read HOUR, FEAR, LOSE and MIND.
- Place the Torch Light on the darkroom floor facing the easel. In the machinery room, knock the items off the high shelf with the Steel Pipe and take the Clothes and the Tool Box. Dial 3, 8, 6, 1, 7, 5 on the Tool Box, pressing the side button after each digit, and take the Weighing Stone.CODE386175
- Hang the Weighing Stone in the dumbwaiter safe and adjust the ropes until all the bars are level. Take the Film to complete the third task.
- Place the Film in front of the torch beam at the easel to project a grid of symbols. The Clothes are numbered: 1 jacket, 2 jeans and 3 hat. On the dial panel on the right wall of the machinery room, use buttons 1, 2 and 3 to set the three symbols shown in the solution image. Flip the breaker inside and take the second Pendant Key.
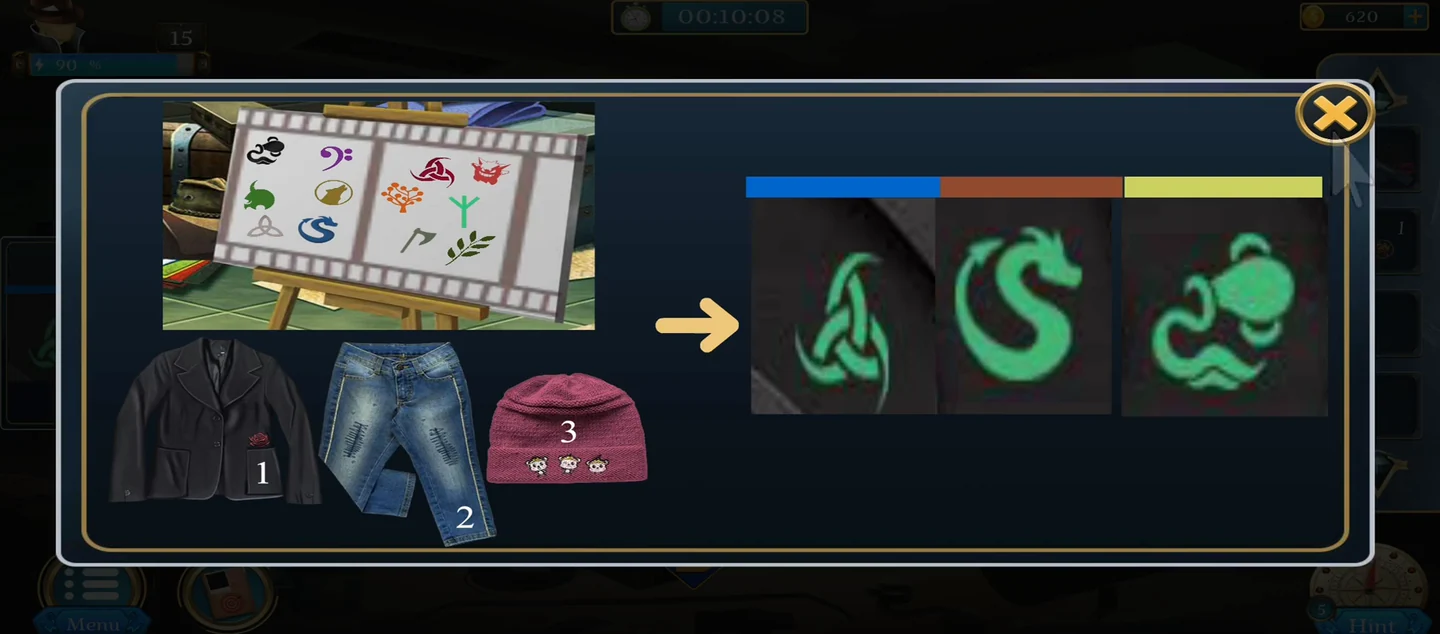
Dial panel: set these three symbols with buttons 1, 2 and 3. - Open the wall safe above the armchair in the darkroom and arrange the letters into the rubbed words: HOUR, LOSE, MIND and FEAR, one per row. Take the Pendant.
- Attach both Pendant Keys to the Pendant and tap the finished Pendant to take it. Place it in the matching socket of the machinery-room wall compartment to open a board of coloured discs. Move the discs to match the solution image. The red row at the top, the green row in the middle and the purple row at the bottom each need five discs. The remaining six red discs go into the two grey rows between them, three in each, in the first, third and fifth columns; the second and fourth columns of those rows stay empty. The hidden display opens to reveal photos the Black Spider keeps as trophies, and the level is complete.
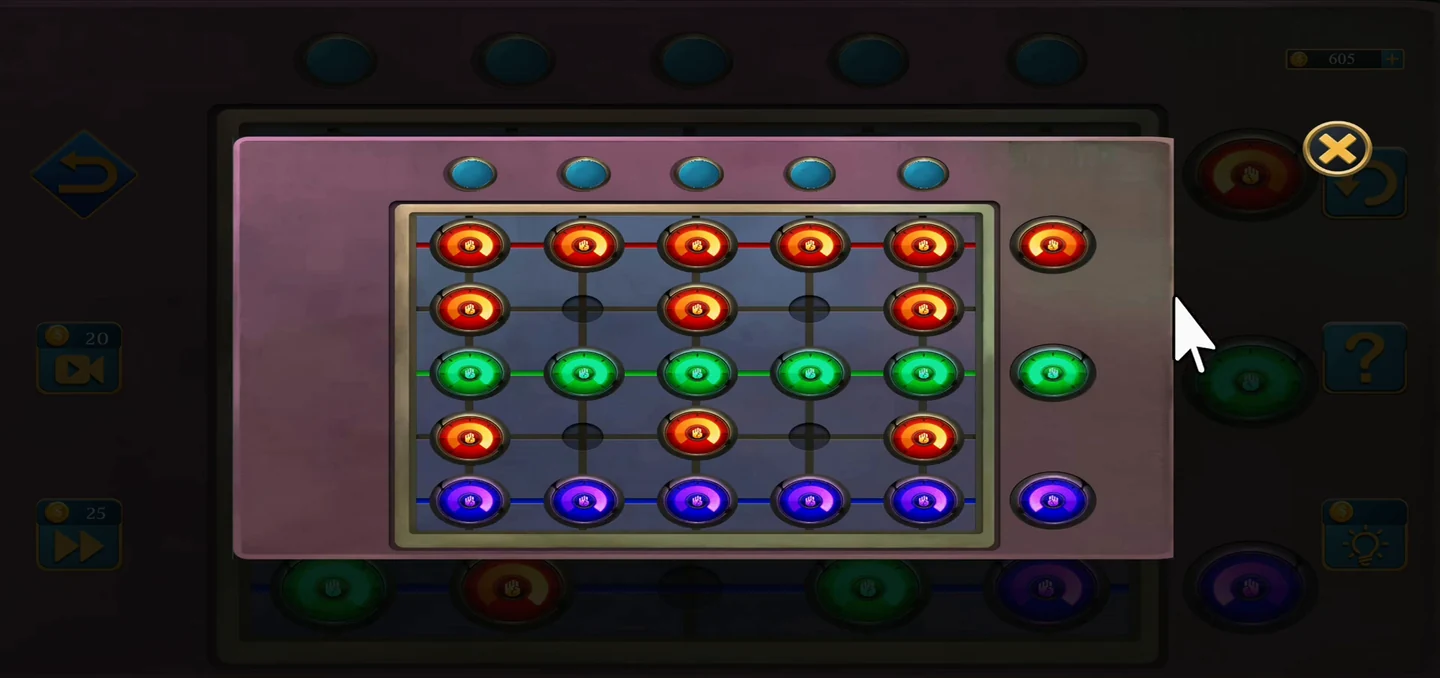
Finished colour layout for the ball board.
Level 16: The Death in the Flat
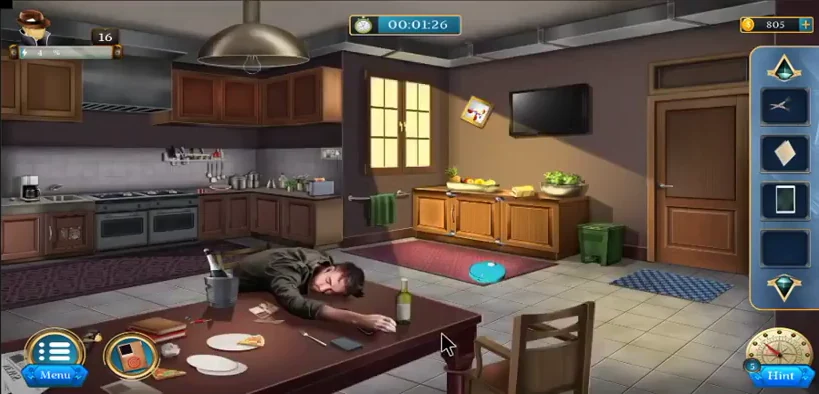
A tenant is found dead at his table. Recover the hidden sheet, open the secret chamber and work out whether it was murder or suicide.
- In the kitchen, take the Letter from under the victim and scan the yellow cup with the Tablet. Take the Scissors from the utensil rack and the Piece of Paper from the green bin. Pick up the robot Vacuum and open it for another Piece of Paper. Take the Bulb from the ceiling lamp.
- The Letter shows arrow directions. On the cabinet to the left of the stove, turn all eight red arrows to match it and take the second Bulb. On the cabinet under the window, turn the four corner clasps outwards and take the Puzzle Piece.
- Go through the right-hand doorway to the bedroom. Take the Photo Frame from the shelf above the clock, the Suitcase from the foot of the bed and the Diary from under the books on the desk. Open the Diary: part of a flower is drawn on the page. Place the Letter and both Pieces of Paper on the drawing to complete the flower. Maize notes that the diary is written in invisible ink, so you will need a way to reveal it later.
- The painting in the kitchen shows four arrows in order: right, up, left and down. Examine the Photo Frame and tap it to rotate the whole frame. Turn it so its red arrow points right and note the digit, then up, then left, then down. The four digits read 7452. Enter 7452 on the Suitcase, tap the padlock to confirm and take the Key.CODE7452
- Insert the Puzzle Piece into the left locker door panel. Move the coloured pieces so each column lines up in the order shown on the panel, lighting the LED, then take the Box. Cut the rope on the right locker with the Scissors and take the third Bulb.
- Put the three Bulbs into the bedside lamp to light five symbols on its shades. Open the Box and slide the tokens along the track into slots I to V in the same left-to-right order. Take the Sheet to complete the first task.
- Place the Sheet on the wooden symbol box on the bedroom floor to highlight five symbols. Pull aside the red curtain to find a vault door, unlock its screen with the Key and set the rows to those five symbols in order. The chamber opens, completing the second task.
- In the lab, take the Base Liquid from the dispenser on the left counter and the red Chemical from the packaging bench. Move the red toolbox on the front table to find the Handle, and take the Pendrive. Use the Handle on the green chest and take the blue Chemical and the Prism.
- Place the Prism in the wall panel's beam to show the recipe: red 25 + blue 35 = 60. Put both Chemicals in the empty slots of the mixing station, either side of the empty middle cylinder. The buttons are crossed over: the green button on the left lowers the red liquid, and the red button on the right lowers the blue liquid. From full cylinders, press the green button three times to bring red down to 25 and the red button once to bring blue down to 35. Check the scales, then press the blue button under the middle cylinder to mix them. Take the Liquid Agent. Select the Base Liquid in your inventory, pour the Liquid Agent into it and tap the mixed Base Liquid to take it back.
- Take the Box from under the packaging bench and the Spray and Laptop from it. Plug the Pendrive into the Laptop to download the decipher data, then take the Pendrive back; you need it again later. On the console by the exit door, press the coloured buttons in the numbered order shown in the solution image. Put the mixed Base Liquid in the left slot below the console. Place the Spray at the dispenser on the right, tap it to remove its black top, then set the open bottle in the right slot. The liquid flows across into the bottle; take the filled Spray.
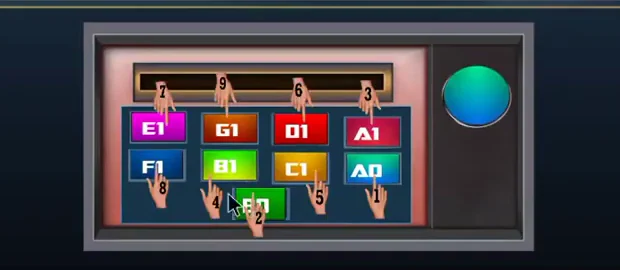
Press the console buttons in the numbered order. - Open the Diary and use the filled Spray on the assembled flower to reveal the hidden writing in binary code. Place the Tablet over the binary, then insert the Pendrive with the decipher data into the Tablet to decode it. The diary shows the victim took his own life after his nephew died from his drugs. The final task is complete.
Level 17: The Airport, the Ballfield and the Ship
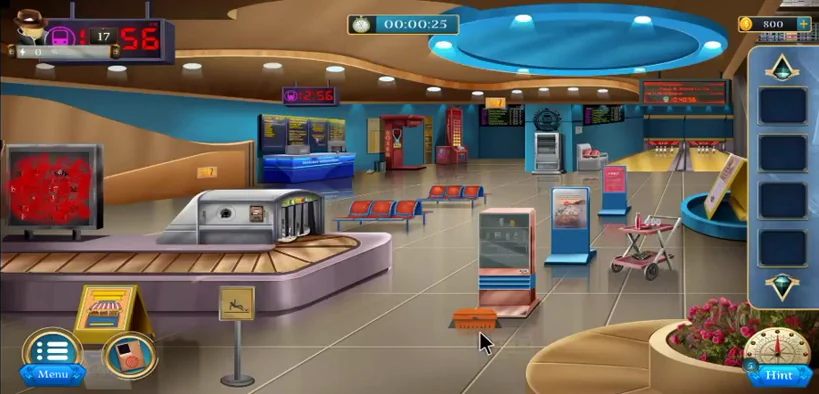
A body is dumped at an airport baggage hall with a message pointing to two more locations. Recover the body, find the locations, open the coffin at the ballfield and save the child on the cruise ship.
- In the baggage hall, pick up the orange Toolbox from the floor at the foot of the grey freestanding sign to the right of the baggage carousel and open it for the Fuse. Take the User Manual from the brochure rack and the Cloth by the bin behind the conveyor. Pick up the yellow Caution Stand by the counter and use it to break the glass of the vending machine, then take the Spray from inside.
- Spray the red graffiti on the wall frame left of the conveyor and wipe it with the Cloth to reveal a message signed with a spider.
- Open the electrical box on the back wall. Its fuse socket already holds an old fuse: tap it to take it out, fit your Fuse in its place, then tap the new fuse to switch it on (the small red light turns green and the lower panel lights up). Tap the lit lower panel to open the light puzzle. The red buttons beside the four columns move lights between linked columns; arrange them as the manual's dot pattern shows: 3, 5, 2 and 4 lights from left to right. With the power restored, tap the silver carousel machine and pull the orange lever in its control panel down to run the carousel, which brings out the body. Take the Note pinned to it.
- On the destination screen above the conveyor, drag letters to spell the two places hidden in the clues: OCEANBLUE from the Note and BALLFIELD from the graffiti. Kyle heads to the ballfield, completing the second task.CODEOCEANBLUE / BALLFIELD
- At the ballfield, collect both Menu Card pieces from the grass; together they show a 3 x 3 grid of spiders. Take the Chisel from the shelves under the bleachers and the Coffee Cup from the bleacher bench. Empty the cup to get the green marble Piece.
- Put the Piece into the blue locker's maze and roll the ball right, down, right, up, right, down, right. The compartment opens: take both Keys, the yellow one and the grey one.
- Examine the small door on the food stand: its lock is frozen, so break the ice with the Chisel. The lock holds a grid of nine spider tiles with one spare space. Tap a tile to slide it into the space next to it, and use the rotate button to turn the tiles, until they match the Menu Card arrangement. Take the Tube and the Cool Compressor, then pick up the blue Box from the field.
- Select the blue Box in your inventory and place the Cool Compressor beside its padlock, then attach the Tube to the placed compressor to freeze the padlock. Shatter it with the Chisel. Take the green and pink Keys.
- Tap the bomb on the coffin and place the four keys you found on its panel, beside the two blue keys already there. Each keyhole needs three overlapping key blades to fill its shape. Select green, yellow and the light blue key for the left keyhole, then grey, pink and the dark blue key for the right keyhole. The coffin opens, but it is a trap, so Maize goes to the Oceanblue ship.
- On the ship, take the Bill from the floor. Its barcode shows 9 8 7 6 5 4 3 2 1 0 9 8; set the desk drawer's wheels to complete that line and take the first Steel Board. Take the Wheel from the left booth and the Blow Torch from the right booth.CODE987654321098
- Place the Wheel on the helm on the back wall. Each wheel has a red arrow, and a fixed yellow marker sits outside each wheel: upper left for the left wheel and lower right for the right wheel. Turn each wheel until its red arrow points at its own yellow marker. On the blue buffet counter, tap a dial to select it, then use the four orange direction buttons below the dials to move its symbols around; the central red button swaps symbols between the two dials where their paths meet. Arrange them so the left dial holds the food items and the right dial the travel items, as shown in the solution image. Take the Ice Cube.
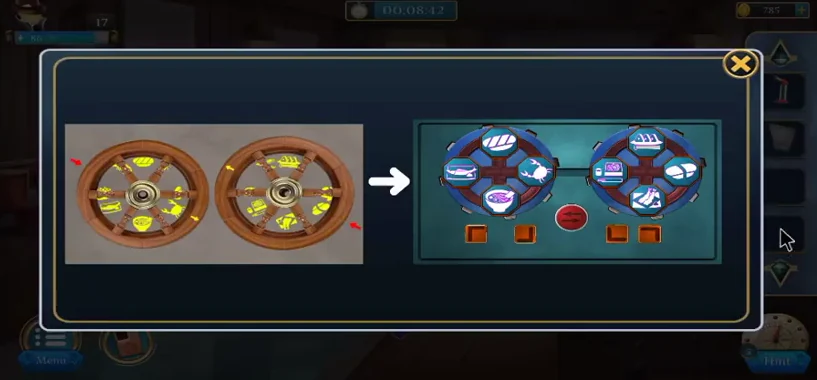
Target layout for the buffet counter dials. - Melt the Ice Cube with the Blow Torch to get the second Steel Board, and take the Oar from behind the right booth cushion. Break the glass floor with the Oar to reach the trapped child.
- Combine the two Steel Boards into a number-guessing clue. Its hints lead to 042. Set the lock to 0 4 2 to disable the mechanism and save the child, completing the level.CODE042
Level 18: The Ransom Call
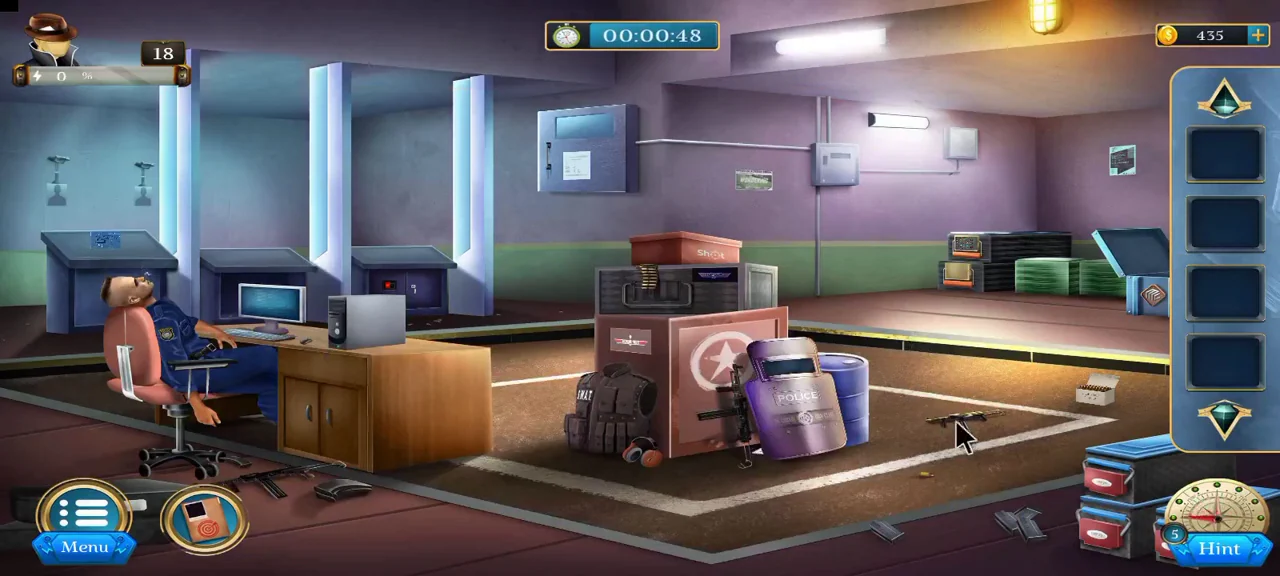
The Black Spider calls Kyle: to save his friend, he must go to a trap-filled building and find a mobile phone. First assemble a handgun from the department's armoury, then switch off the inferno and lasers to reach the phone.
- In the armoury, take the Bullets from the box at the bottom right and the Instruction Catalogue from the central display. Take the Access Card from the sleeping guard and use it on the wall locker behind his desk to get the Polaroid Glass.
- Open the Instruction Catalogue and view it through the Polaroid Glass. Its green, blue and red lenses reveal what each switch state means. Use these values with the switch settings in the breaker box on the back wall to arrange the safe's 3 x 3 grid with its arrows, as shown in the solution image. The finished rows read 0 (zero), 2, P in the top (green) row; F, 1, 6 in the middle (blue) row; and X, 5, 3 in the bottom (red) row. Take all seven gun parts from the safe.
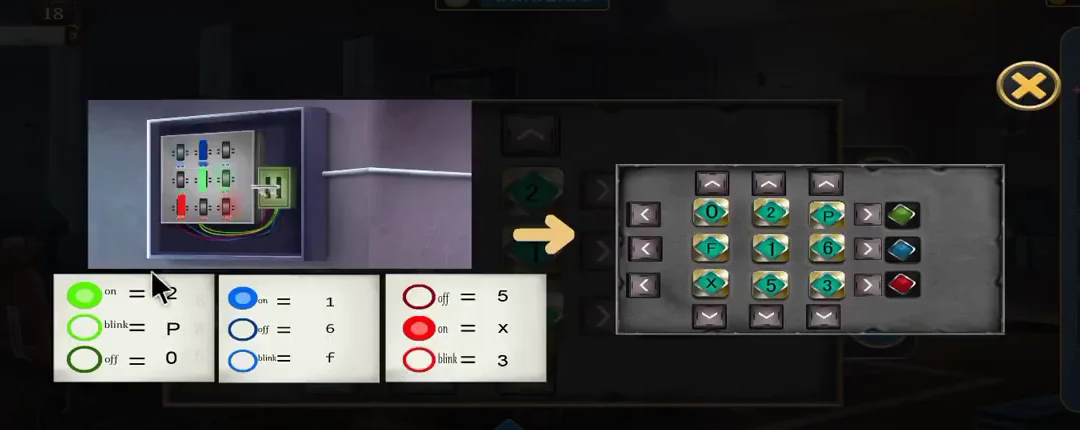
Safe clue (left) and the finished grid: 0 2 P / F 1 6 / X 5 3. - Take the Blueprint fragment and the Magazine from the tactical vest on the central crate. At the left workbench, add the Blueprint fragment to the half already lying there to complete the sheet. The game asks you to drag the parts in the given order: place the gun parts from your inventory one at a time in the order shown on the completed blueprint. When the Gun is assembled, take it, then open it from your inventory. Place the Magazine beside it and then the Bullets, and tap the placed box of Bullets to load the Gun. The first task is complete.
- In the office room, take the Metal Plate from the top of the maroon machine on the right, behind the foreground desk, and the green Puzzle Piece from the black filing drawers. Insert the Puzzle Piece into the grid on the desk safe and slide the rows and columns so each crest tile reaches its matching outline, as shown in the solution image. Take the Coin.
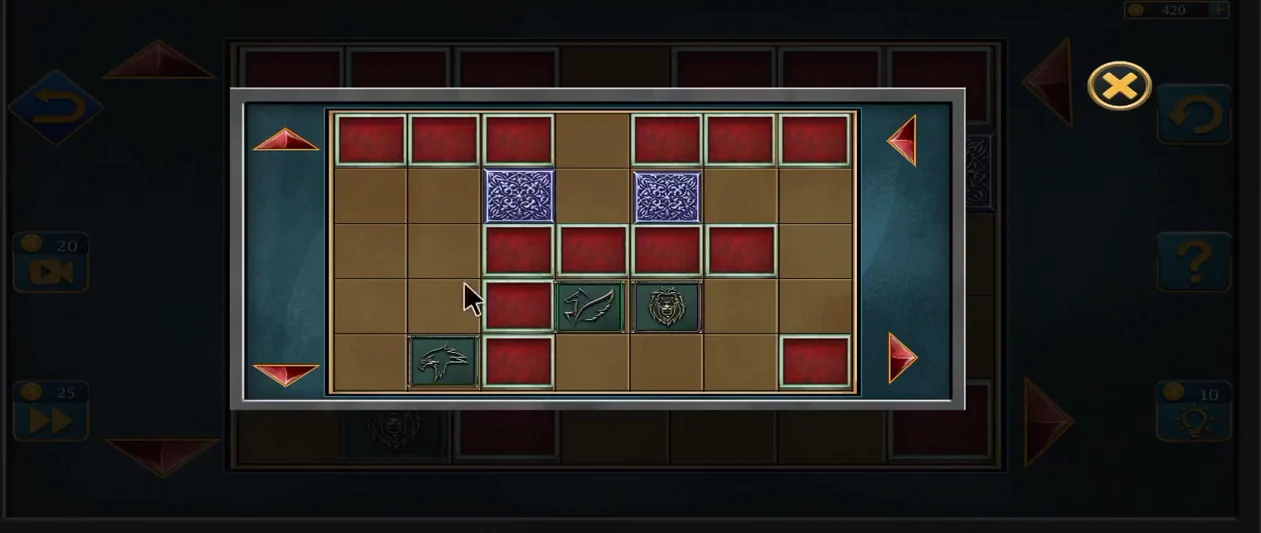
Finished crest layout for the desk safe. - Examine the litter on the floor near the beanbags and take the Broken Piece and the item labelled Garbages. Put the Garbages into the opening of the green bin at the left of the office and take the Rod that appears. Keep the Broken Piece for later.
- In the office, inspect the closed red closet door at the back and tap its disc lock. Tap a disc to rotate it and use the arrows to move the ball. Guide the ball from the left entry through the upper-left disc, across to the upper-right disc, down to the lower-right disc and out of the exit on the right. The closet door opens; take the Box from inside, then open the Box in your inventory and take the Wheel.
- Insert the Coin into the arcade machine in the office and use the arrows to guide the ball from the bottom tray to the top-right goal. Take the Tape and the Wire.
- In the trap room, lever up the heavy cover with the Rod. Remove the tangled wires one at a time, starting with whichever lies on top, until the gauge is free. Take the Meter.
- Cut open the pink beanbag in the office with the Broken Piece and take the Chip Piece. Insert it into the pipe junction terminal in the trap room and slide the tiles to complete the symbol layout.
- Scrape the rust off the Metal Plate with the Rod to reveal a path through nine squares. Open the wall cabinet on the far left of the trap room and slide the chips into the places the plate and the junction show, as shown in the solution image. Take the second Wheel.
Chip cabinet: place the chips as shown on the right. - Fit both Wheels onto the valve mounts on the right counter to block the gas. The flames die out, completing the second task.
- Join the Wire to the cut cable of the box beside the bed, wrap it with the Tape and pull its lever. The screen shows a row of symbols above a scale from 10 to 70. Insert the Meter into the right-hand pedestal and press each coloured button: green reads 30, yellow 50 and blue 65. Read the symbol above each value on the scale. On the laser keypad, enter the hand with an eye (third row, first key), the sun with a dark centre (first row, third key) and the low spiky burst (second row, second key), then press the green tick.
- Break the glass case with the Rod and take the phone. Its map shows where Kyle's friend is held, and the level is complete.
Level 19: Rescuing Allen
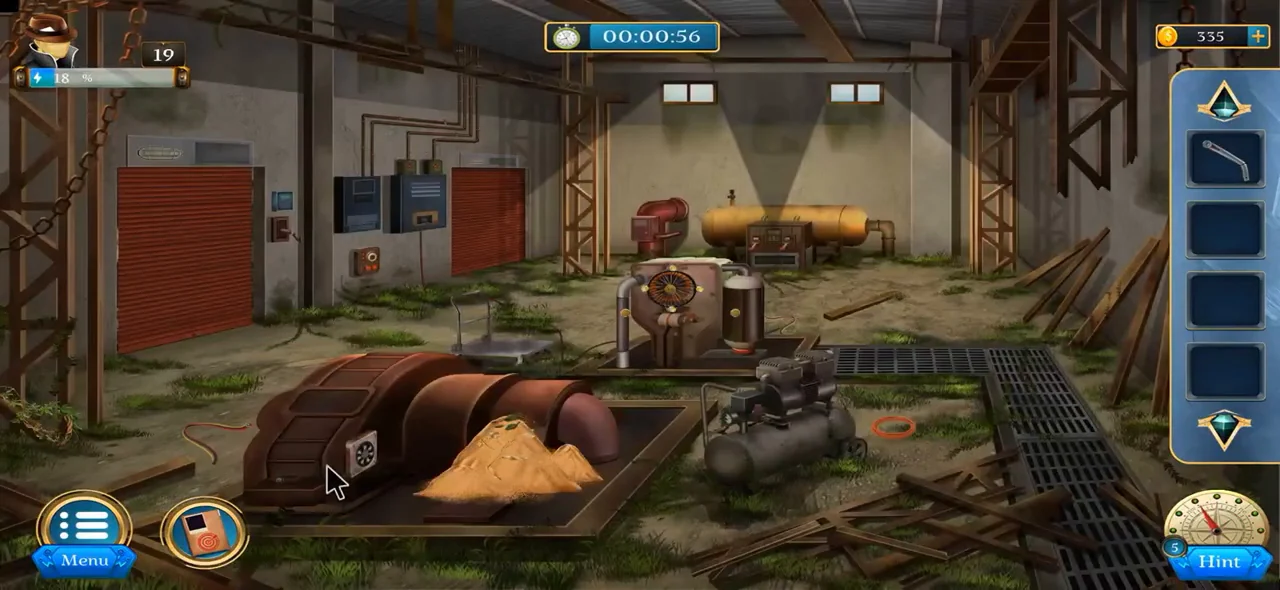
Kyle's friend Allen is held captive in an abandoned factory. Collect a drive belt, climb the chain to the loft and open the chamber holding Allen.
- Take the Steel Piece and the Stone from the rubble on the right. Place the Stone on the sand pile and sharpen the Steel Piece on it, then cut the vines on the far-right column and take the Lever.
- Attach the Lever to the blower beside the sand pile and crank it. The sand blows away to reveal a chart of symbols numbered I to IX on the pipe.
- At the terminal beside the red shutter, tap each slot to change its symbol and use the swap buttons to set the symbols for the numerals shown above them: II, I, VII, VI and V. The shutter opens.
- Take the blue Plate from the floor in front of the shutter and the second Plate from the floor in the next room. Slide both into the light box on the wall in the first room to show four coloured symbols.
- In the second room, open the high-voltage cabinet on the right pillar. Select each chip and use the arrows to move it onto the coloured square of its symbol. A metal box drops to the floor.
- On the box's round knife lock, press the buttons in this order: top left, top, right, bottom right, top right, bottom, left and bottom left. Take the Button.
- Insert the Button into the green locker on the left wall. Tap the round buttons to rotate the coin pieces until they form the complete woodland picture, then take the Spanner.
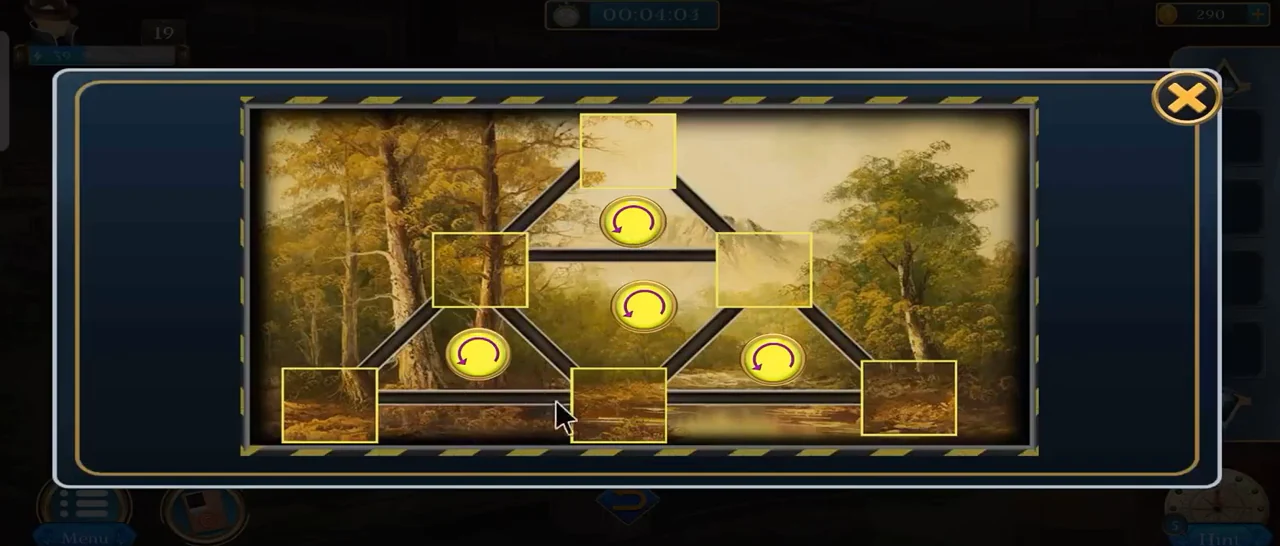
Completed woodland picture. - In the first room, place the Spanner on the large fan. Turn it with the arrow buttons in the direction marked by each bolt to remove all four, then take the Gear.
- In the second room, pull the lever beside the red shutter to lower it. The lowered shutter shows four pairs of colours, each joined by a differently shaped line: yellow to red, red to blue, green to yellow and blue to green. Open the control desk on the left of the second room. Tap each line between two coloured buttons until its shape matches the line joining the same two colours on the shutter, then take the Belt. The first task is complete.
- Fit the Gear to the motor between the two columns, loop the Belt around the pulleys and pull the lever. The chain starts moving; climb it by pressing the arrows in three stages. Stage 1: right, down, left, up, down. Stage 2: left, right, down, right, up. Stage 3: up, down, right, left, down.
- In the loft, the monitor left of the window shows a coloured shape clue. Take the Pointer from near the handcart and attach it to the left of the three wall rulers. Open the yellow safe and set its six symbols using the colours and ruler arrows, as shown in the solution image. Take the Puzzle Piece.
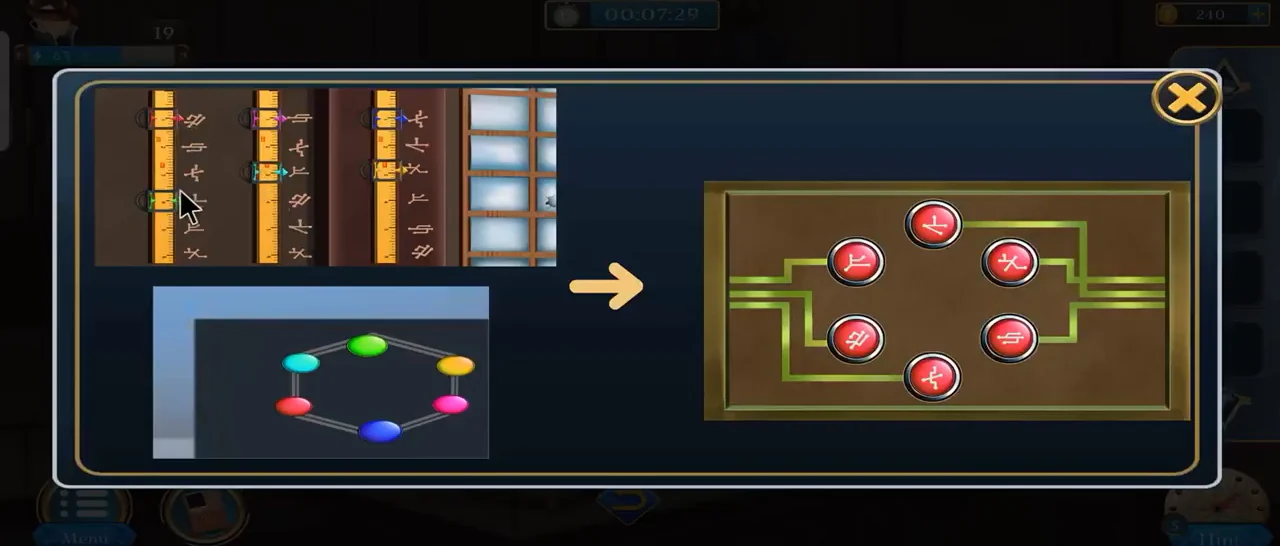
Yellow safe: final symbol settings. - Insert the Puzzle Piece under the fourth column of the wall cabinet on the right. Swap the coloured blocks between the hanging cubes until all four columns balance as shown in the solution image, then take the Key.
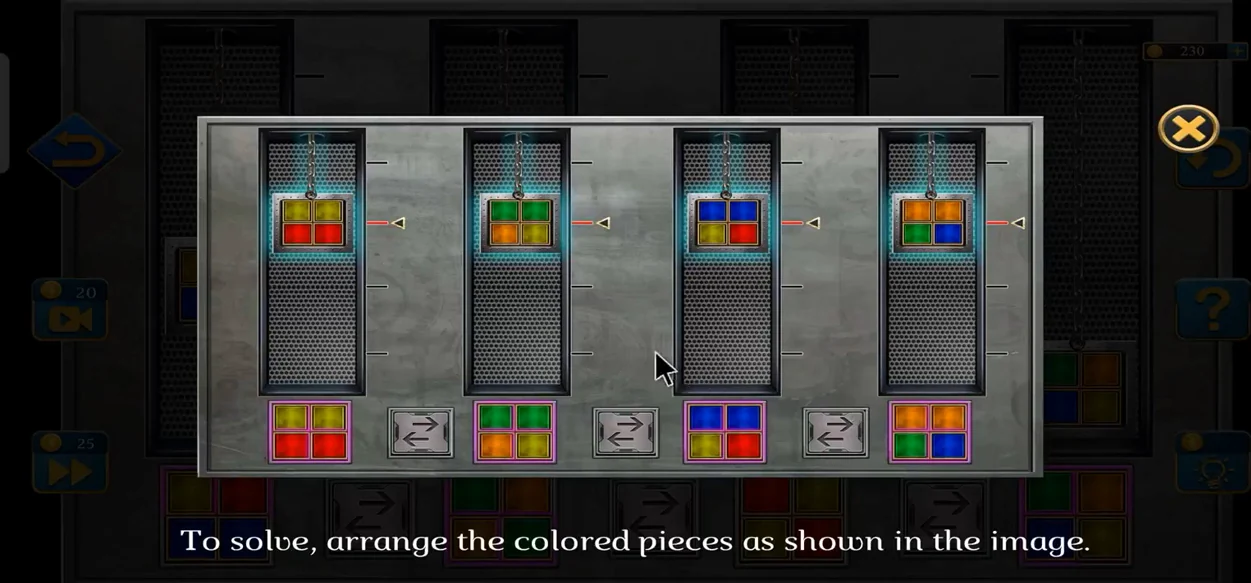
Balanced block layout for the four hanging cubes. - Take the Handle Hook from the blue engine on the left and pry open the dark green cabinet on the right wall. Take the Pin and the Plate, and turn the Plate over in your inventory to see a pattern of wire shapes on its back. Insert the Pin into the empty slot of the electrical box above to activate it. The box has four placement spaces and a column of wire pieces: place each wire shape into the space that matches its position on the back of the Plate. When all four are in place, the cage is lowered.
- Tap the lowered cage and unlock it with the Key. Allen is inside, wired to explosives, and the Black Spider appears on screen to taunt Kyle before the level ends.
Level 20: The Boat to the Ship
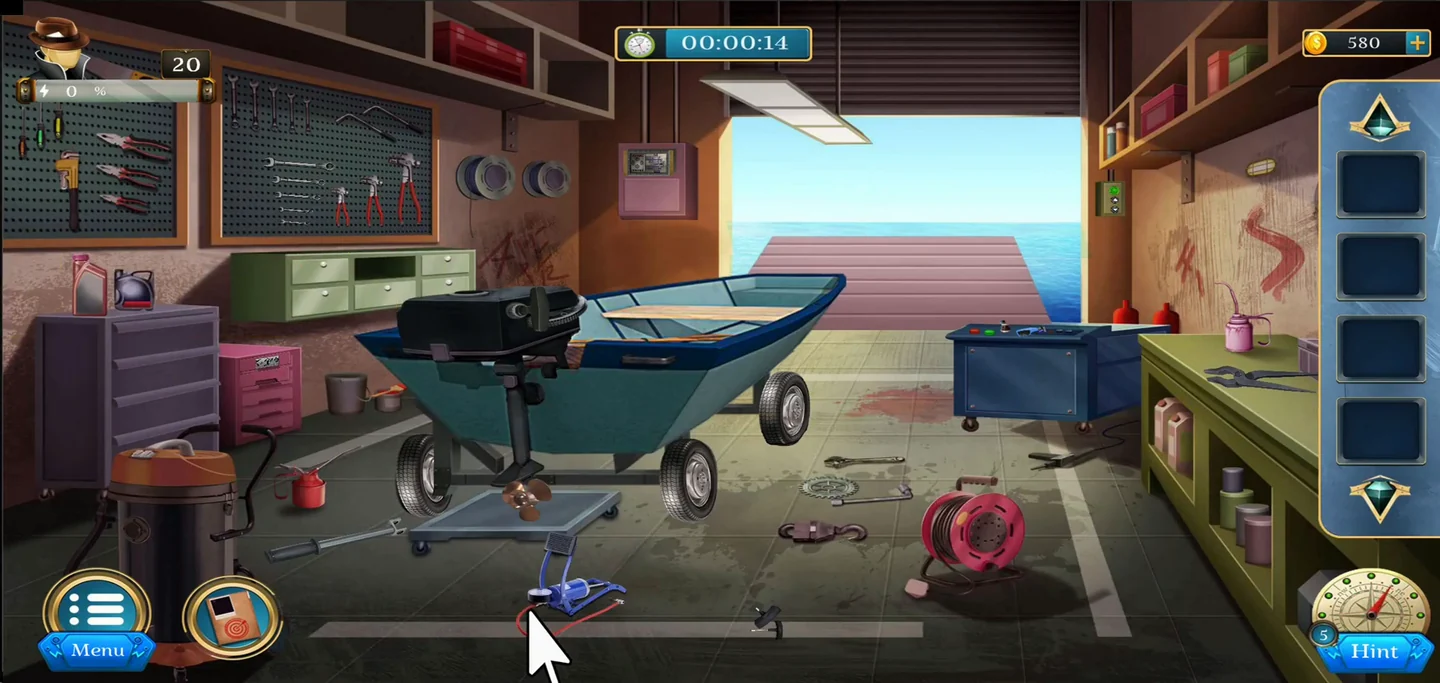
Allen is being held on a ship out at sea. Repair a boat trailer, launch the boat, board the ship and drain the flooded pump room to free him.
- In the boathouse, take the Puller from the floor right of the boat trailer, the Spanner from the tool pegboard on the left wall and the Spray from the blue console on the right.
- Open the pink drawers under the left workbench. Swap neighbouring strips until they form the dragon picture, then take the Support Block and the Repair Strip from the top drawer and the Filling Nozzle from the middle drawer.
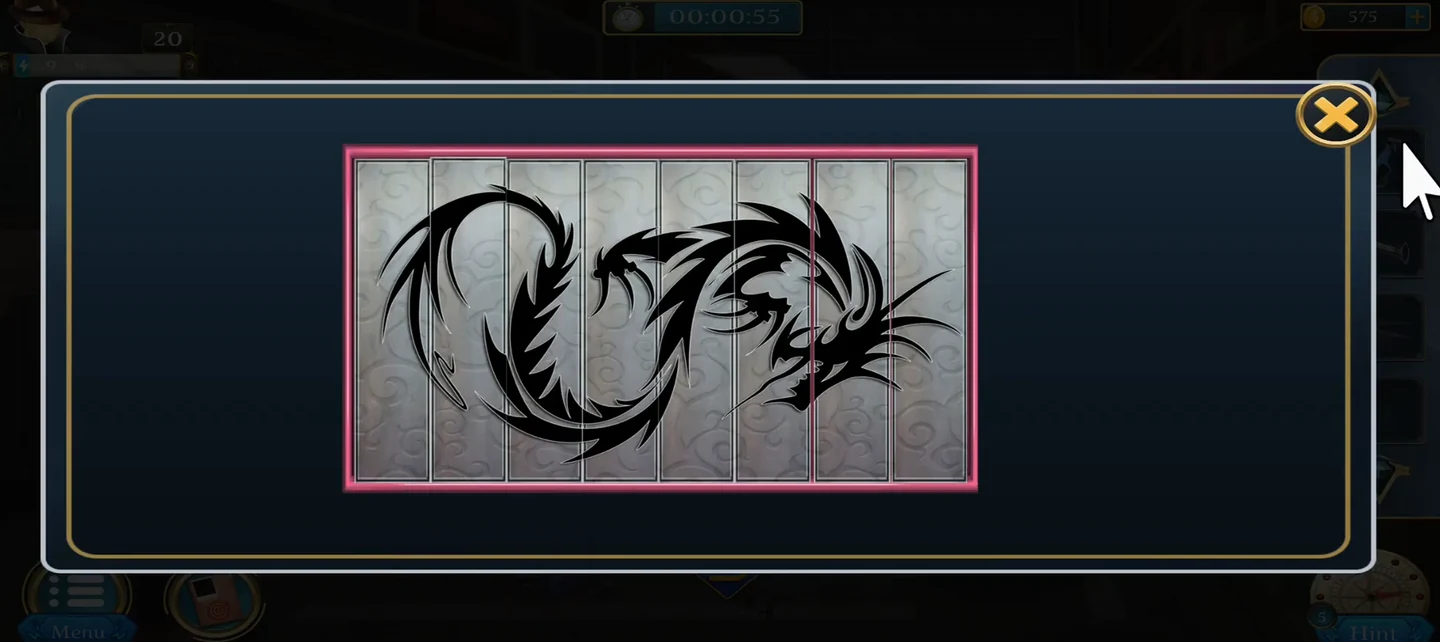
Completed dragon picture. - Prop up the trailer's right side with the Support Block and remove the flat Tyre with the Spanner. Place the Tyre at the blue foot pump and spray it to find the leak. Pull out the nail with the Puller, then use the reaming tool lying beside the tyre on the hole. Push in the Repair Strip and seal it with the second tool beside the tyre, the plugging tool. Finally, work the foot pump to inflate the tyre and take it.
- Refit the Tyre on the trailer and tighten its nuts with the Spanner.
- Open the control box left of the garage door. The arrows move both characters at the same time, each along its own track. Coins are only collected when both characters land on coins at the same moment; each such move lights one green and one red indicator. Light all five of each colour. From the starting position, this sequence works: right, up; down, right; up, right; up, up; down, left; down, right; right, up; down, down; up, right; up, right. The solution image shows example positions along the way. When the puzzle is solved, press the down button to lower the launch platform beyond the open garage door.
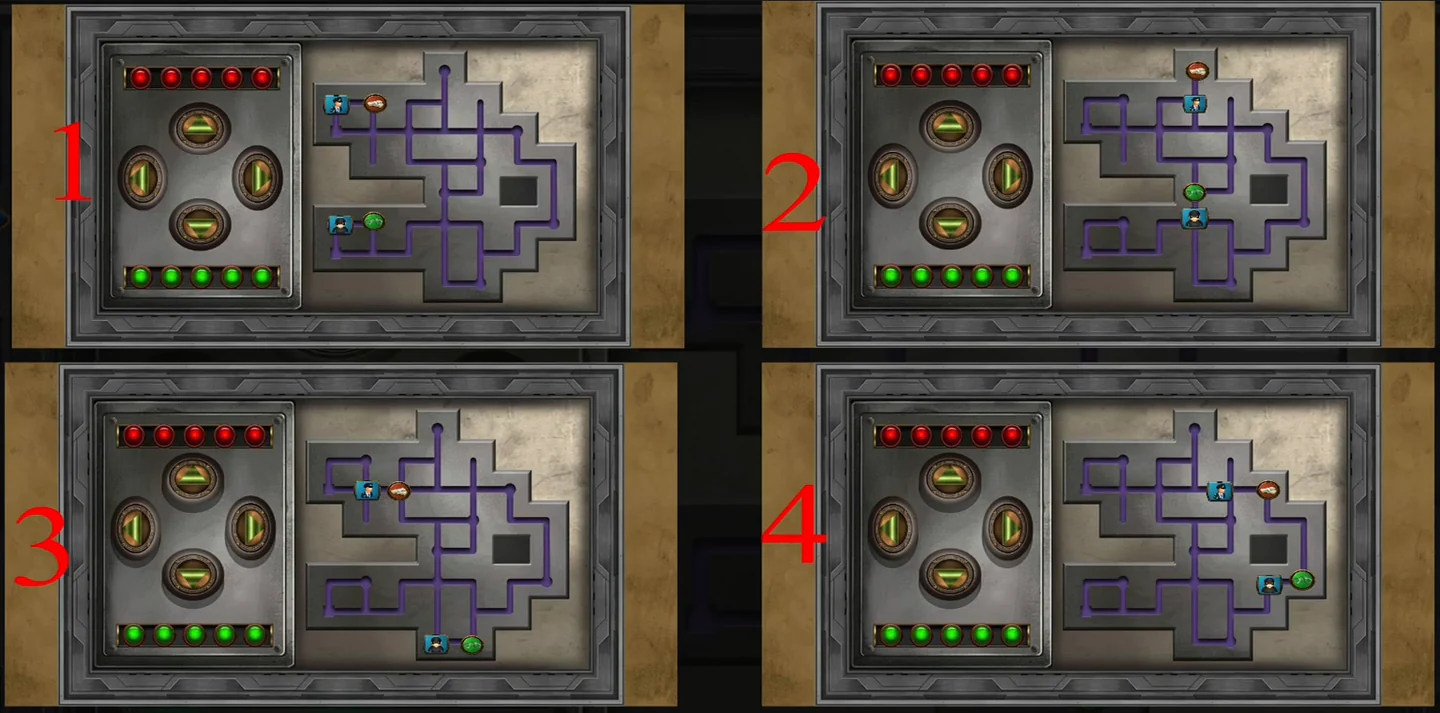
Coin maze: example positions at four stages. - Take the Lever from under the trailer and fit it onto the outboard motor's gear. Use the Spanner to remove the screw, then tap the screw so Kyle moves it into its socket. Attach the Filling Nozzle to the blue fuel pump and press the pump's green button to fill the motor. Finally, pull the starter handle on the motor. The boat launches, completing the first task.
- Steer the boat left and right to dodge the sharks and turtles until you reach the ship.
- On deck, take the Rod and the Chisel. Prise the nails out of the wooden chest on the left with the Chisel and Rod and take the Cutter. Cut the Chain off the mast, wrap it round the deck valve and turn it.
- Open the bronze vent box left of the cabin door. Place coloured pieces so the pieces around each numbered spot add up to its number, as shown in the solution image. The screen shows TOOLE JEW-A-5432. Enter 5432 on the keypad of the stairway door, press the green check mark at the lower right of the keypad, then tap the opened doorway to go down into the pump room.CODE5432
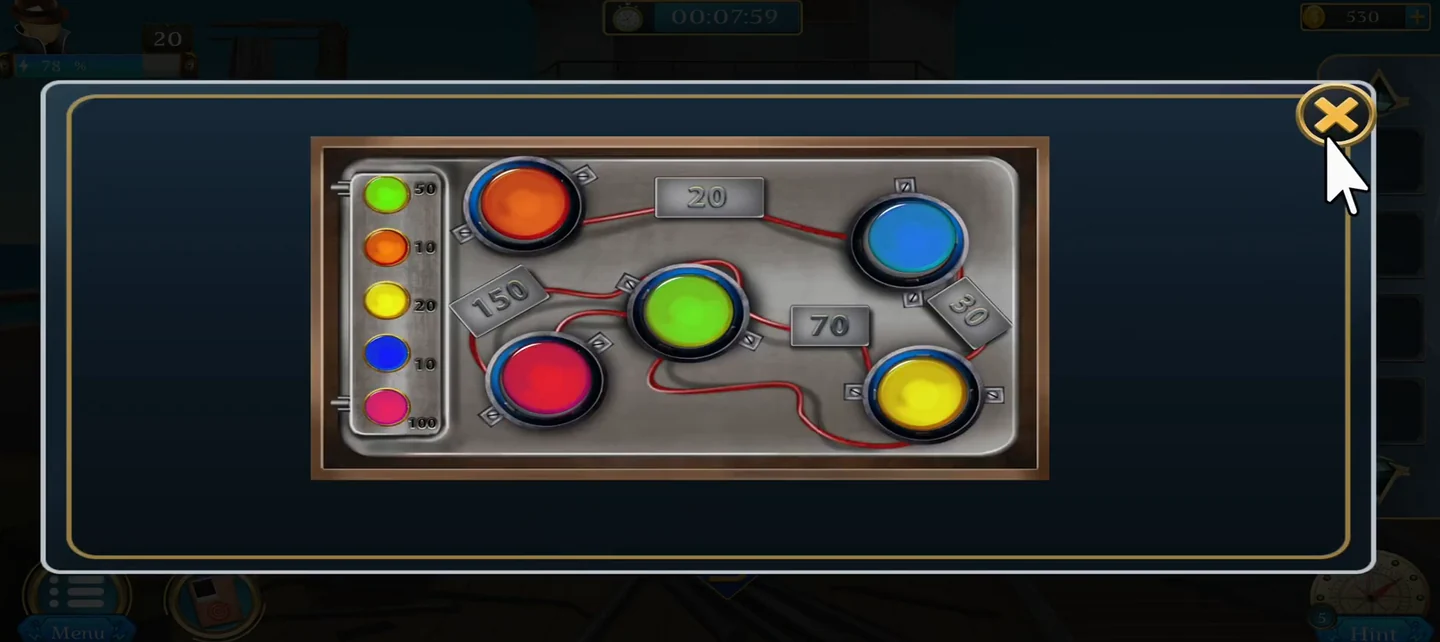
Finished layout of the bronze vent box. - In the flooded pump room, slide the latch of the left door and take a Pipe and the Wheel. Upstairs, fit the Wheel to the cabin door and open it. The board is a network of linked circles: move your green token along the links into the green-framed goal before the red pursuer (the police) catches you. The pursuer moves after each of your moves, so plan a path that stays out of its reach. There are four rounds. Moves that work: round 1, up two, then left one and down-left into the goal; round 2, down one and down-right, then up-right three times; round 3, up one and left one, then down-left; round 4, down two, left one, up-left twice, right one, up one and left one. Take the second Pipe.
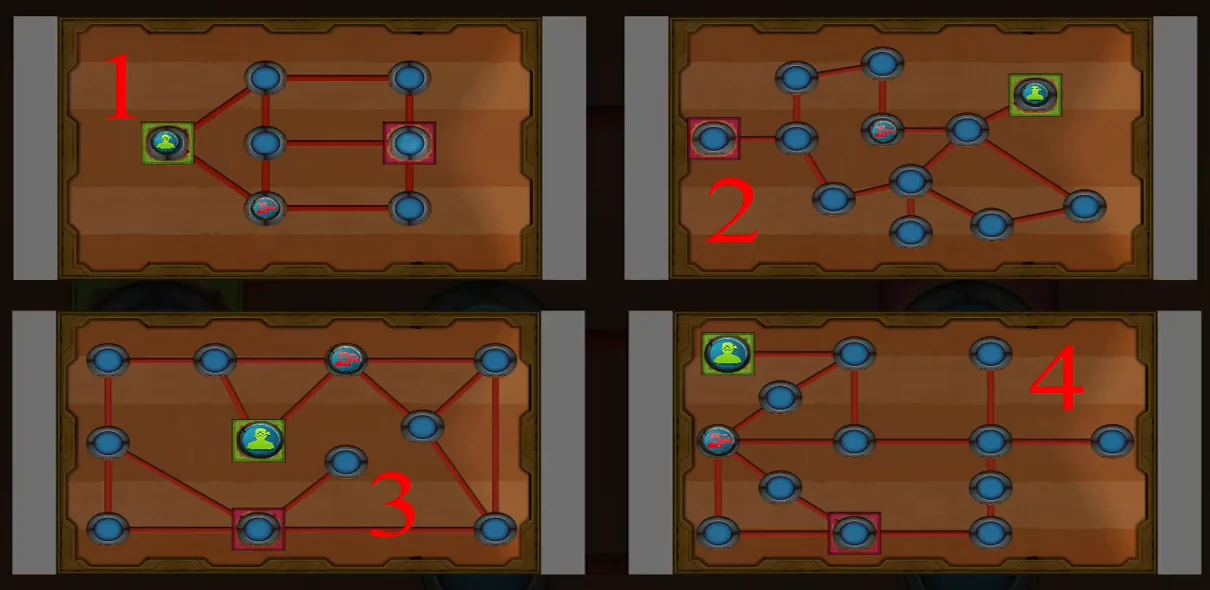
Chase board: where the green token finishes in each of the four rounds. - Connect a Pipe to each pump inlet. Tap each button on the generator panel to reveal 3548. On the panel behind the pumps, combine the segment pieces into the digits 3, 5, 4 and 8.CODE3548
- Press the large green button on the wall to drain the water; the pool empties and a chain with a hook is lowered. Tap the hook and attach it to Allen's cage in the pit, then open the cage. Allen is freed, and the level is complete.
Level 21: The Black Spider's House
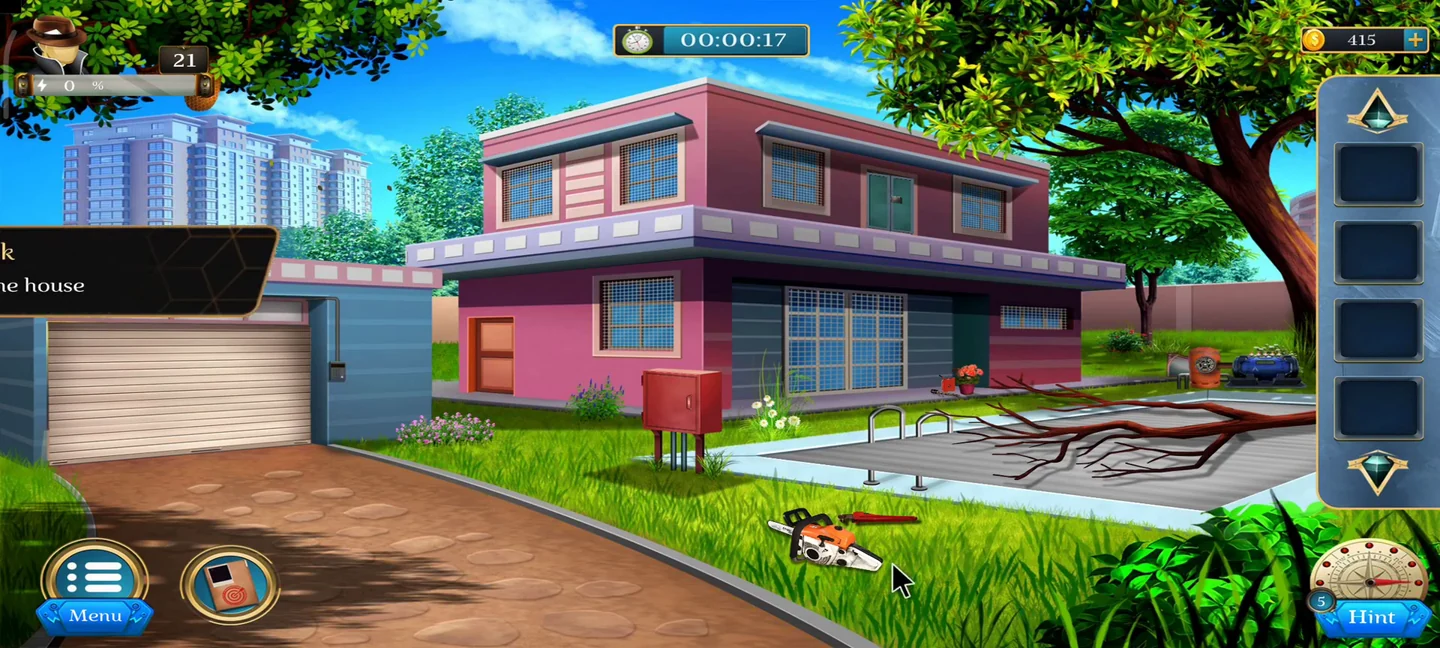
Kyle traces the Black Spider to a suburban house. Get inside, open the secret chamber, develop the hidden film and identify the next target.
- In the front yard, take the Chainsaw and the Spanner from the grass and the Fuel Can and Hammer from the patio ledge. Fill the Chainsaw with fuel and pull its cord to start it, then cut the fallen branch over the pool into pieces. Pull the lever in the red electrical box to roll back the pool cover.
- Unbolt the airlock of the pump behind the pool with the Spanner to see five gauges: 4, 7, 9, 3 and 6 volts. In the red electrical box, set the five displays to 4v, 7v, 9v, 3v and 6v using the dial and switches. With those values still showing, flip the separate blue toggle switch on the far right of the panel. The pool drains; take the Dog Tag from the bottom.CODE4-7-9-3-6
- The Dog Tag shows five hats. Set the garage keypad's five reels to the same order with the button under each reel: baseball cap, top hat (flat crown and straight wide brim), graduation cap, plain peaked cap seen from the side, and the front-facing peaked cap with a badge. The reels also include a rounded brimmed hat; do not use it in the second slot. The garage opens.
- Break the dried cement in the garage with the Hammer and take the Ladder and the Magnet. Place the Ladder below the upstairs balcony and climb up. Inspect the balcony door: its maze board asks for an object. Use the Magnet from your inventory on the board; only then do the arrow buttons appear. Use the arrows to guide the piece through the maze into the hole in the top-left corner, and the balcony door opens. The first task is complete.
- Inside, take the Knife from the dining table, the Pencil and Book from the purple beanbag, a Box from under the stairs, a Box from the umbrella stand and the Paper from the floor. Shade the Book's blank page with the Pencil to reveal a hexagon pattern.
- Open the green cabinet under the rear bookshelf. The board has four orange rotate buttons: top, centre, bottom-left and bottom-right. Each one turns the ring of tokens around it. Use them to move the coloured symbol tokens into the shaded pattern shown in the book, as in the solution image, then take the two Masks.
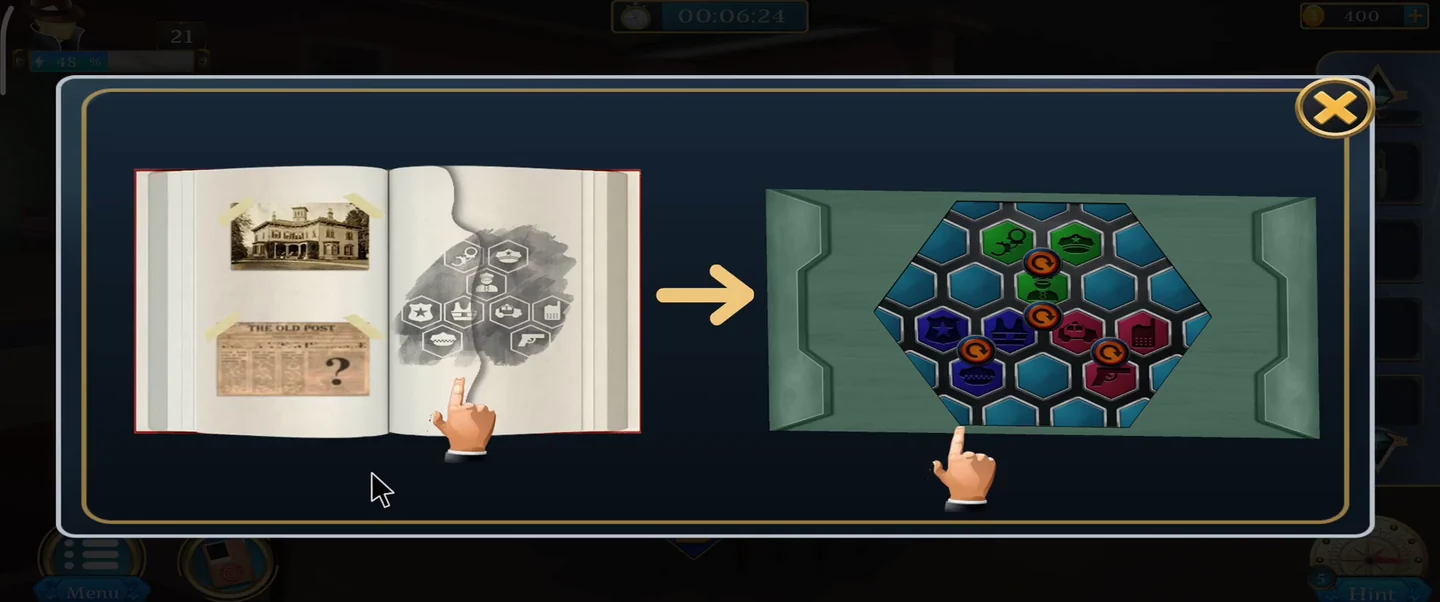
Finished hexagon dial layout. - Cut the tape on the cardboard box on the table with the Knife and take more Masks. The mask shelf on the rear wall has four rows of three spaces, and four of them are empty: put your four Masks into the gaps. Take the Camera from the umbrella stand; its battery is flat.
- Open the wooden cabinet under the right window. The Paper shows six symbols; move pieces into the centre, rotate them and send each to its track as shown, then take the Adapter. Open the Camera in your inventory and take out its batteries. Open the Adapter, insert the batteries and tap the loaded Adapter to take it back. Plug it into the outlet under the stairs, wait for it to charge, then tap the Adapter to take it back. Open the Adapter again, remove the charged batteries and tap them to collect them, then open the Camera and put them back in. View the Camera's photo: it shows the twelve masks in their correct positions on the shelf.
- With all twelve masks on the shelf, swap masks two at a time until the arrangement matches the Camera photo, four rows of three. A trapdoor opens to a secret basement, completing the second task.
- In the basement, take the Cover bag (it holds a Lighter), the Remote from the bench and the Grappler from the metal locker. In the laboratory to the left, use the Grappler to lift the Scroll case out of the snake's display.
- On the green cabinet under the right-hand bench, use the arrow buttons to form the centre shape in the order shown, as shown in the solution image. Take the Green Vial. Take the Tray from the shelves above the terrarium and the Burner from the back bench.
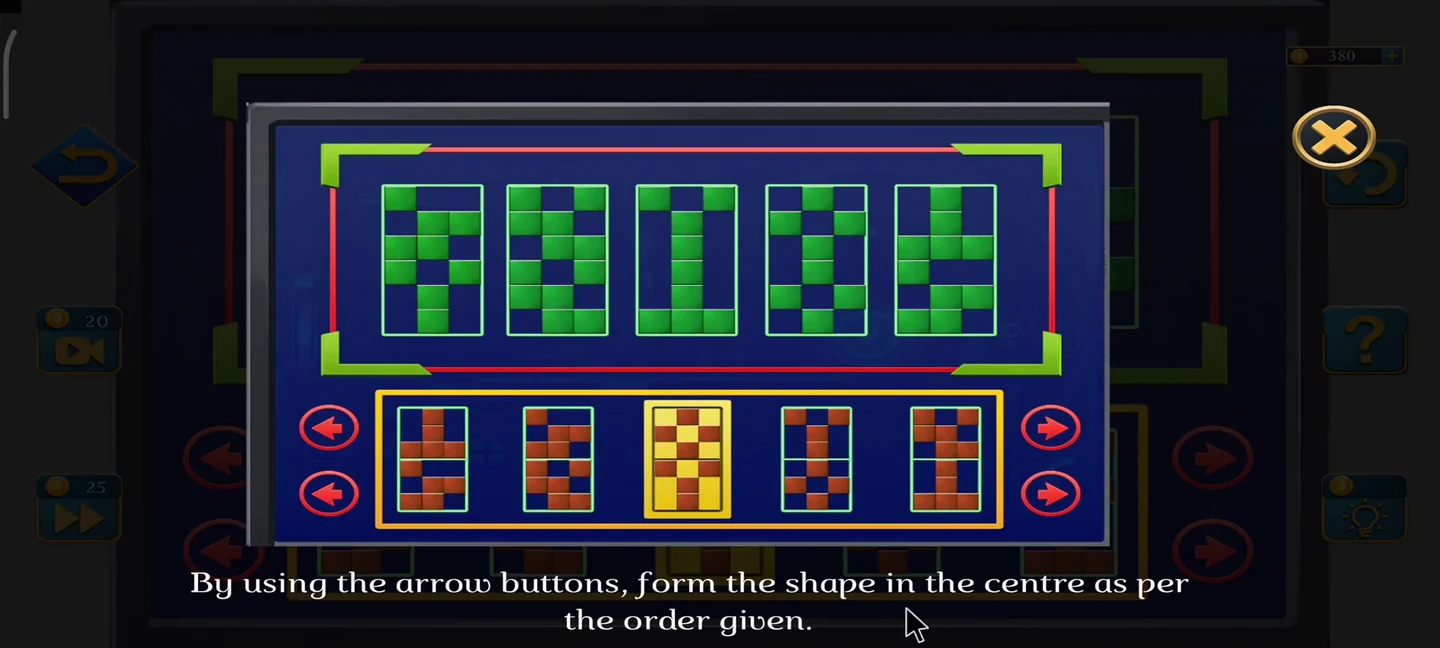
Green panel: form the shapes in this order. - In the basement, inspect the rolled-up projector panel on the wall and unfold it: 5G#6@ appears in coloured characters at the lower right. When the game says a device is needed to control the screen, use the Remote on it. On the Scroll case, the five columns have five coloured rows (red, cyan, pink, blue and green from top to bottom). Turn the columns so that, from left to right, 5 sits on the red row, G on the cyan row, # on the pink row, 6 on the blue row and @ on the green row, then take the Key. On the other end, tap the runes two at a time to match them in pairs; a wrong match resets the puzzle. Take the rolled Scroll.CODE5G#6@
- Unlock the drawer under the central lab bench with the Key and take the Film. Take the small Key from the basement key board, open the blue locker and take the Tongs and the Cloth.
- Set up the Burner on the basement table, clamp the Green Vial in the Tongs and light it with the Lighter to make the Violet Vial; tap it to take it. Select the Tray in your inventory and pour in the Violet Vial. Open the lab safe and swap and rotate the icons into place, as shown in the solution image, then take the Red Vial. Open the Tray again and add the Red Vial.
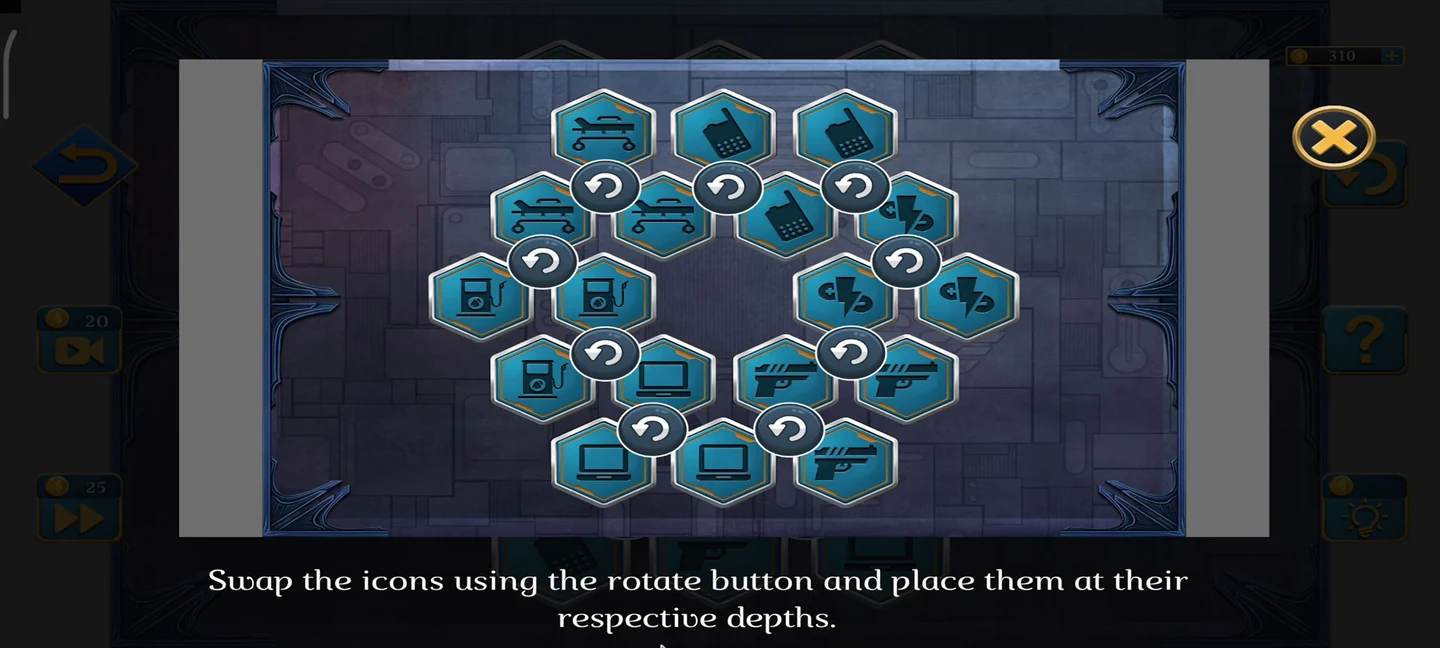
Finished icon layout for the lab safe. - Open the filing cabinet in the classroom by drawing the green zigzag from the terrarium glass on its grid, then take the Blue Vial. Add it to the Tray, develop the Film in it and wipe it with the Cloth. Then tap the cleaned Film to take it back into your inventory; the third task is complete.
- On the classroom projector, insert the developed Film, then use the Remote to show the slides. They reveal the Black Spider's next target, and he calls Kyle to taunt him. The level is complete.
Level 22: Erasing the Evidence
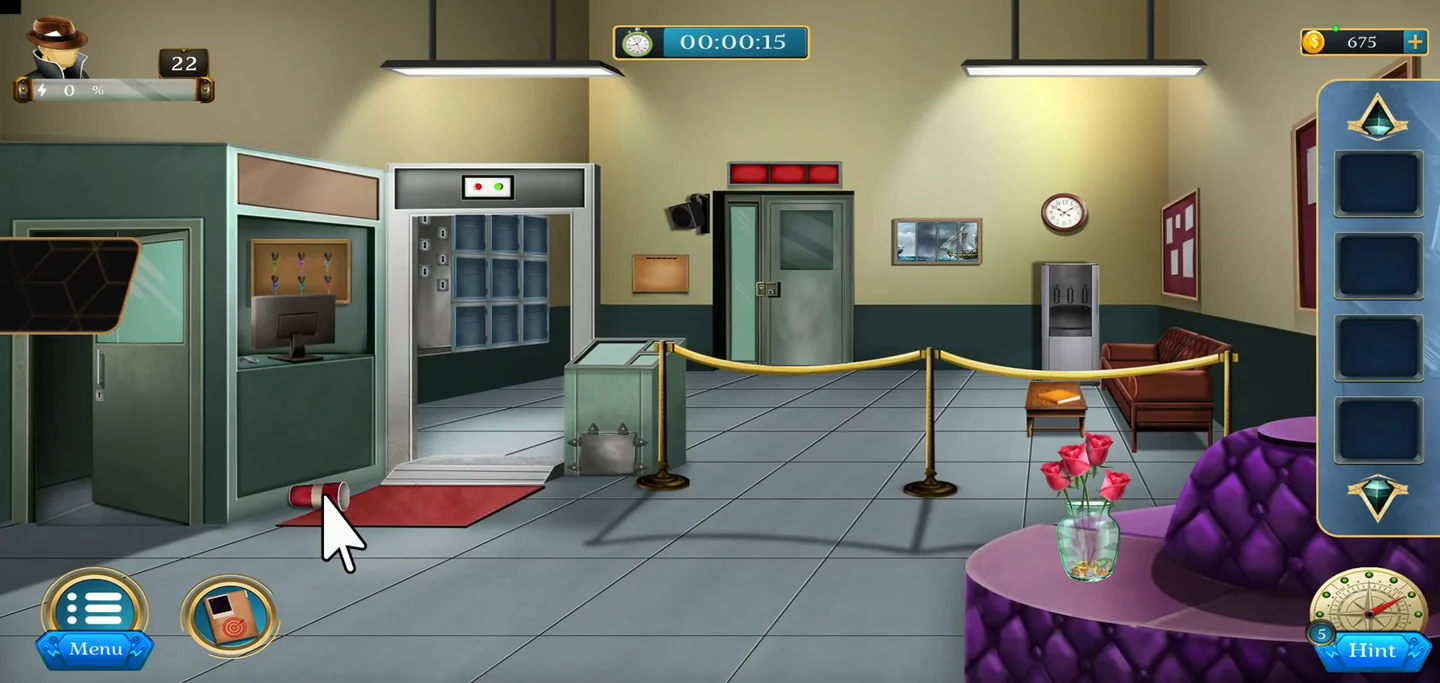
To save Maize, the Black Spider forces Kyle to break into the police station, delete files from the server and plant a bomb in the evidence room.
- In the station lobby, take the Cup from the red mat by the security booth and all six coloured Keys from the key board on the booth wall. Open the metal locker under the counter by the metal detector and take the Chip.
- At the hallway lockers beyond the metal detector, put all six Keys into the key panel on the left. Select one key and then another to swap their positions, and keep swapping until the arrangement matches the solution image: left column from the top light blue, grey, red; right column from the top purple, green, dark blue. The locker holding the Card opens. Take the Card and fit the Chip into it.
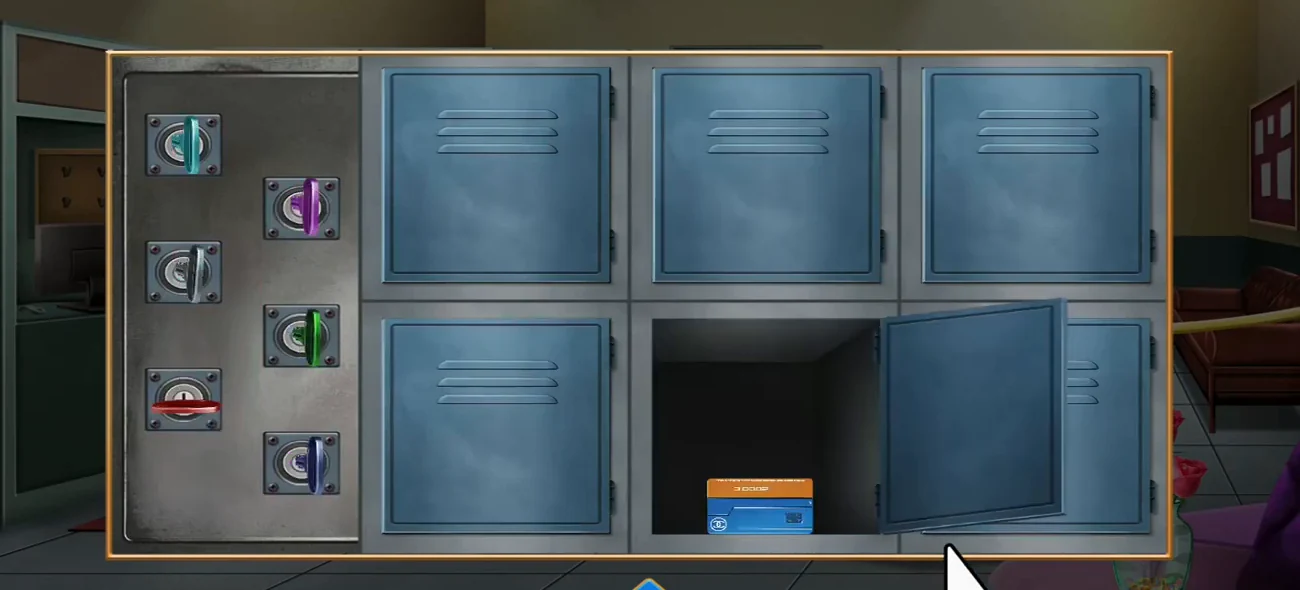
Key arrangement that opens the locker. - Examine the ship painting right of the security door: it is cut into four vertical panels. Select one panel and then another to swap them, and keep swapping until the ship picture is complete. The painting opens to reveal the Clue Paper; take it. Place the Cup in the water dispenser and press its symbol buttons in the order on the Clue Paper, then take the Water Cup.
- Pour the water into the empty vase of roses to reveal floating numbers. Reading them from top to bottom gives 63185. Swipe the Card at the security door reader and set the code wheels to 6 3 1 8 5. The door opens, completing the first task.CODE63185
- In the server hallway, take the Note from the floor and the Eraser from behind the potted plant. Turn the Note over in your inventory and rub it with the Eraser to reveal a grid of nine coloured dots. Take the Device from the cabinet of the left server console and the Bag from under the bench. Examine the wooden box on the left wall of the hallway to start the brass ring puzzle. It has three successive targets: for each target symbol, rotate the three rings so the three marked parts combine into it, using the solution image. The box opens; note the four glyphs inside, because you need them for the black Box in the evidence room.
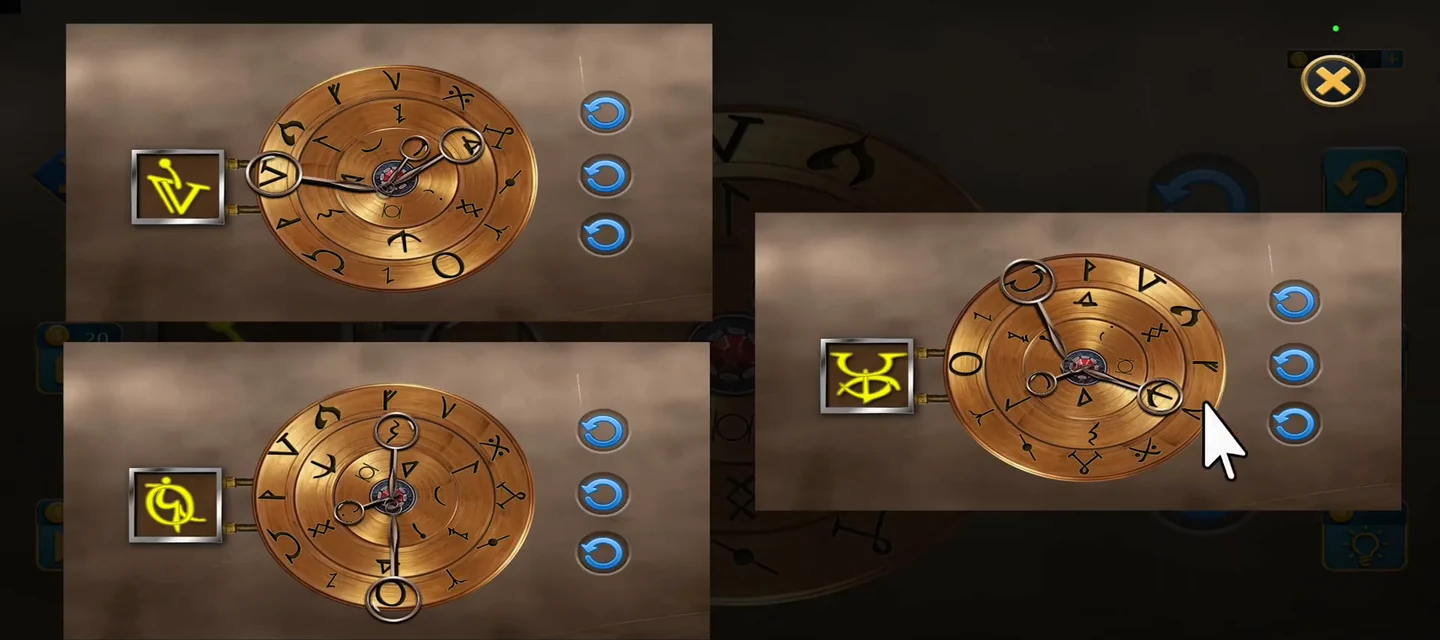
Ring settings for the three targets, in order. - In the maintenance room, take the blue Solution from the floor, a Button from the boot, and the Spanner and Screwdriver from the blue drums. Take the small metal Box from the shelf of the left workbench and open it in your inventory. Fit the Button into its circular slot to open it and take the Light Stick. Select the Light Stick in your inventory and tap it to bend it; it starts to glow green. Tap the glowing Light Stick to take it back into your inventory. Unscrew the wall cabinet with the Screwdriver and take the Knife. Note the four glyphs on the inside of its door.
- Take the Wheel from the red toolbox on the upper shelf. Back in the hallway, lift the mat outside an office door to find a Wallet; open it to take the green glyph Button.
- On the panel beside the boiler, shift the rows and columns of coloured squares until they match the nine-dot grid on the erased Note, as shown in the solution image. Remove the cover's four bolts with the Spanner and take the Mechanism, a pair of metal canisters.
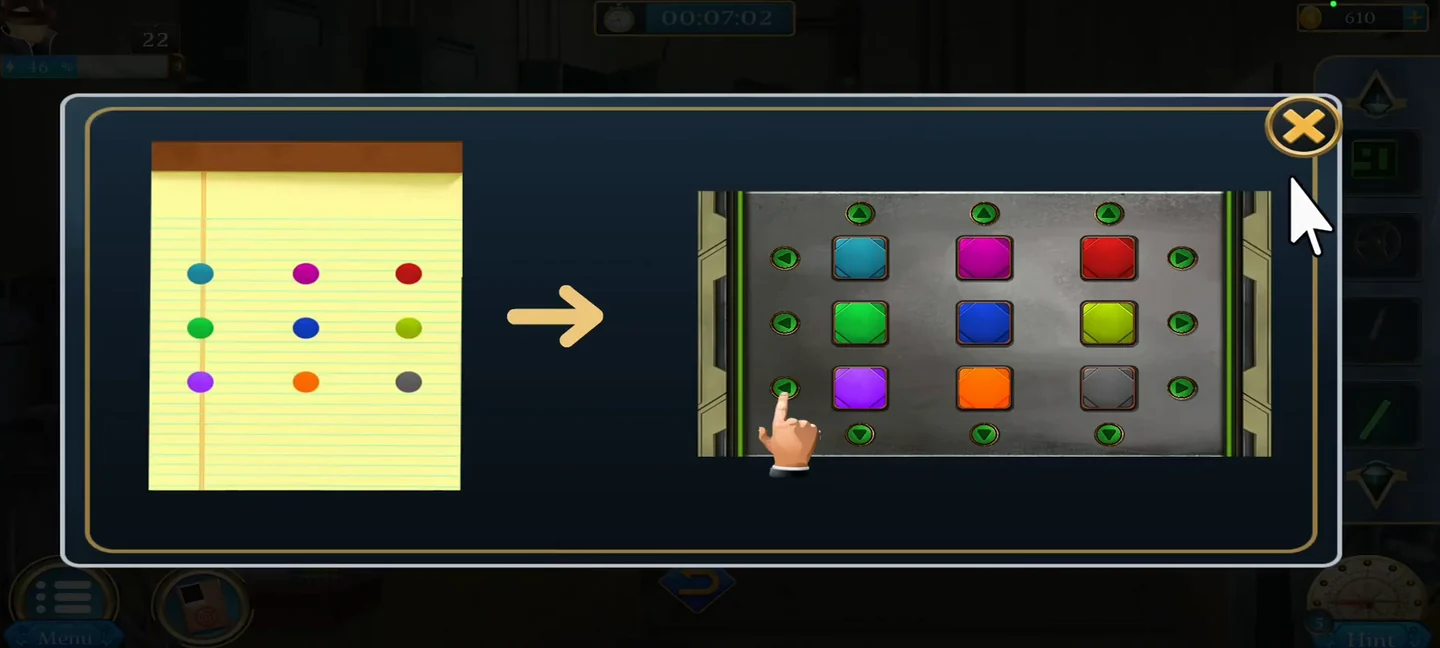
Colour square layout from the note. - Shine the Light Stick on the safety poster in the hallway to reveal a 3 x 4 pattern of icons. Open the Bag in your inventory: its lock is a 3 x 4 icon panel. Swap tiles until the panel matches the poster pattern, then take the Wire from the opened Bag. In the maintenance room, take the second Wire from the cart.
- At the server room door, fit the Card (with its Chip) into the authorization slot beside the lock. Open the Device in your inventory and attach the Wire from the Bag to it, then tap the wired Device to take it back; keep the cart Wire for later. Attach the Device to the lock, then tap the lock assembly to open the symbol panel. Tap the button that matches each symbol shown in the red window until the doors open.
- In the evidence room, take the Package, the Weight from the wooden case and the File from the archive shelves. Pick up the black Box from the floor beside the stacked boxes on the left of the evidence room and open it from your inventory. It uses both sets of four glyphs: the set from inside the hallway ring box and the set from inside the maintenance knife cabinet's door. Select a row and use the left or right arrow to shift it, until the matching glyphs line up in the two red-framed target columns. Take the USB Cable. Fit the Wheel to the wall safe above the right shelving, open it and take the green Solution. Cut open the Package with the Knife to get the second Mechanism, and insert it into the empty slot of the metal panel beside the wall monitor.
- Tap the camera view on the metal panel to start a search. The left and right arrows are above the view and the up and down arrows are on its left. Use both sets to align each object with its outline; when it turns purple, tap it to find it. There are three scenes to search, as shown in the solution image; the skip button costs 25 coins. Next, insert the green glyph Button into the empty slot of the floor safe in front of the evidence desk. Then select the Device in your inventory, attach the USB Cable to it and tap the updated Device to take it back. Plug it into the wall computer and delete the Black Spider folder. The screen shows the codes A5@0, 41&M, 1$5D, RS4@ and P%56, completing the second task.
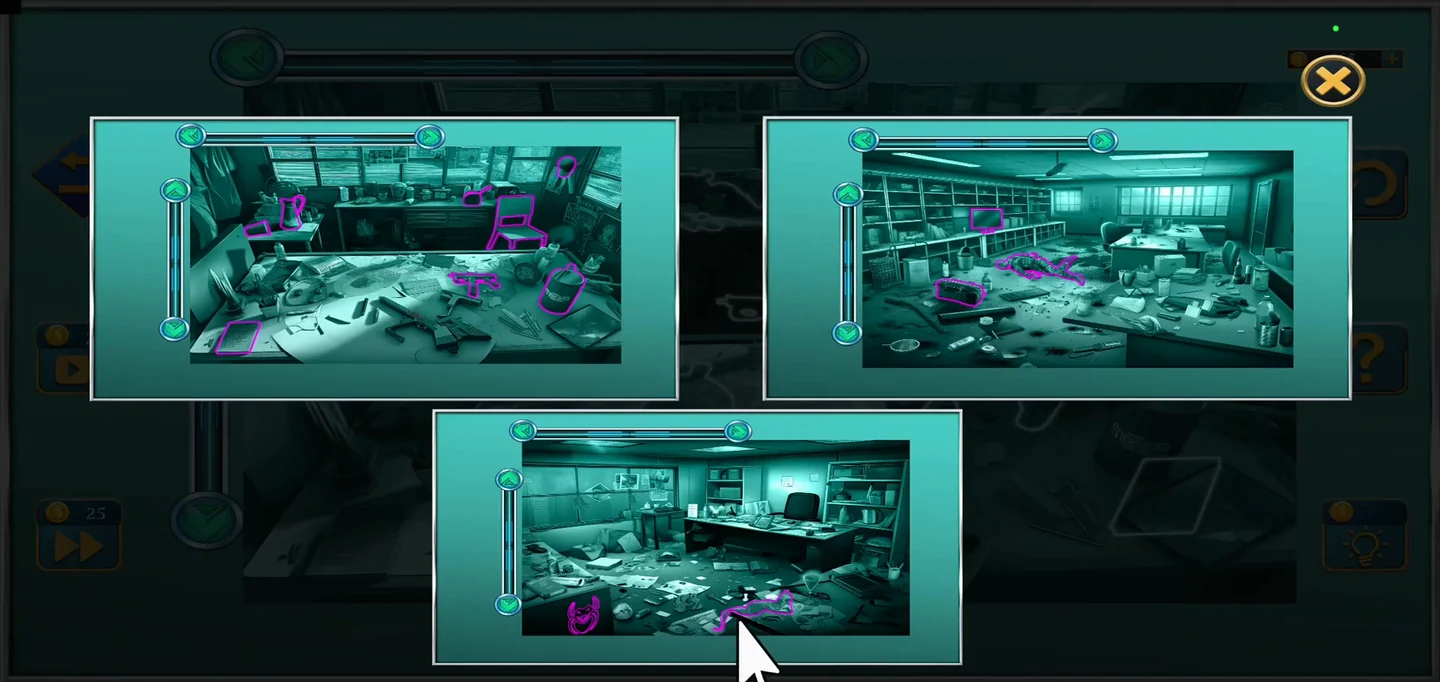
Camera search: the three scenes and their highlighted objects. - At the floor safe, use the File to convert the five codes into five glyphs. Swap the tiles into the right order and rotate each one with the button above it until the safe shows those glyphs. Take the amber Solution.
- Select the Mechanism from the boiler in your inventory and pour the green, amber and blue Solutions into its two canisters. Following the dot path shown on the left wall cabinet, read the numbers on the Weight to get 518904; enter it on that cabinet's keypad and take the Reading Machine. Select the Mechanism again, place the Reading Machine on it, then add the cart Wire to finish the Bomb. Tap the Bomb to take it into your inventory. Kyle then plants it in the floor safe, and the level is complete.CODE518904
Level 23: The Black Spider's Mother's House
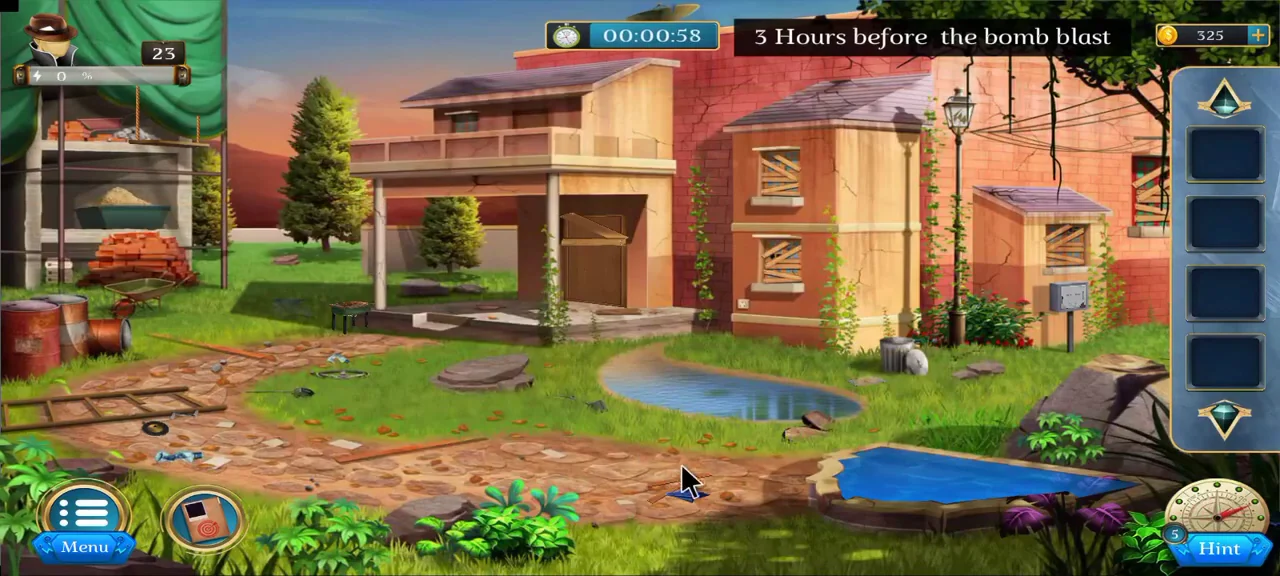
This level is a flashback to the hours before the bomb blast. Kyle searches the Black Spider's mother's house for something that will shake him emotionally and help save Maize.
- In the yard, take the Cloth and a Wood Plank from the path by the pond. The pond is full, so use the Wood Plank on its cracked wall to drain it, then take the Boomerang from the empty basin. Take the Sharpener and Handle from the sandy path on the left and the Machine from the grass by the porch. Select the Machine in your inventory, fit the Handle and the Sharpener, place the Boomerang on it and turn the Handle to sharpen it. Tap the sharpened Boomerang to take it.
- Tap the rope holding the green canopy on the left. Throw the Boomerang when the moving target lines up with the rope. The canopy rolls up; take the Cutter Machine and the Tool Kit from the workbench, then select the Cutter Machine in your inventory, tap its Blade to detach it and tap the Blade to take it.
- Take the Board from the grass by the shed. Select it in your inventory: it is too dirty to read, so clean it with the Cloth, then turn it over to see a second group of four symbols on the back. The front symbols are the clue for the Tool Kit, and the back symbols are the clue for the junction box in the next step. Open the Tool Kit and use the buttons around the dial to slide the symbols into place, as shown in the solution image. Take the saw teeth and fit all three to the Blade, then tap the repaired Blade to take it. Select the Cutter Machine, attach the Blade and tap the repaired Cutter Machine to take it.
Tool kit dial: copy the front of the Board. - Open the junction box on the right wall of the house. The left and right arrows at the bottom slide the carriage along the row, and the up arrow on the carriage picks up or swaps the module at its position. Use them to arrange the modules to match the symbols on the back of the Board, as shown in the solution image. Take the Wire and the Battery.
Junction box: copy the back of the Board. - Place the Cutter Machine on the boarded front door, add the Battery and connect them with the Wire, then tap the Cutter Machine to start it. The saw cuts the boards and the door opens, completing the first task.
- Inside, take the Saw Blade (a hacksaw) from the right desk drawer and the Match Box and Candle from the left table. Move the shirt and book off the floor trunk and light the Candle with a match, then tap the lit Candle to take it.
- In the study, drive the bugs off the wooden chest with the lit Candle and take the Puzzle Piece numbered 3. Open the upper wall cabinet and insert the Puzzle Piece into its empty slot to start the puzzle. Drag digits from the row at the bottom into the entry spaces and press the green button to check them: green means a correct digit in the right place, yellow a correct digit in the wrong place and grey a wrong digit. The code is 754321. Take the Wheel.CODE754321
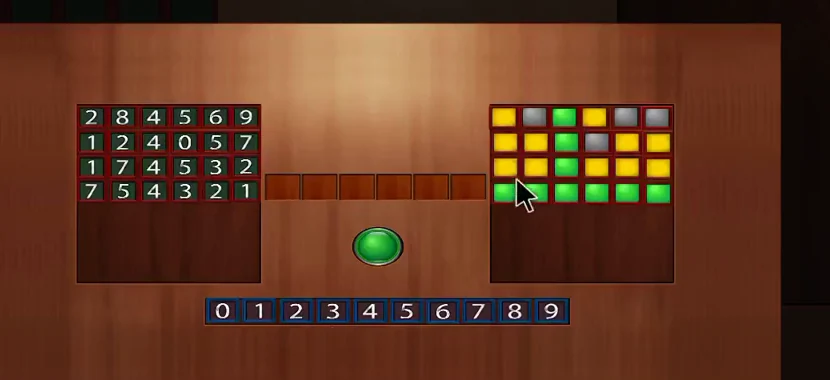
The all-green bottom row, 754321, opens the cabinet. - Take the Bird Cage from the left desk and cut its bars with the Saw Blade. Take the Wooden Box from inside and examine it: tap its lock repeatedly until the progress bar below it fills and the box opens. Take the Key. Take the Knuckle Buster from the grey case on the floor.
- Take the Photo Frame and slide its pieces to make room for the large piece, as shown in the solution image. Take the Canvas, unfold it and place it on the torn easel painting to complete the coloured clue.
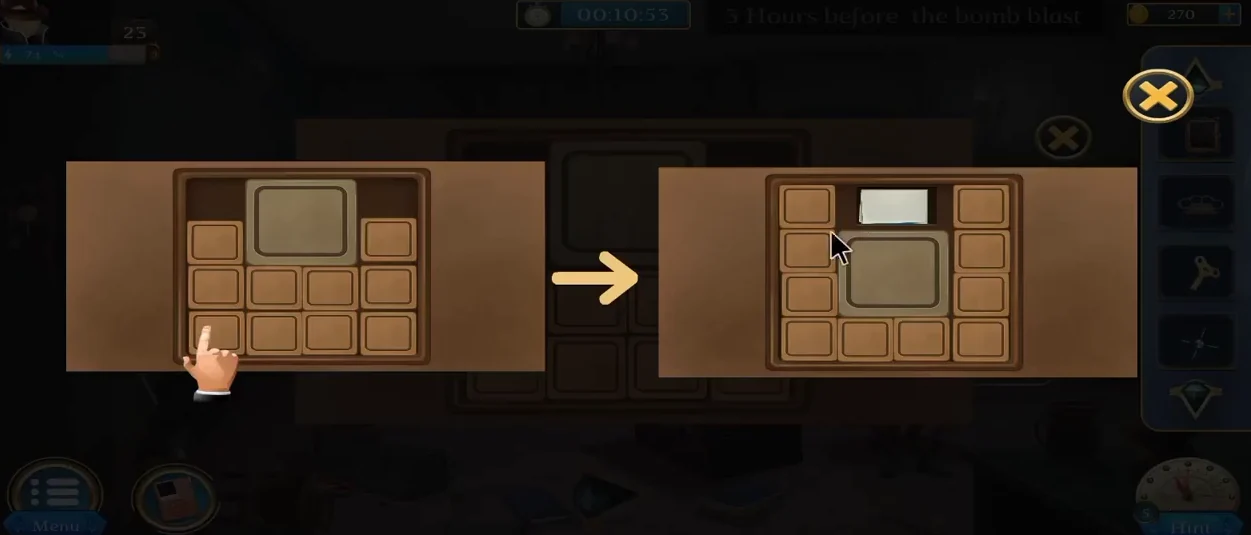
Photo frame: slide the pieces to free the large piece. - Take the metal Box from the floor on the left and set its coloured symbols to match the Canvas, as shown in the solution image. Take the Screwdriver and unscrew the grandfather clock's case, then insert the Key.
Metal box colour settings from the Canvas. - Break the cracked picture on the living-room wall to reveal a safe and take the Glass Piece. Slash the poster with the Glass Piece and punch through the wooden wall with the Knuckle Buster, then take the Pendant.
- Take the pink Button from the gramophone and the Brush from its table. Scrub the Pendant with the Brush to reveal green 7, red 2, yellow 3 and blue 4. On the grandfather clock, use the matching coloured corner buttons to set those values, then take the green Puzzle Piece.CODE7-2-3-4
- Insert the Puzzle Piece into the living-room sideboard. Four green coins must end up in the matching symbol sockets of the central 2 x 2 block. Each numbered button around the edge pushes the coins in its row or column inward by the number of spaces shown, and one press can move more than one coin together. For example, the right-hand 2 on the fourth row pushes both bottom coins two columns to the left at once. Use these moves to steer all four coins into the centre, as shown in the solution image. Take the Photo to complete the second task.
Target: all four green coins in the central sockets. - Insert the pink Button into the wall safe and fit the Wheel from the study cabinet into its slot. Take the Globe and the Antique from the desk; they show coloured symbols and numbers that give 1524. Enter 1524 on the safe, press Start and take the Camera. A cutscene reveals the Black Spider's past, and the level is complete.CODE1524
Level 24: The Underground Mine
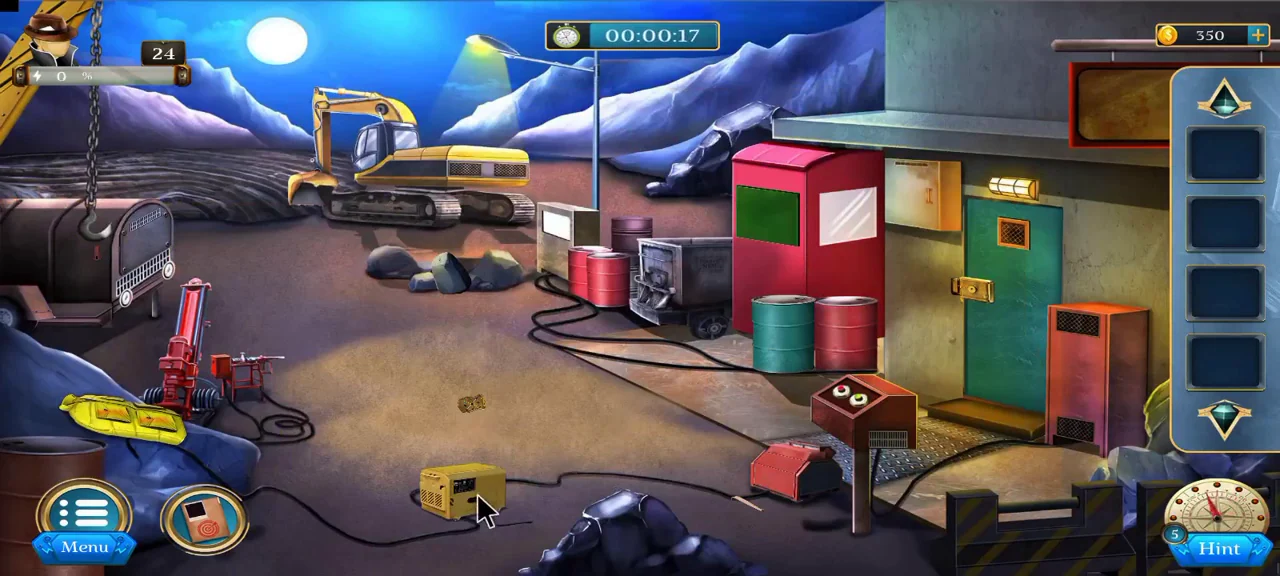
Maize is held somewhere underground beneath an excavation site. Break into the tunnels, collect a welding mask and cut open the steel seal.
- At the excavation site, take the Machine from the ground in front. Open the top pocket of the yellow vest on the blue rock to get the Pouch. Open the red bin for the Metal Wire and take the Steel Piece beside it.
- Pry open the green and red barrels by the office door with the Steel Piece, tip the green one over and take the Metal Roller. Open the hatch on the red fuel pump to see eight symbols in two rows.
- Open the Pouch and use its rotate buttons to arrange the tiles like the pump note, then take the Allen Key.
- Remove the four bolts on the winch with the Allen Key. Insert the Metal Roller, attach the Metal Wire and pull the red handle to drag the rock pile aside. Take the Box from under the rocks and the Shield from the middle of the yard.
- Spin the Shield's pointer to reveal five coloured symbols in order. On the Box, press play and then stop as the needle reaches each symbol in that order. Take the Driller and attach it to the yellow Machine, then tap the finished Wall Breaker to take it.
- Use the Wall Breaker on the wall beside the green door to break into the underground, completing the first task.
- In the tunnel, take the maroon Box near the floor hatch and the Welding Nozzle from the ore cart. Move the toy on the wheelbarrow and take a Sign Board Piece and the Lighter. Open the yellow toolbox for the Washer and the Screw.
- In the machine room, take the second Sign Board Piece. On the control console, a few butterfly tiles are already fixed on the grid. The spare tiles sit in the column on the left, the two columns on the right and the tray of three at the bottom. Place every spare tile on the grid so that each row contains only one colour and each column contains only one butterfly design; the fixed tiles show which colour belongs to each row and which design to each column. Not every square is used: some stay empty when the grid is finished, as the solution image shows. When all are placed, the console opens: pull the lever inside to make the overhead grabber drop a Cylinder, then pick it up from below.
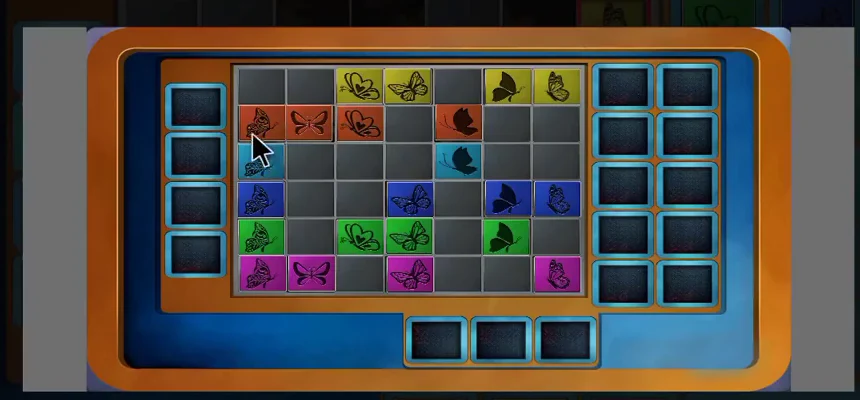
Finished grid: one colour per row, one design per column; some squares stay empty. - Join the Sign Board Pieces into a STOP sign with mirrored letters. Using it and the four silhouettes on the tunnel plaque, open the hexagonal safe by swapping the icons into place, as shown in the solution image. Take the Lever and the silver Box.
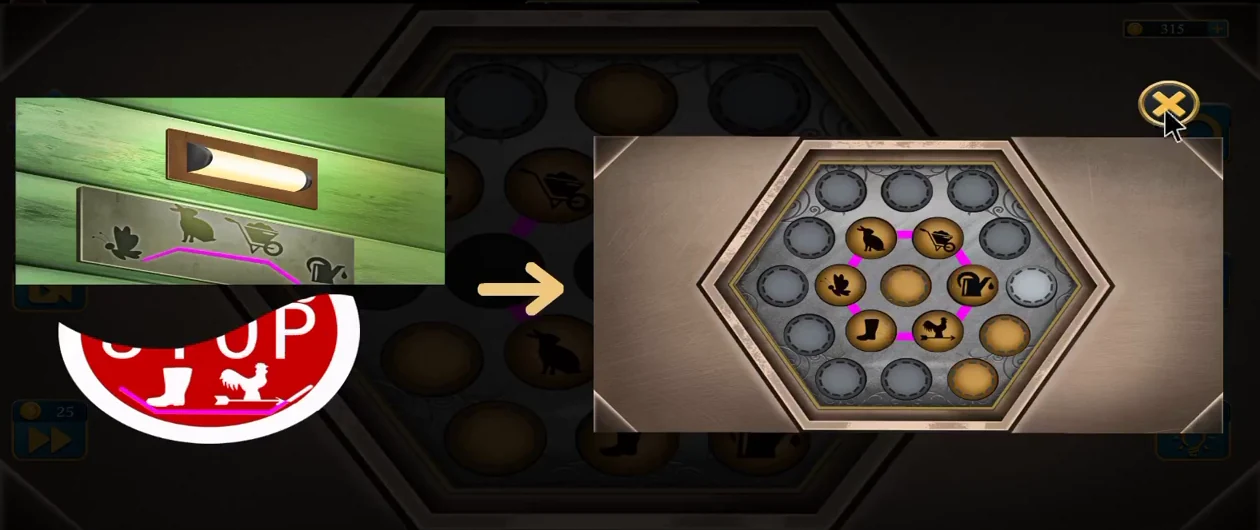
Hexagonal safe: final icon positions. - Open the silver Box and rotate and swap the ring sections to match the icons, as shown in the solution image. Take the welding Mask to complete the second task.
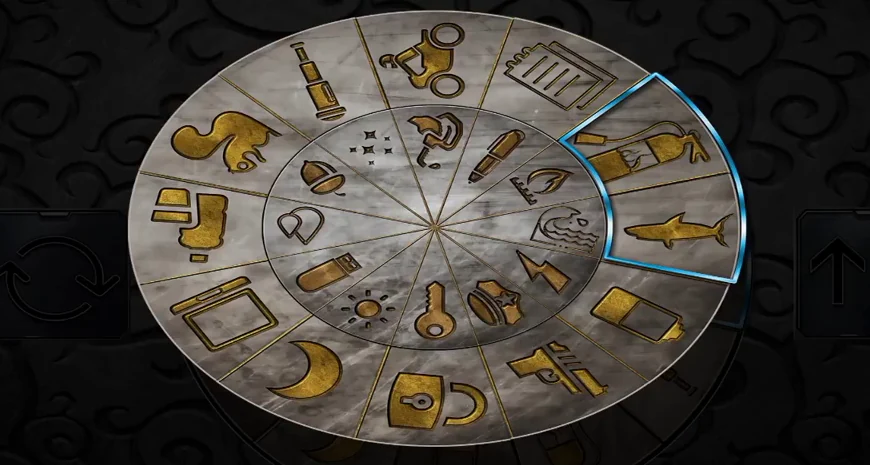
Match each outer icon with the inner icon shown beside it. - Open the maroon Box for the Glass Cover. In the machine room, tap the floodlight, remove its metal guard and fit the Glass Cover. Its button cycles five silhouettes, each with a glyph: bird, lighthouse, boat, fan and jug. The green chart on the wall of the same machine room is the key that turns each glyph into a number; read it before returning to the tunnel. Translated, the pieces belong in slots bird 1, jug 2, boat 3, fan 4 and lighthouse 8. Place the pieces in those numbered slots of the tunnel's electrical cabinet, as shown in the solution image. Take the Cutting Blade and the Driller.
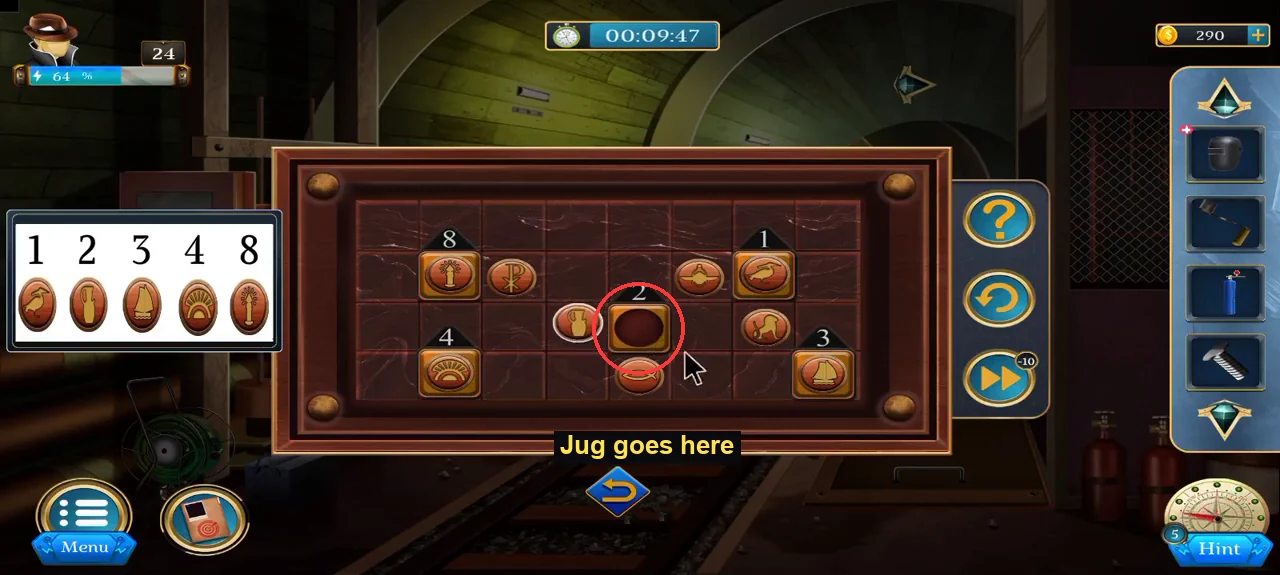
Cabinet pieces in place; the jug fills slot 2 last. - Unscrew the floor hatch beside the tracks with the Driller, then take the Driller back from the hatch close-up. Select it in your inventory, tap to remove the drill bit, fit the Cutting Blade and tap the finished Cutting Machine to take it. Cut the chain on the mine cart and take the Box.
- Compare the Box's line patterns with the wall chart in the machine room to get 90457. Enter it and take the second Cylinder.CODE90457
- Take the green hose cart Roller from beside the pipes at the lower left of the tunnel. Select it in your inventory, add the Washer, Screw and Lever, and tap the finished Roller to take it. Place it beside the open floor hatch and tap it to reel in the third Cylinder, then tap the Cylinder hanging beside the Roller to take it.
- Join the three Cylinders in your inventory and tap them to open the pressure gauges. The Mask shows the pressures: set the red gauge to 30, the green to 40 and the blue to 10. Then attach the Welding Nozzle and tap the assembled Welding Equipment to take it. Return to the machine room, place the equipment at the round steel seal and use the Lighter on it to cut the seal open. The level is complete.CODE30-40-10
Level 25: The Final Showdown
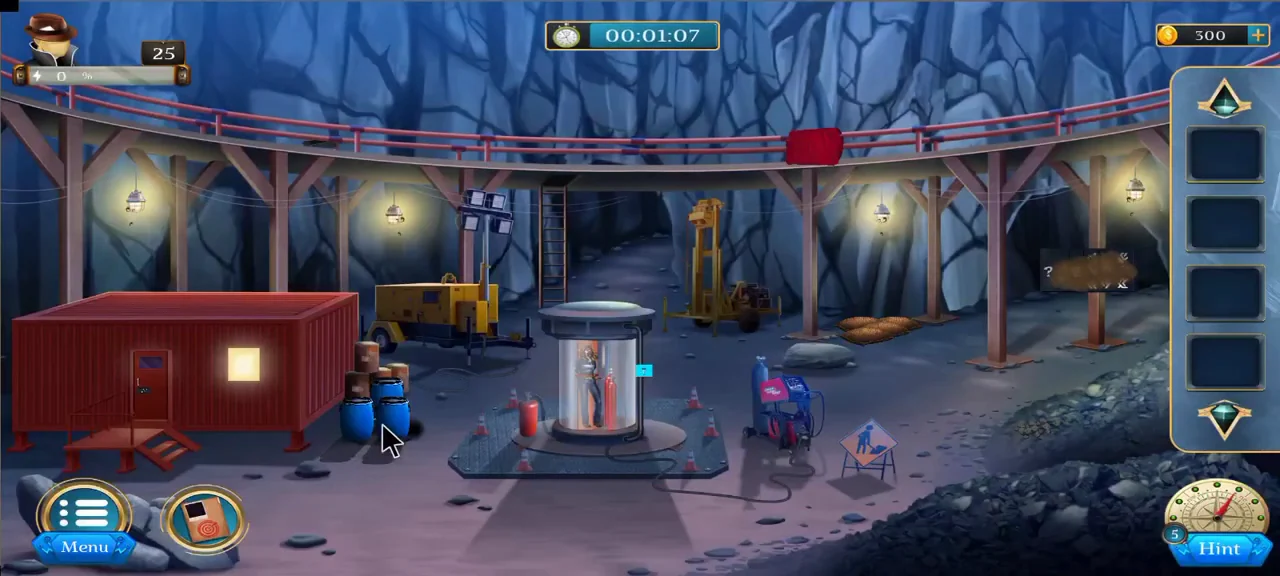
Maize is trapped in a glass chamber filling with poison gas deep underground. Free her, overpower the Black Spider, build a ladder, find the key and give Maize the antidote.
- In the cavern, take the Air Blower from the blue barrels, the Hook from the grey rocks and the Box from the red railing of the overhead walkway. The chamber console shows a 3 x 3 icon clue.
- Open the puzzle panel on the red container. In the console's clue, each icon has an arrow beside it; two icons form a pair when their arrows point the same way on the same background. Tap a gold token connected to the empty node to slide it there, and keep moving tokens until each green icon on the panel has its paired token beside it, as shown in the solution image. Take the Chemical and the Laser Tool from the opened compartment.
Red container: final token positions. - Tear open the middle sandbag on the right with the Hook and take the Mud Ball. Pour the Chemical on it to dissolve it and take the Solving Piece.
- Blow the dust off the signboard on the right wall with the Air Blower, and pull the red cloth off the panel on the overhead walkway. Each shows three columns of symbols. Fit the Solving Piece into the Box and swap its six strips so the walkway columns come first and the signboard columns follow. Take the Battery.
- Select the Laser Tool in your inventory and put the Battery in it, then tap the assembled Laser to take it into your inventory and close the view. Open the chamber close-up again and tap the blue control panel beside it to bring up its icon display. Use the Laser on that display to remove the panel; this opens the chamber. It was a trap: Maize has inhaled the poisonous gas and needs an antidote, completing the first task. Kyle confronts the Black Spider, who throws the antidote down into the pit out of reach before Kyle overpowers him.
- Take the Safety Hat from the debris in the foreground and examine it: a card inside shows a rotation arrow under each of the four dials of the purple safe. On the safe, the two rotate buttons at the lower right turn the selected dial right (clockwise) or left (anticlockwise), and the arrow button at the lower left moves to the next dial. Dial 1: rotate right once, then press the arrow. Dial 2: rotate right once and left once, then press the arrow. Dial 3: rotate left once, then press the arrow. Dial 4: rotate left twice. The safe opens. Take the Wheel and fit it into the green box in the shaft room to lower the platform.
Dial card (left): turn each dial as its arrow shows. - Take the Bag from the platform and untie it to get the Strapped Stick. Take the Fuse and the Clue Plate from the pink machine. At the hammock, tap the rope holding the blue Can to untie it, then take the Can. Open the Can in your inventory, cut it open with the Strapped Stick and take the Ropes.
- In the rail tunnel, put the Fuse in the electrical box's switch to light three coloured pairs. Combine them with the Clue Plate's three pairs and set the colours on the six sliders of the central console, as shown in the solution image.
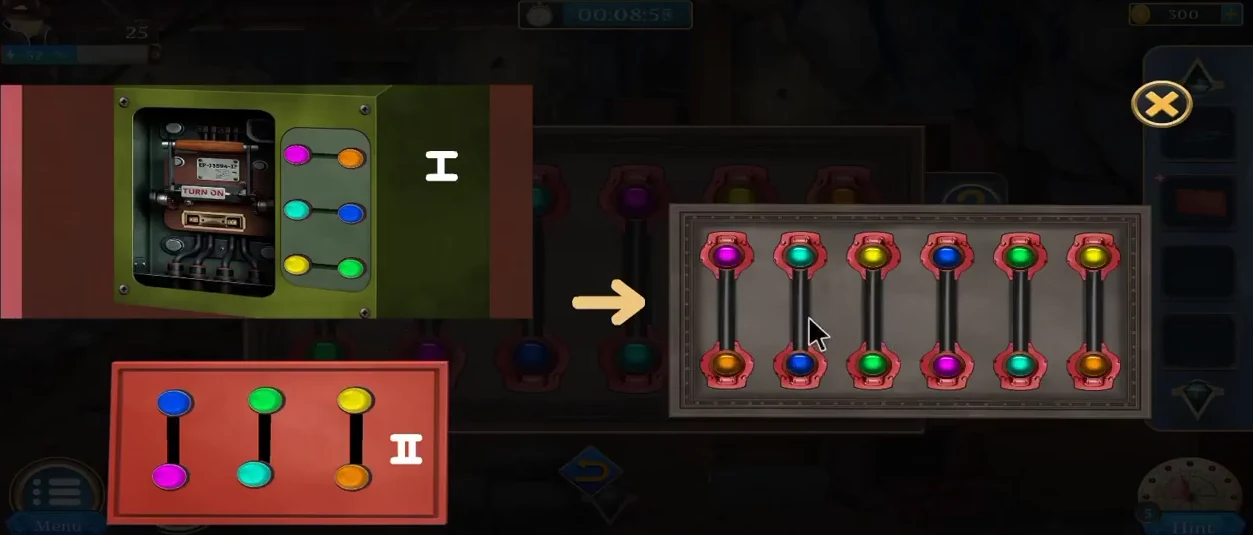
Central console: slider colours. - Take the Salt Paper from under the cable, the Rod from the crossed bars, the blue-grey Box from under the dynamite crate and the Chisel by the track. Smash the wooden crate with the Chisel and take the Lever.
- Insert the Lever into the far-left electrical box and flip it. Slide the red knobs on the mixing desk to reveal orange rings, then light the eight buttons red and green as shown in the solution image. Take the Puzzle Piece.
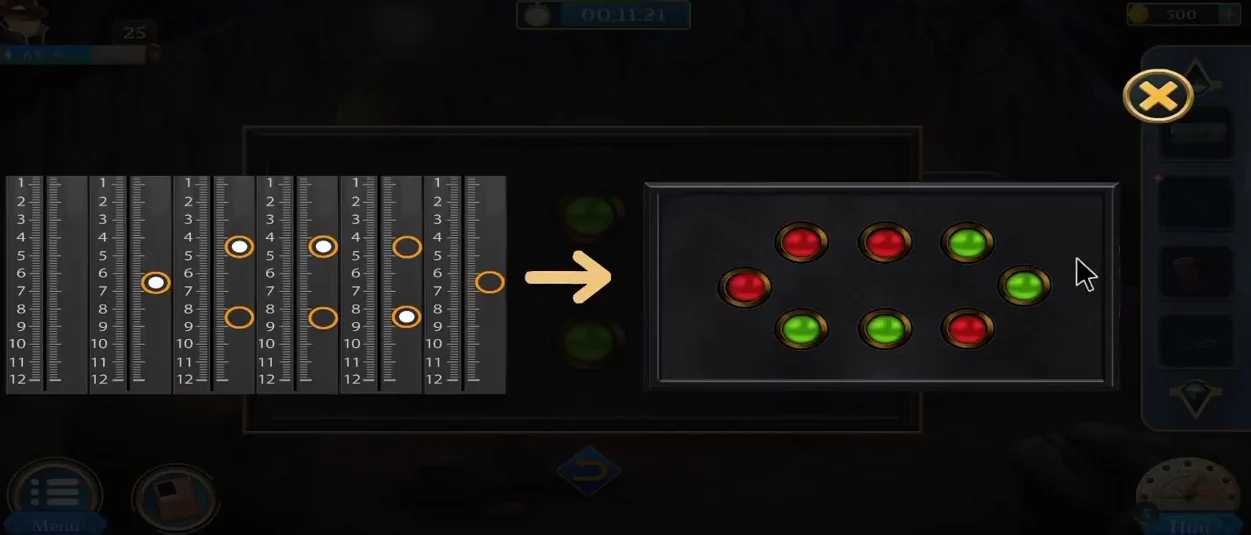
Button colours for the mixing desk. - Insert the Puzzle Piece into the terminal in the shaft room. The maze has coloured goal squares and ladders of matching colours, and the exit is at the top. Steer your officer token with the arrows, dodging the balls that roll up and down. Reaching each coloured goal lowers the ladder of that colour: blue, then yellow, orange and light blue. Then reach the white lever to lower the white ladder and leave through the exit at the top. On the panel that opens, pull the lever to lower the two platforms, then take the Gun Part and the second Solving Piece from them.
- Take the burgundy Box from the floor by the desk. In the rail tunnel, take the Shovel Head and Shovel Stick from the rock pile, join them and tap the Shovel to take it. Go back to the cavern with the large round tunnel openings and use the Shovel on the metal plate in the top opening, above the hammock, to reveal a letter grid. Use each symbol pair on the Box to find a letter, giving EOFS. Enter it and take the Steel Steps.CODEEOFS
- Take the Seismometer from the cabinet left of the table and examine it in your inventory: its chart shows a grid with symbols in certain positions. Then select the blue-grey Box you took from under the dynamite crate in your inventory to open its puzzle, and use the rotate buttons to arrange the symbol groups to match the chart, then take the second Gun Part.
- Rub the Salt Paper over the round seal on the back wall to reveal eight emblems arranged in a ring. On the console by the rail tracks, swap the emblem tokens until all eight sit in the same positions as on the seal, and take the red Button.
- Insert the red Button into the gauge console in the shaft room. Press play to see the target values, then set each clock gauge with its coloured button, as shown in the solution image. Take the Key; the second task is complete.
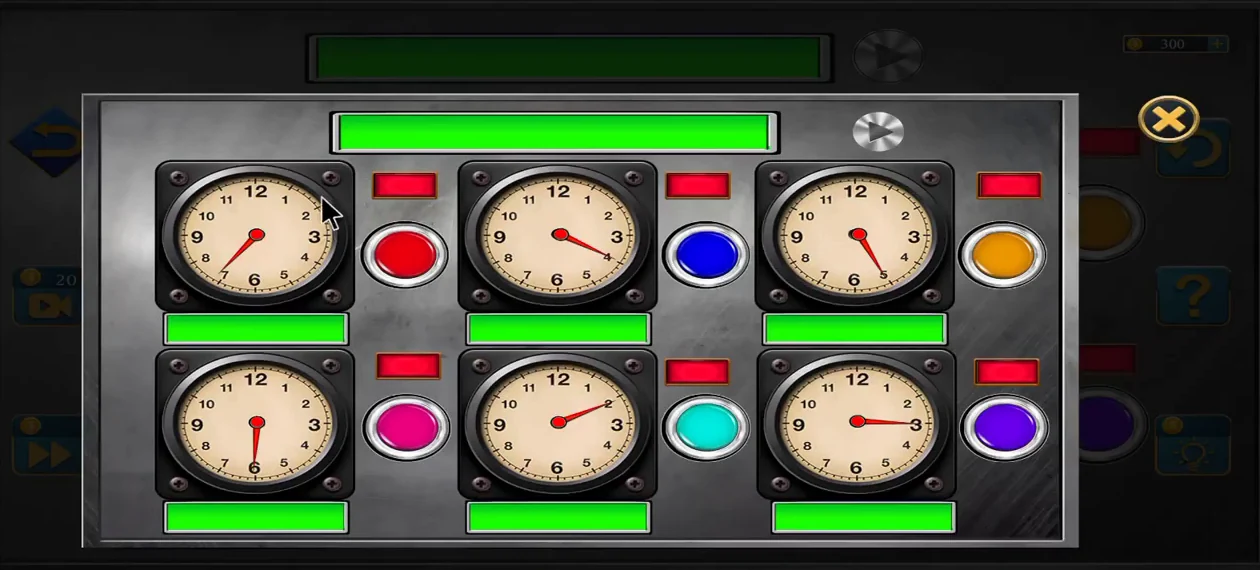
Target settings for the six clock gauges. - Open the red wall locker in the rail tunnel with the Key and take the third Gun Part. Open the Rod in your inventory, add the Steel Steps and then the Ropes to build the Ladder; the third task is complete. Take the Ladder and place it under the high pipe, then climb up and take the chained Box.
- Put the second Solving Piece into the chained Box's lock and take the fourth Gun Part. Assemble the Gun from all four parts, then tap the assembled Gun to take it back into your inventory. Return to the shaft room and fire the Gun's grappling hook at the distant crate, open it and take the Antidote. Maize is cured and the Black Spider is jailed, completing the game.