Getting started: the torn bunny
After the opening scene you stand in the hallway in front of a locked double door decorated with four symbol panels. Use the arrows at the screen edges to turn and move, and tap objects to interact.
- Tap Play and watch the introduction, or skip it. When you gain control, you are facing the locked double door.
- Turn right. A child sits between two doors. Open the right-hand door to enter the living room with the orange sofa.
- Talk to the child holding a bowl, who thanks you for the food. Then talk to the crying child on the orange sofa: someone tore up and hid the stuffed bunny you gave them. They hand you the first part, the bunny's arm (piece of bunny).
- Open the door at the back of the living room to enter the workshop. The damaged toy rabbit lies on the table and a box with a picture on its lid sits on the lower shelf.
Workshop picture box
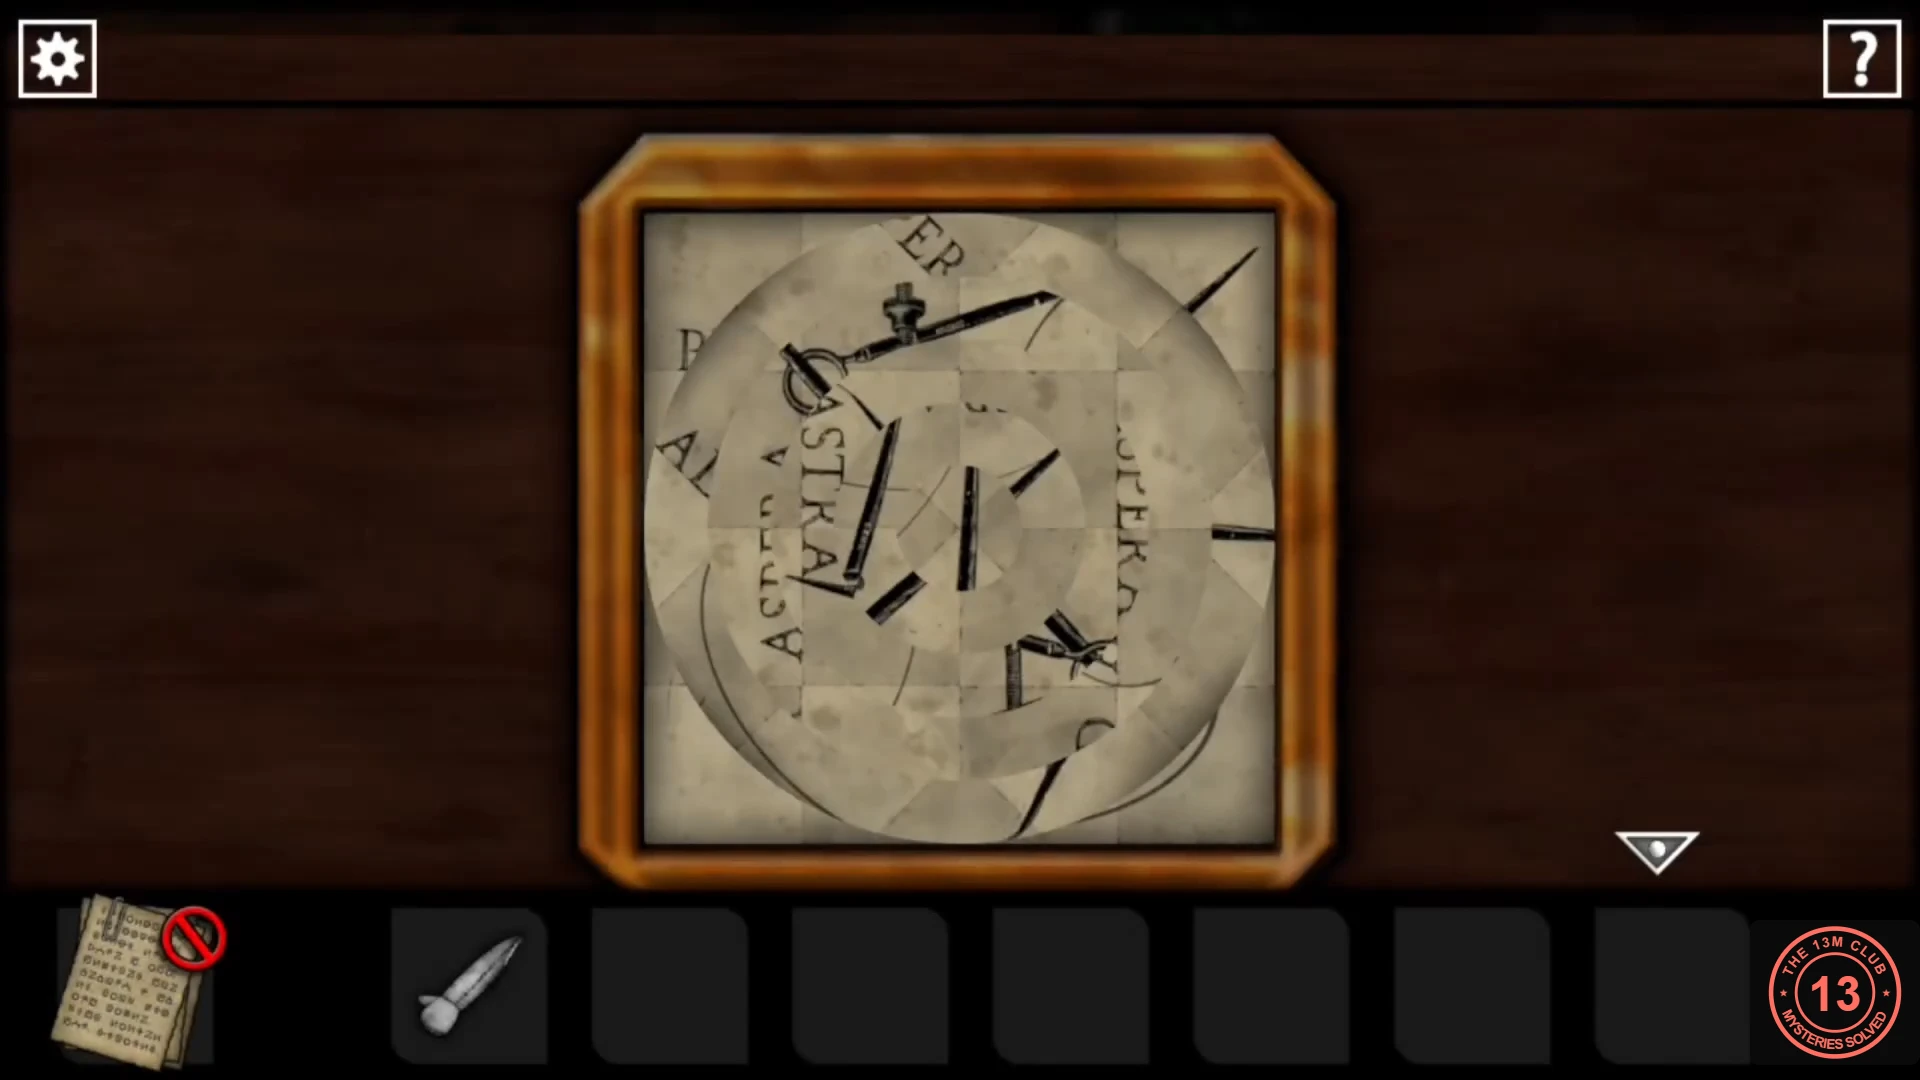
The lid of the box on the workshop's lower shelf shows a picture split into concentric rings that have been turned out of line. Rotate the rings until the picture is whole.
- Tap the box on the lower shelf. Tap a ring to rotate it. The finished picture shows a pair of compasses drawing a circle, with the motto PER ASPERA AD ASTRA. The rings may not start in the same positions as in our example, so line them up one ring at a time, using the compass legs, the drawn circle and the letters of the motto as landmarks.
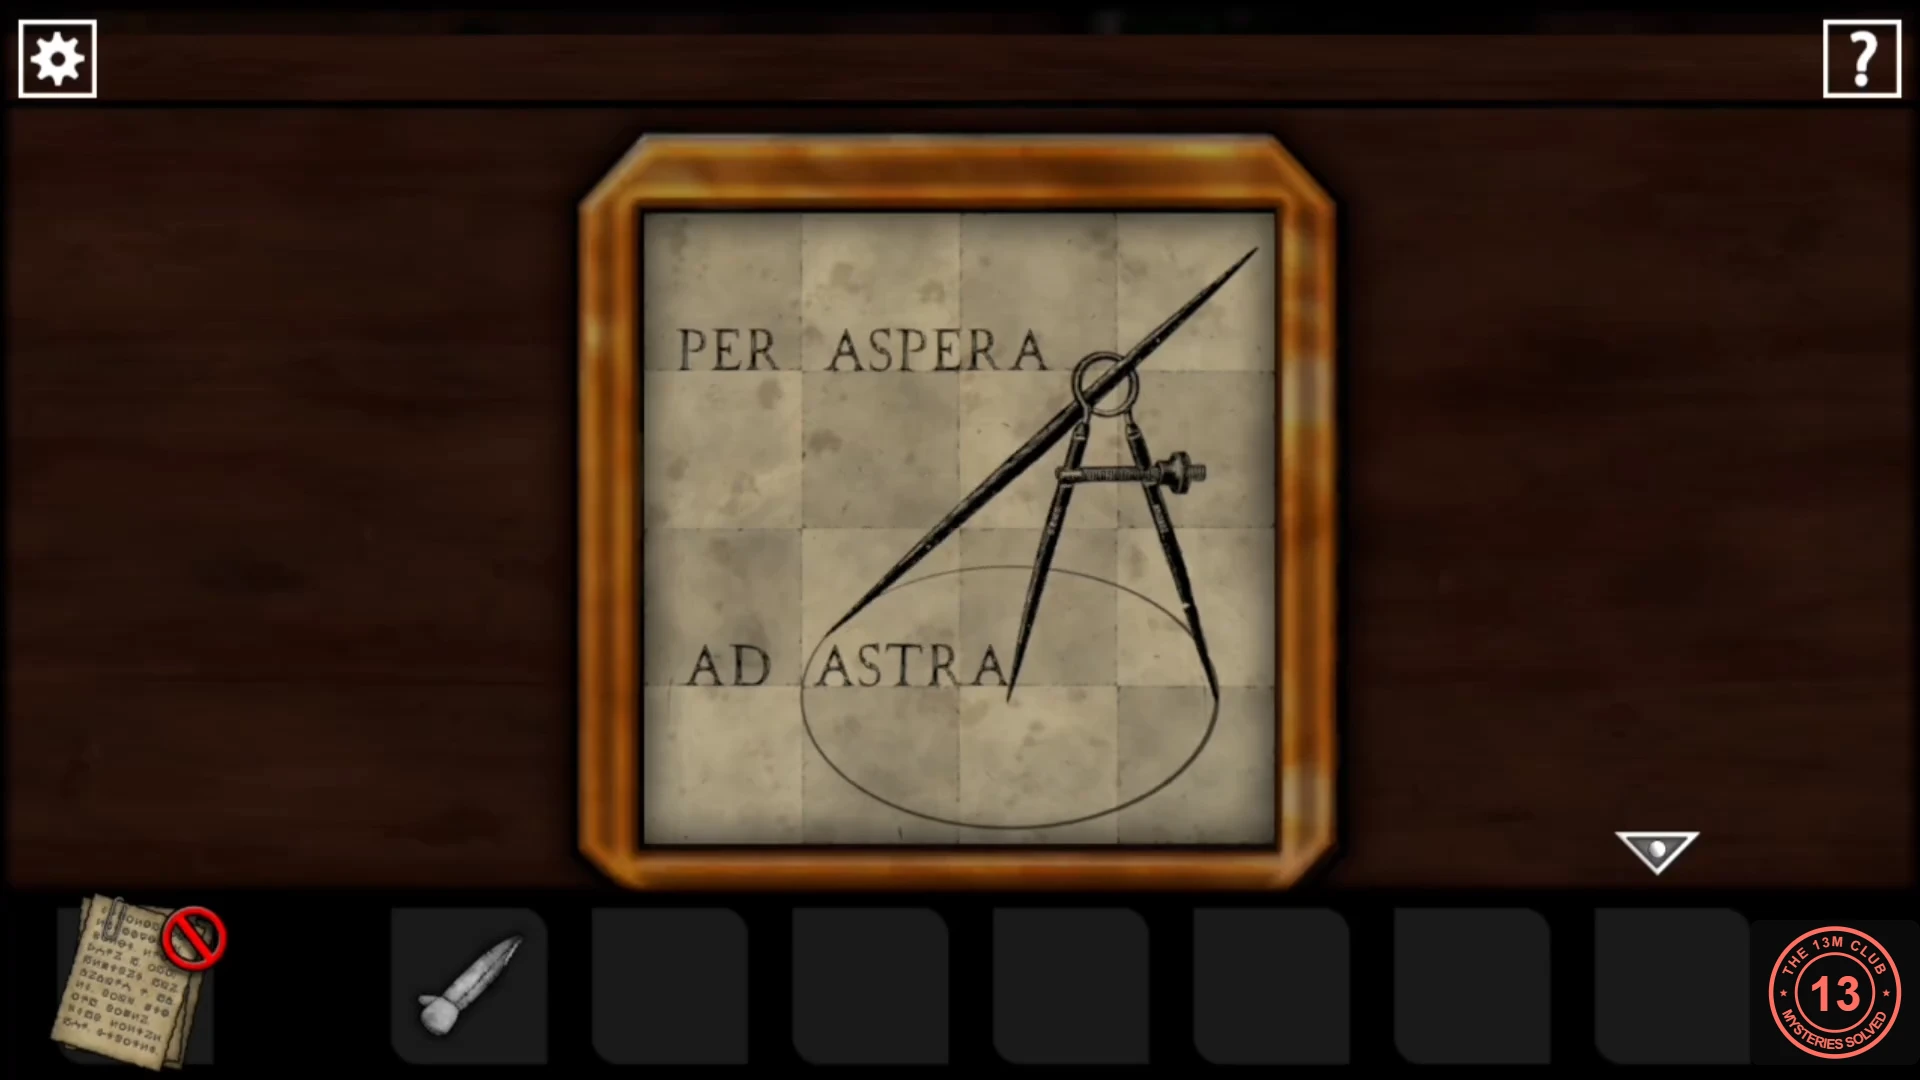
Solved: the compasses and the motto PER ASPERA AD ASTRA line up. - The box opens. Take the superglue, the scissors and the red button.
The couch note and the cactus
Collect a symbol note from a child in the room with the cream sofa, then take a cutting from the cactus in the next hallway.
- Go back to the view with the two doors and turn right. A boy in a cap sits on a cabinet. Open the door on the right to reach the room with the cream sofa.
- Talk to the bandaged child on the cream sofa. They dreamt of being buried between the cushions and found a note there when they woke up. You receive a piece of paper with four symbols in a 2x2 grid.
- The door on the right of this room leads to the TV room. You can look around, but nothing there can be used yet.
- Return to the boy in the cap and turn right into the hallway with the cactus, the barred door and a child sitting on the floor. Tap the cactus and use the scissors on it to get a piece of plant. You keep the scissors.
Moth and mosquito drawer
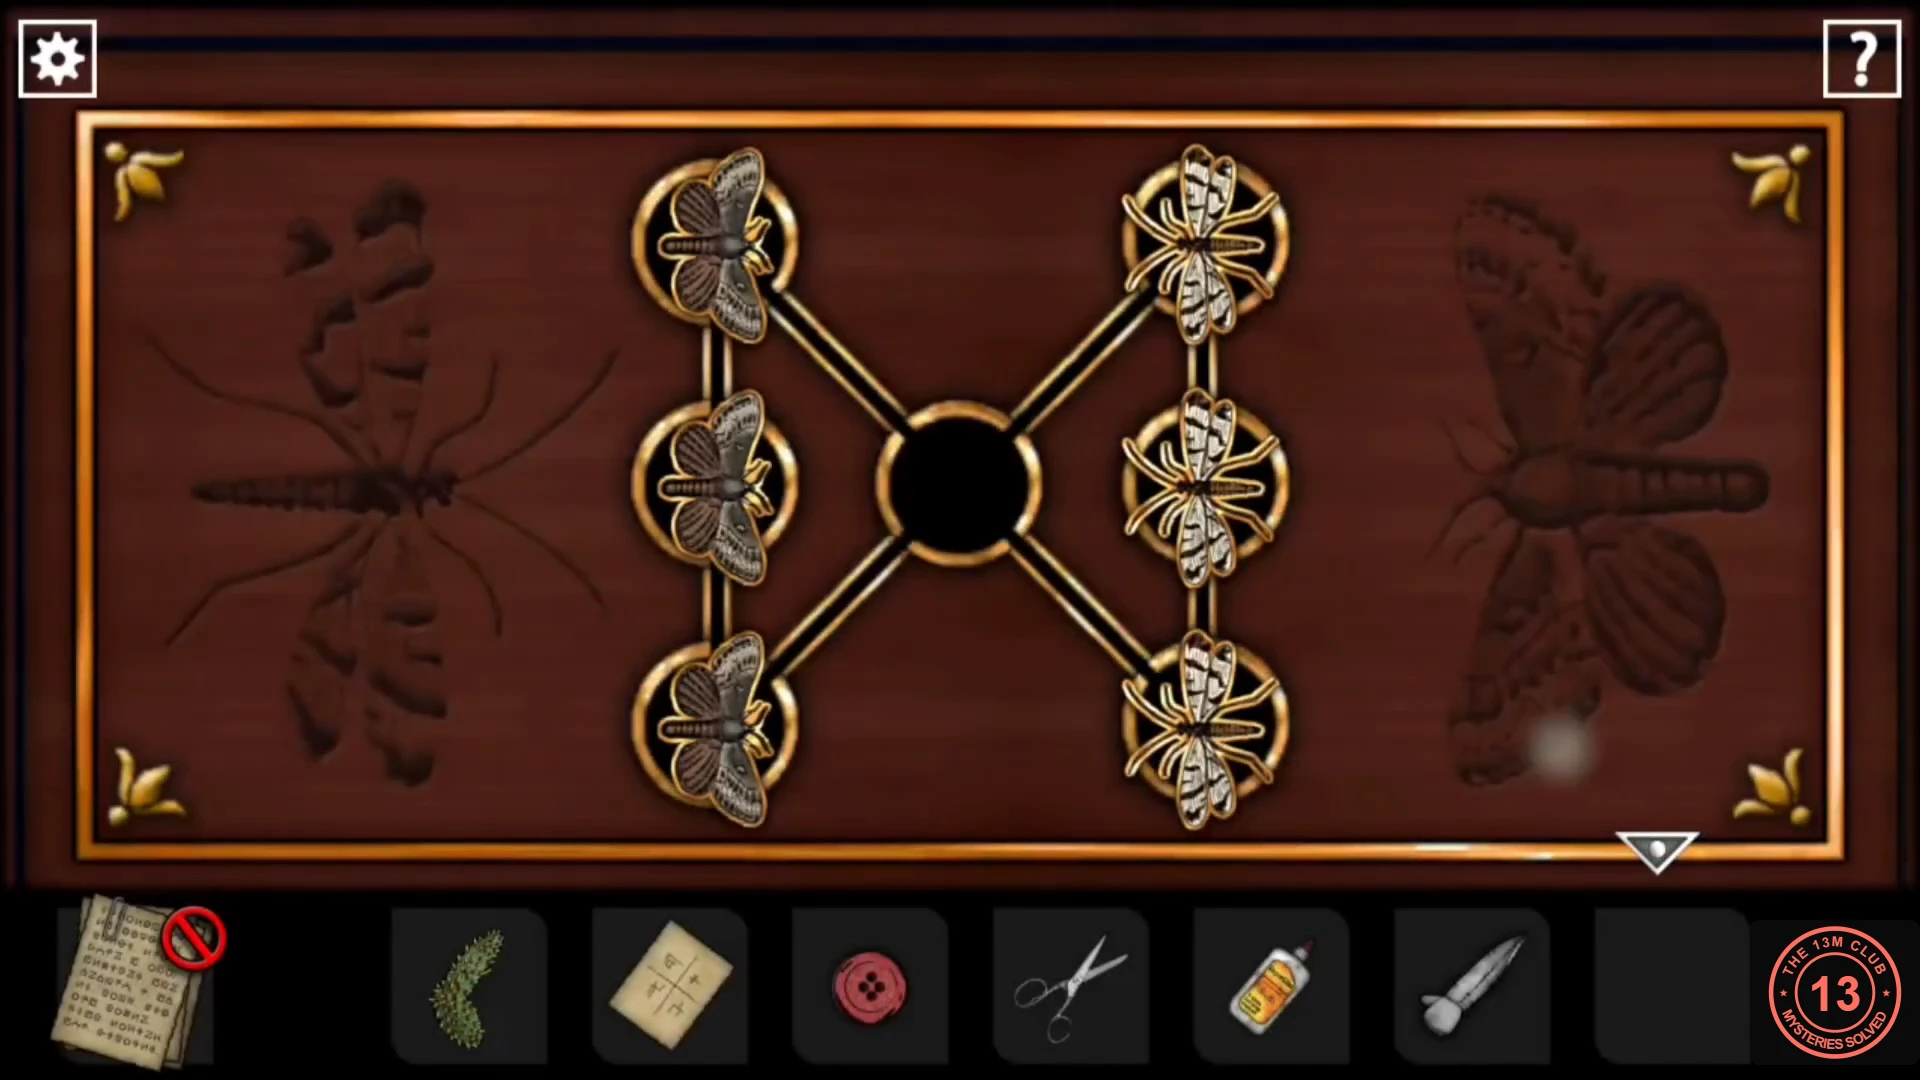
The drawer of the small cabinet under the cactus holds a sliding puzzle. Seven spots are joined by lines: three down the left, three down the right, one in the centre, and two diagonals that cross at the centre (left top to right bottom, and left bottom to right top). Three brown moths start on the left and three white mosquitoes on the right, with the centre empty. Swap the two groups; the left side is engraved with a mosquito.
- Tap the cabinet drawer. Tap a piece to move it along a line, either into the next empty spot or by jumping over one piece into the empty spot beyond.
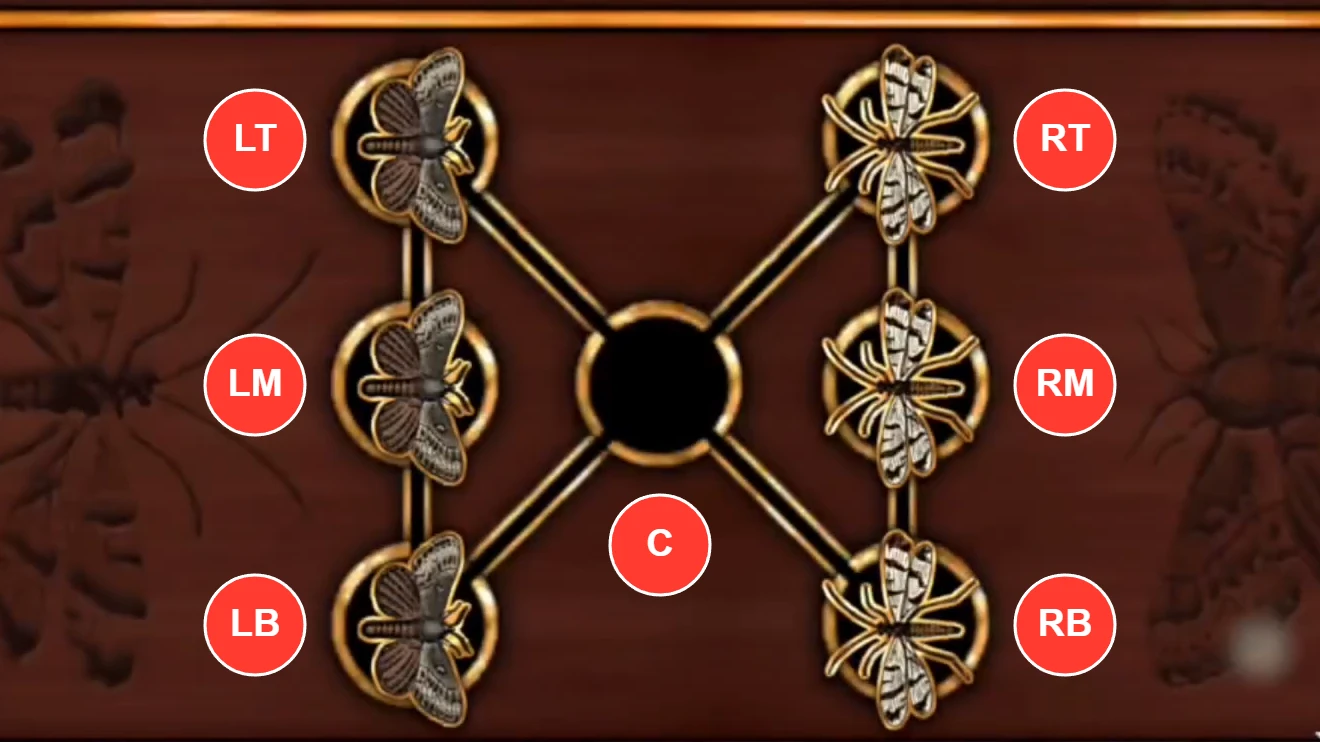
Spot names used in the move list. - Tap the pieces on these spots in order (L = left column, R = right column, C = centre; T, M and B = top, middle and bottom): LB, RT, RM, RB, C, LT, LM, LB, RT, RM, RB, C, LT, LM, LB, RT, C. Each tap moves the piece standing on that spot at that moment. At the end the mosquitoes are on the left and the moths on the right.
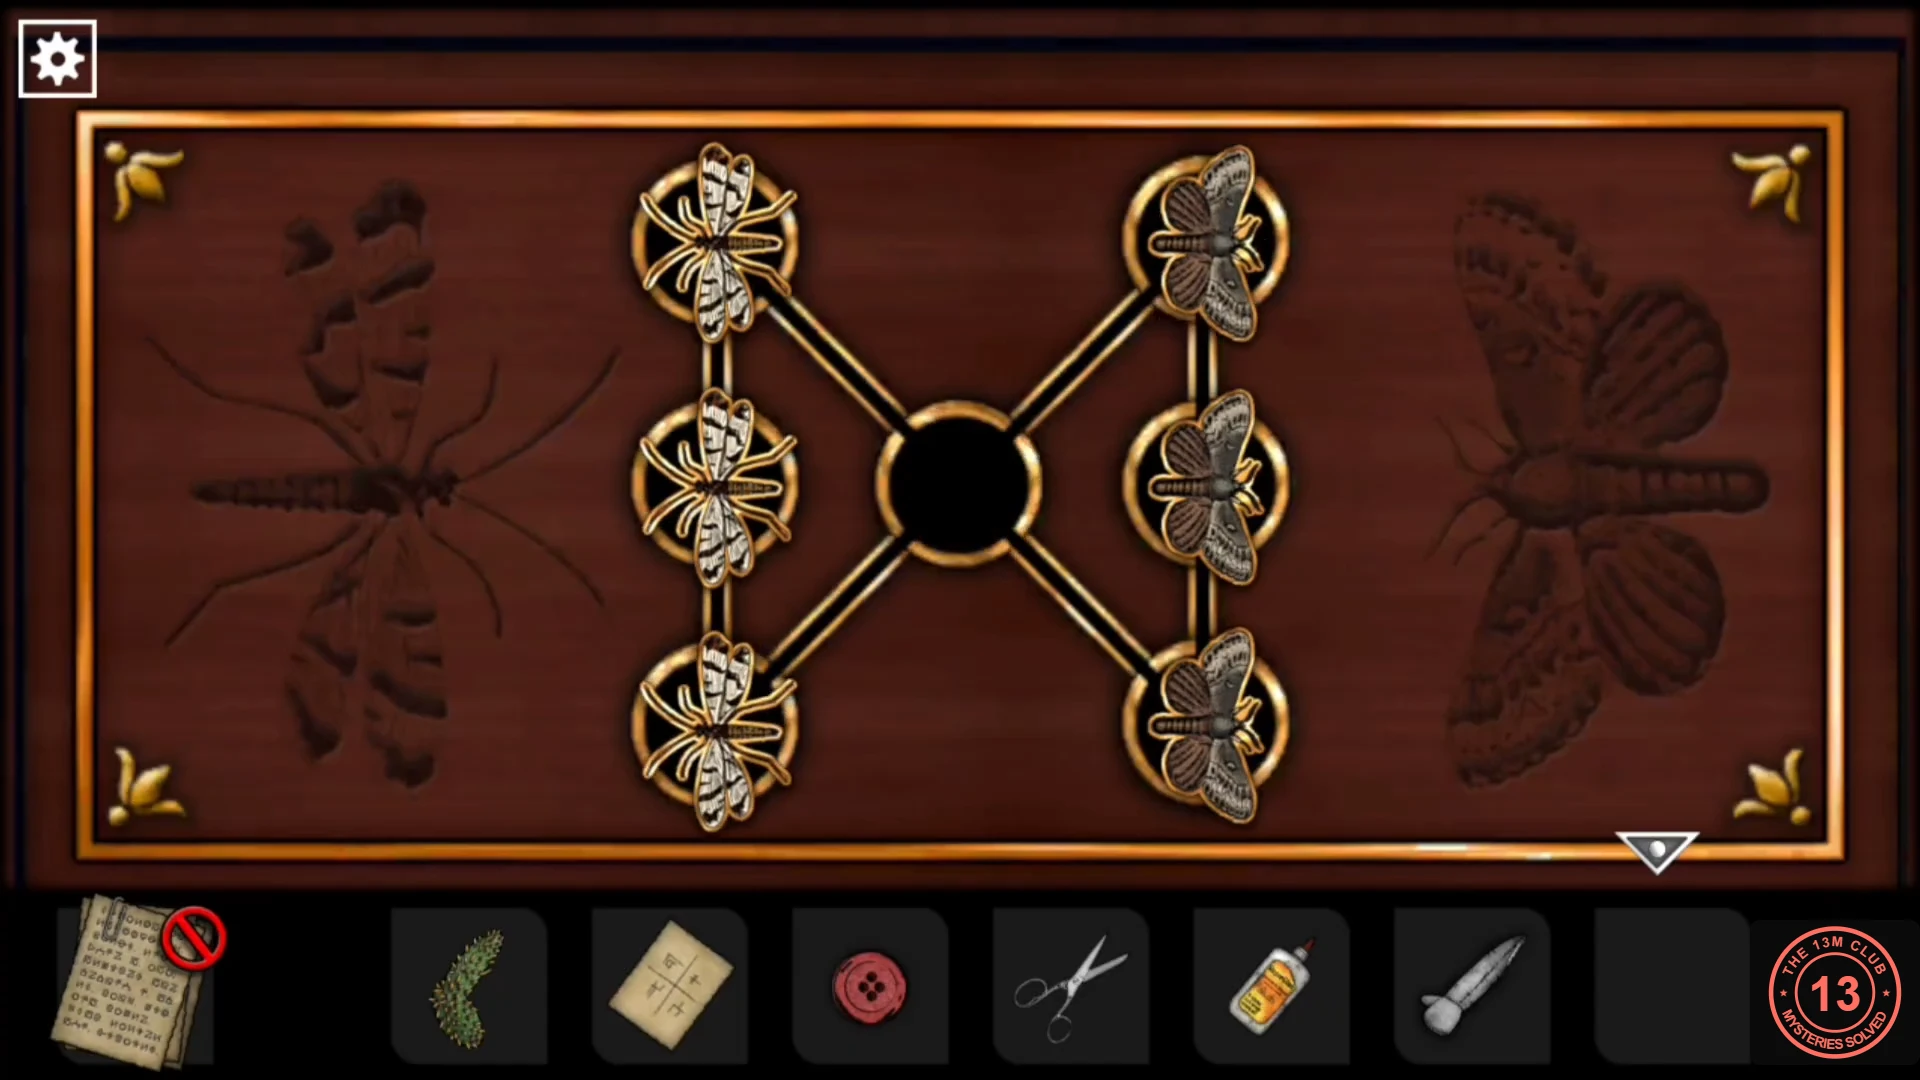
Solved: mosquitoes on the left, moths on the right. - The drawer opens. Take the gear and the small glass cylinder, which is the fuse.
Red symbol wall panel
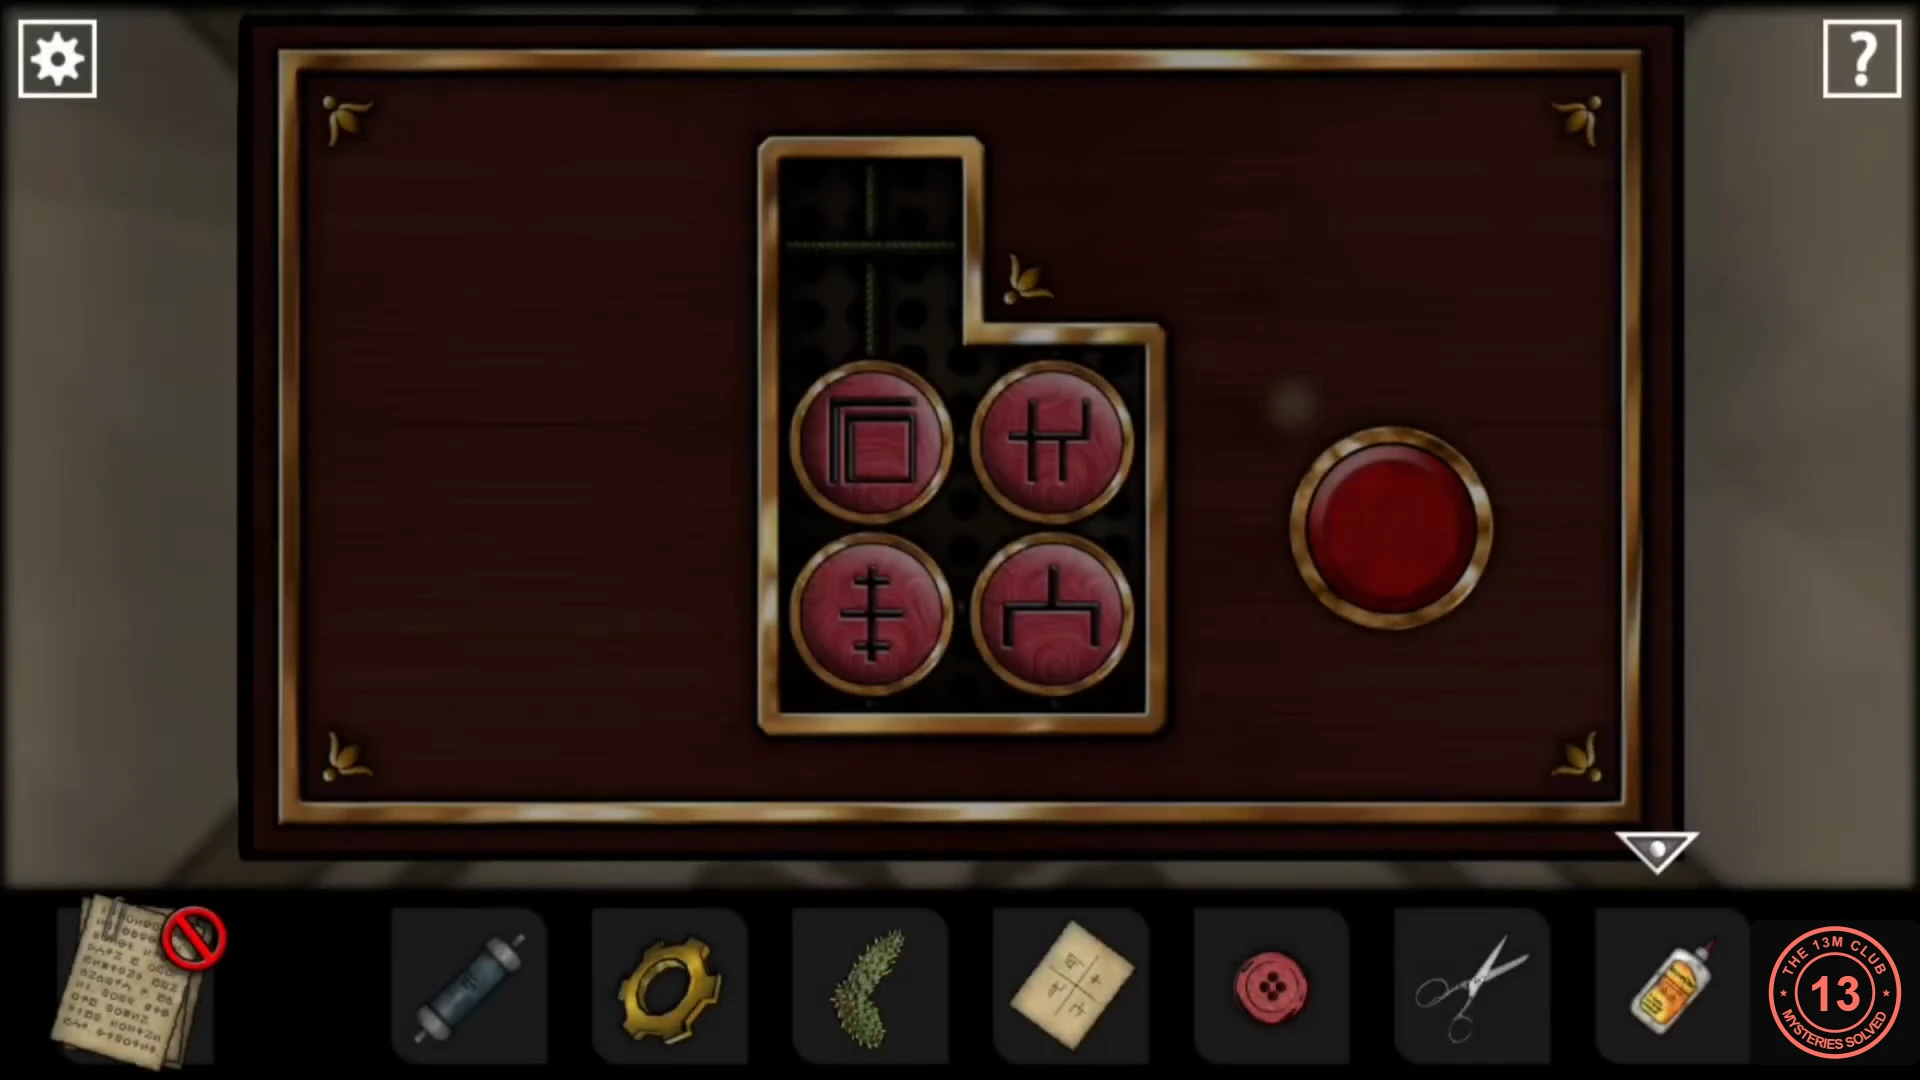
A small panel on the wall to the left of the boy in the cap holds four red symbol tokens and a large red button. The note from the cream sofa shows the target arrangement.
- Tap the panel. The tokens sit in a 2x2 block with one extra space above the top-left position, and that space starts empty. Tap a token next to an empty space to slide it there; the top space connects only to the top-left position. The red button turns the four positions of the 2x2 block one step anticlockwise, empty position included.
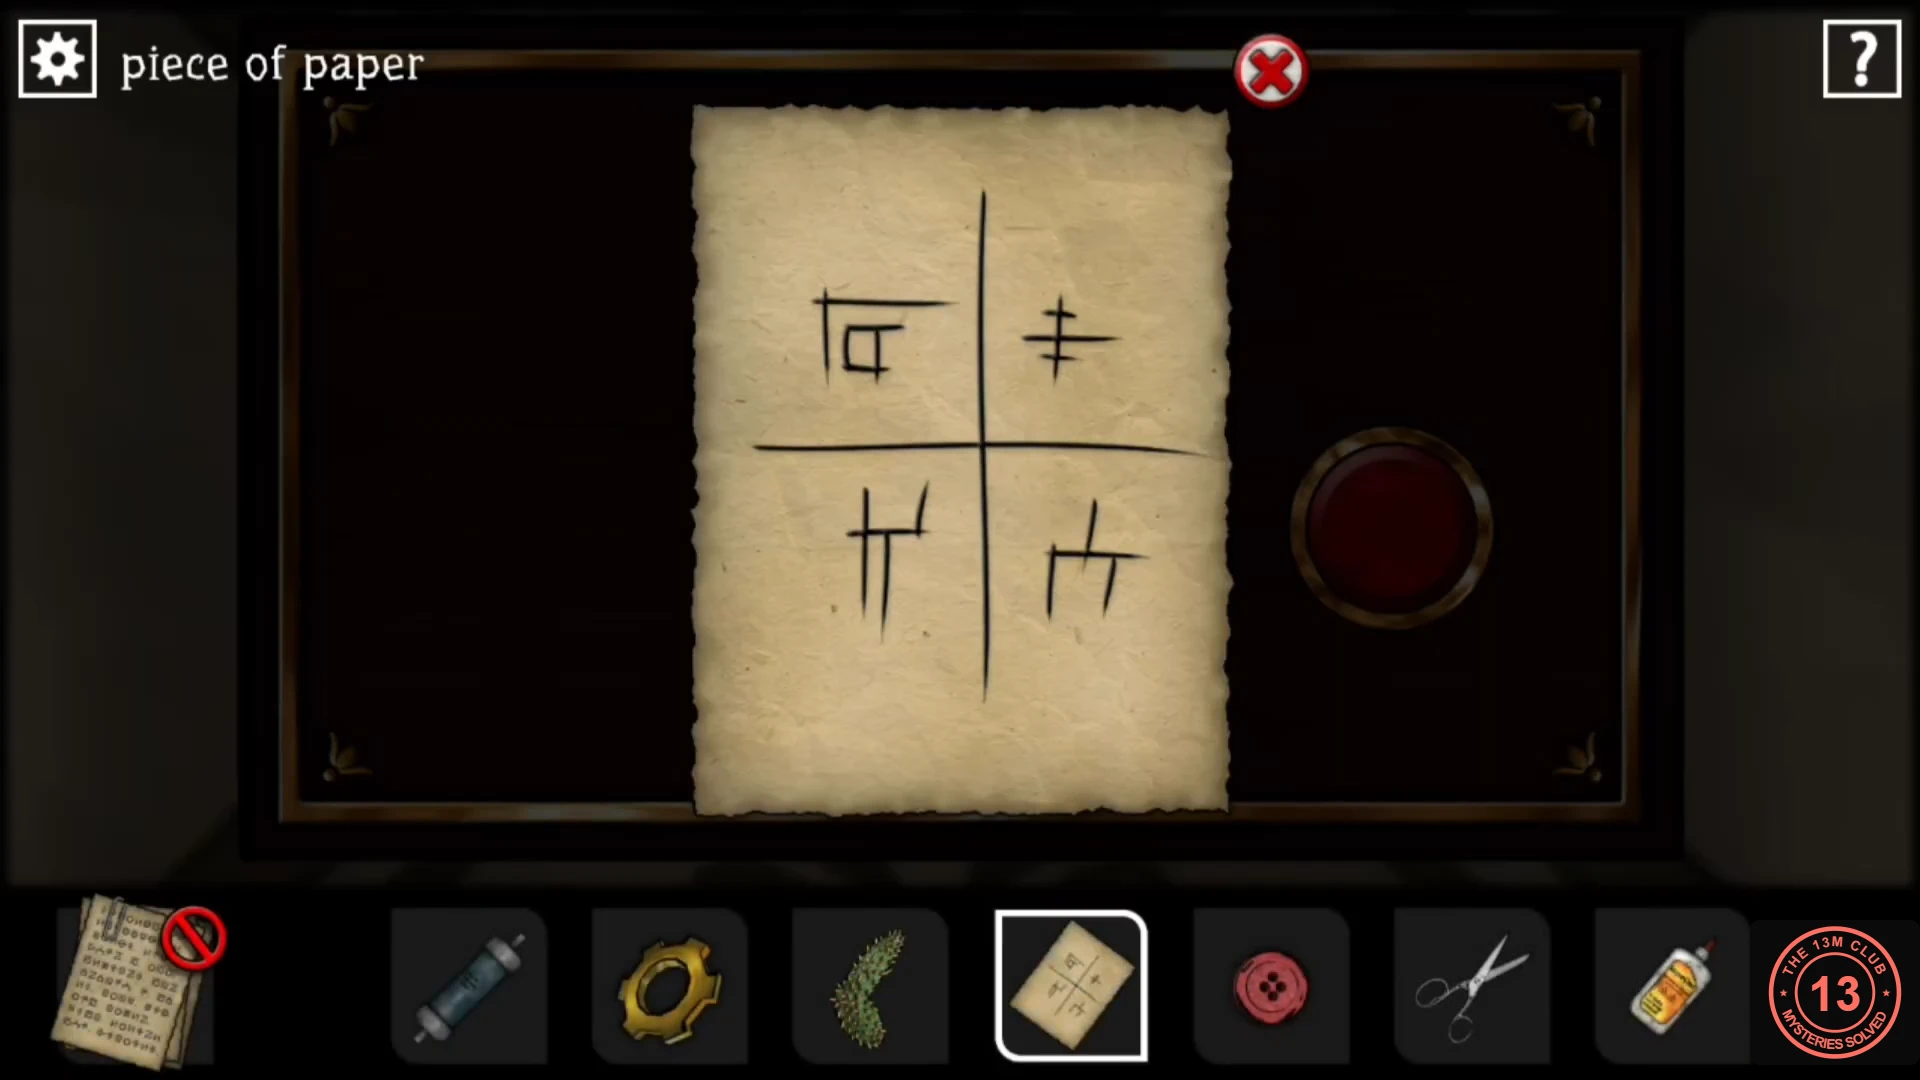
Clue: the note from the cream sofa shows the target arrangement. - Target, matching the note: top left the square inside a square, top right the double cross, bottom left the symbol that looks like two joined H shapes, bottom right the house shape. The panel starts with the square top left, the double H top right, the double cross bottom left and the house bottom right. From that start, this order works (each "tap" slides the token in that position into the empty space): tap top left, tap bottom left, tap bottom right, tap top right, tap top left, tap the token in the top space, press the button twice, tap top left, tap top right, press the button, tap the token in the top space, press the button. If your panel starts differently, park one token in the top space and use slides and button turns to place the other three one at a time.
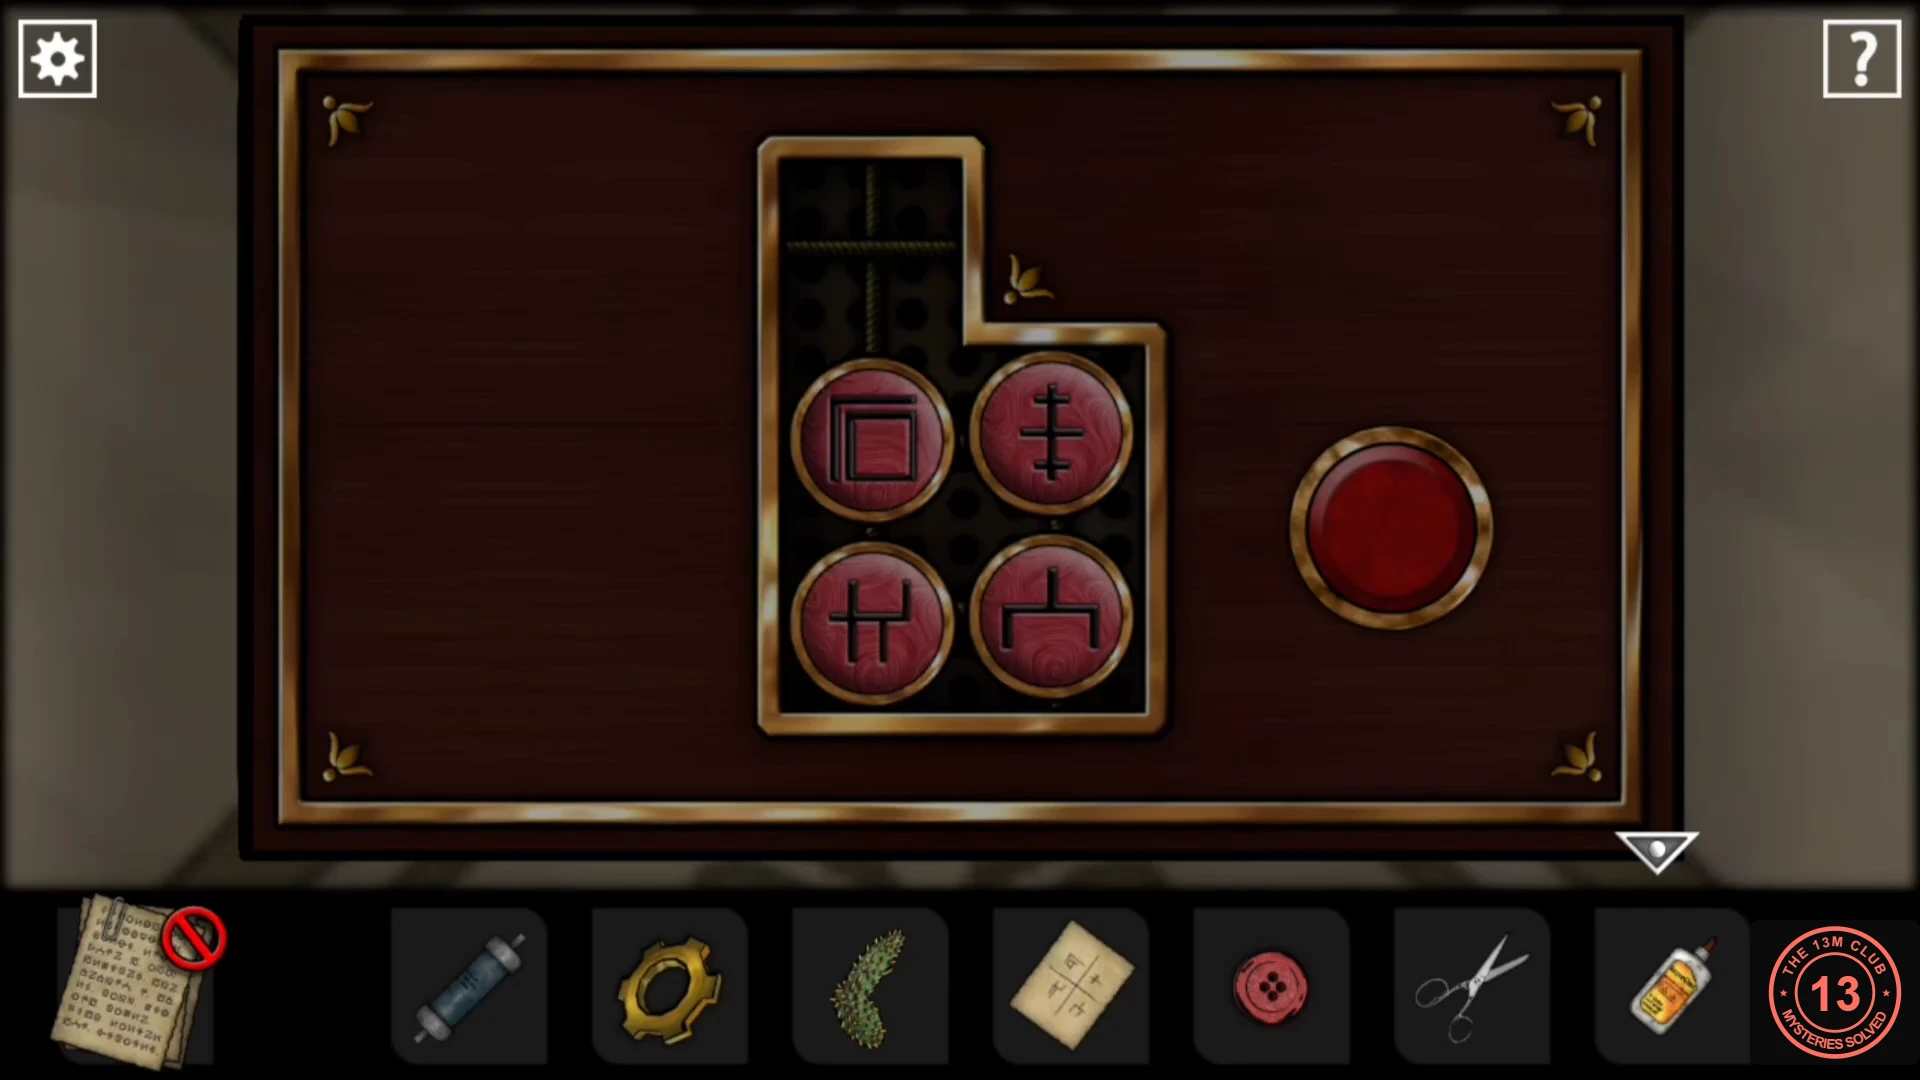
Solved: the tokens match the note. - The panel slides away. Take the key.
- Go back to the view with the two doors and use the key on the left-hand door. It opens the study, with a lighthouse painting and a desk holding a skull and an open book.
Study book and the lens grid cabinet
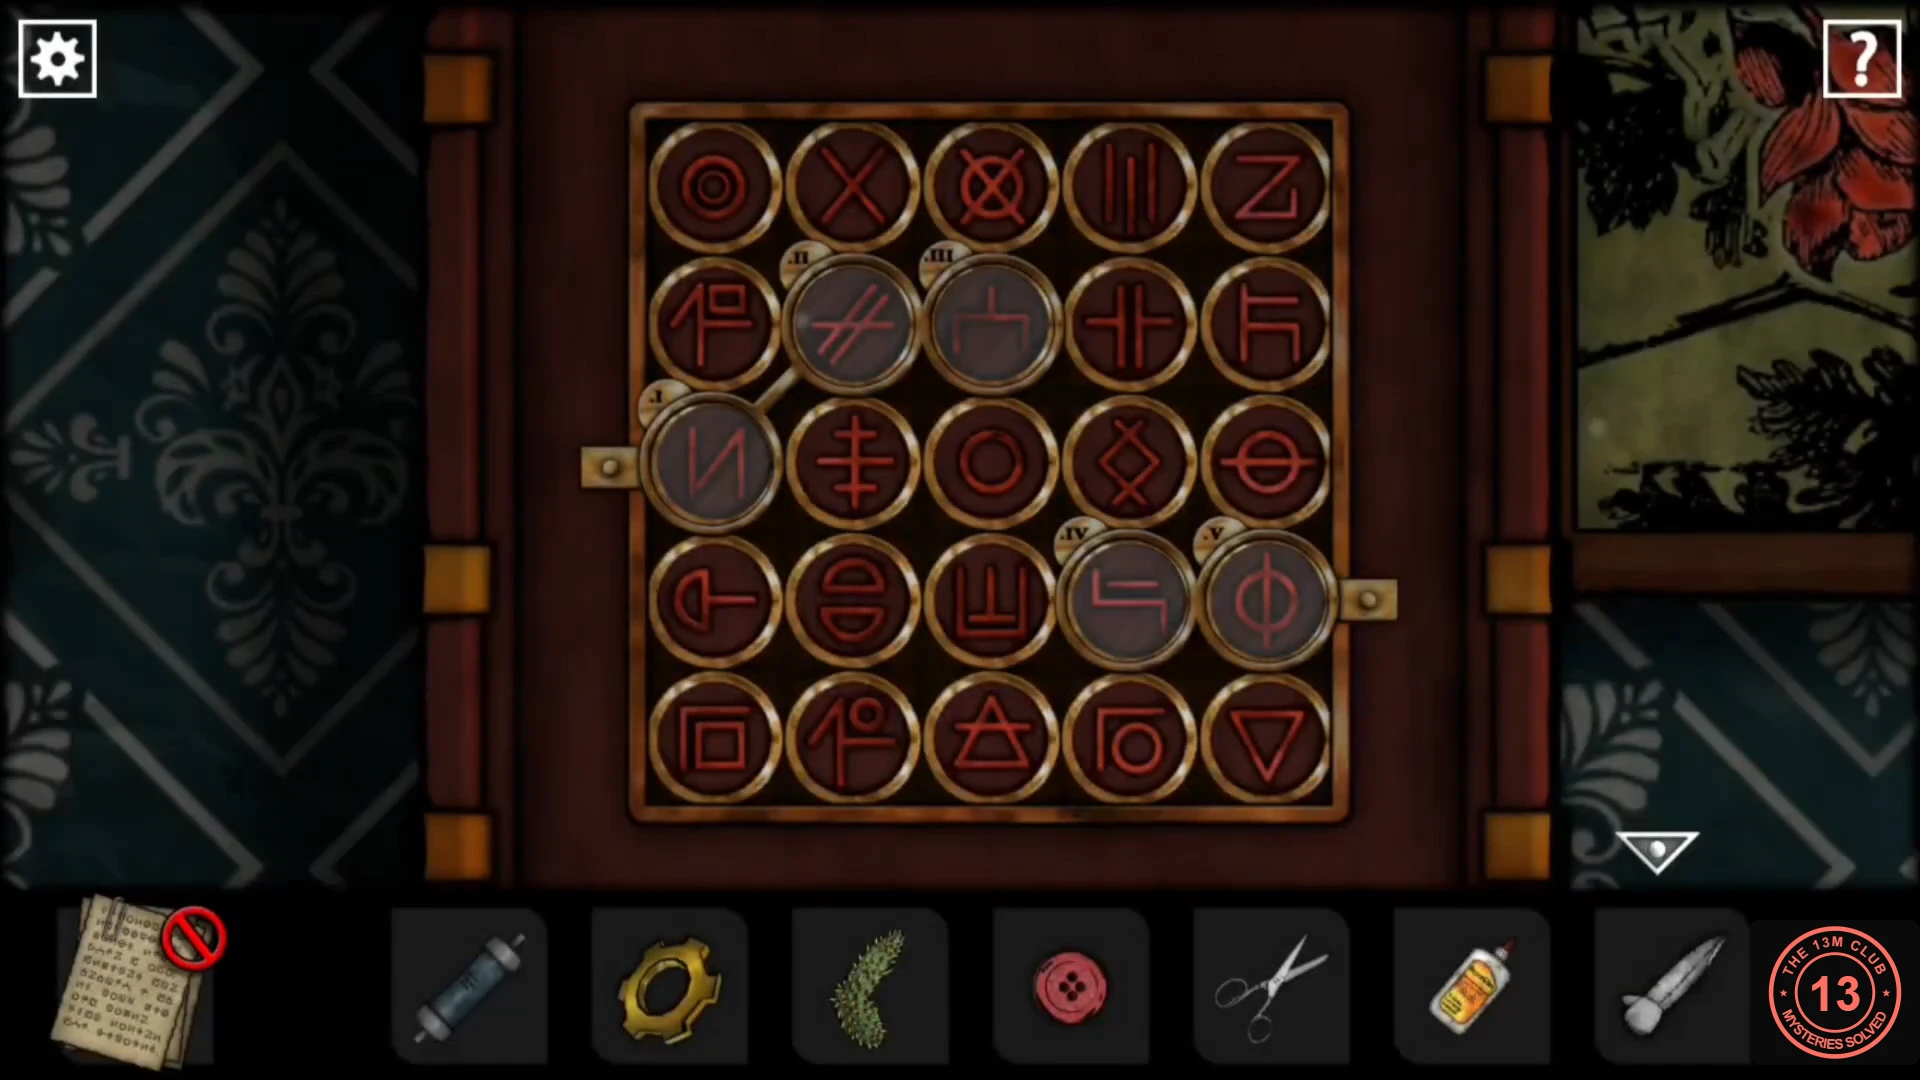
The open book in the study pairs five red symbols with Roman numerals. The tall cabinet in the room with the cream sofa holds a 5x5 symbol grid under five numbered lenses. Sorting the grid takes many slides, so this section explains the method instead of listing every move.
- Tap the open book on the study desk. It shows: I = a circle with a vertical stroke, II = a downward triangle, III = a plain circle, IV = a flag-like symbol, V = two concentric circles.
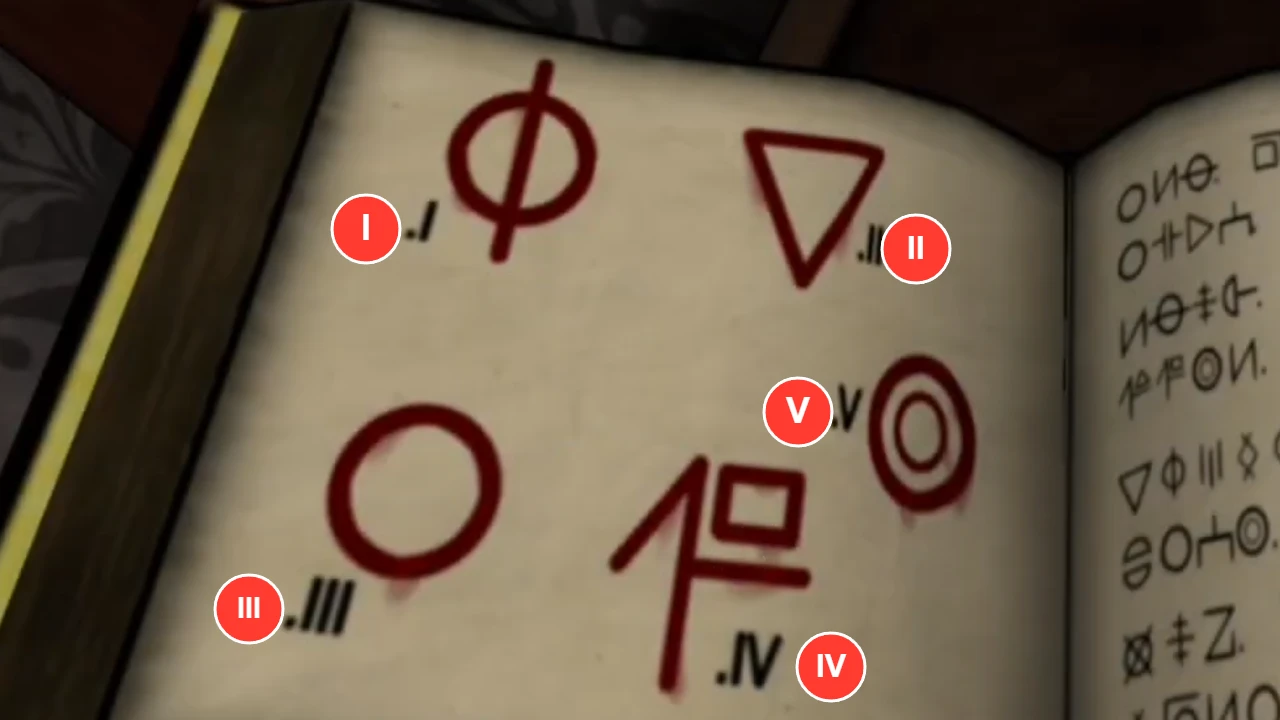
Clue: the study book pairs each Roman numeral with a symbol. - Go to the room with the cream sofa and open the tall cabinet on the left. Five numbered lenses stay fixed over the grid. Counting rows from the top and columns from the left: I at row 3 column 1, II at row 2 column 2, III at row 2 column 3, IV at row 4 column 4, V at row 4 column 5. Drag a row sideways or a column up or down to slide it. Symbols pushed off one edge come back at the other.
- Slide rows and columns until each lens shows its symbol from the book. Two facts make this manageable: each column holds exactly one lens, so a column slide changes only that column's lens, and rows 1 and 5 hold no lenses, so sliding them never disturbs a lens. To set a lens, find its symbol. If the symbol is already in the lens's column, slide that column until it sits under the lens. If not, get the symbol into row 1 or row 5, slide that row until the symbol reaches the lens's column, then slide the column. Getting a symbol into row 1 or 5 can mean sliding another lens's column, so check the lenses you have already set after each move.
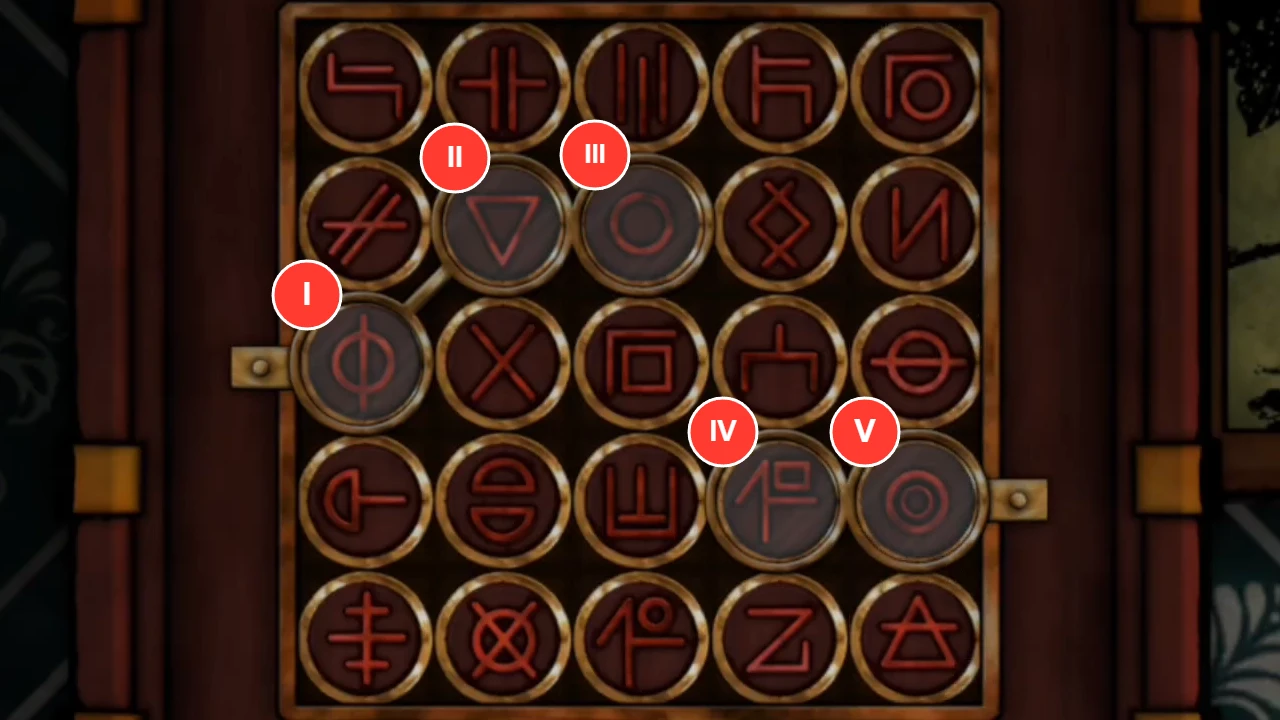
Solved: every lens shows its symbol from the book. - The cabinet opens. Take the gold key.
Desk shape board
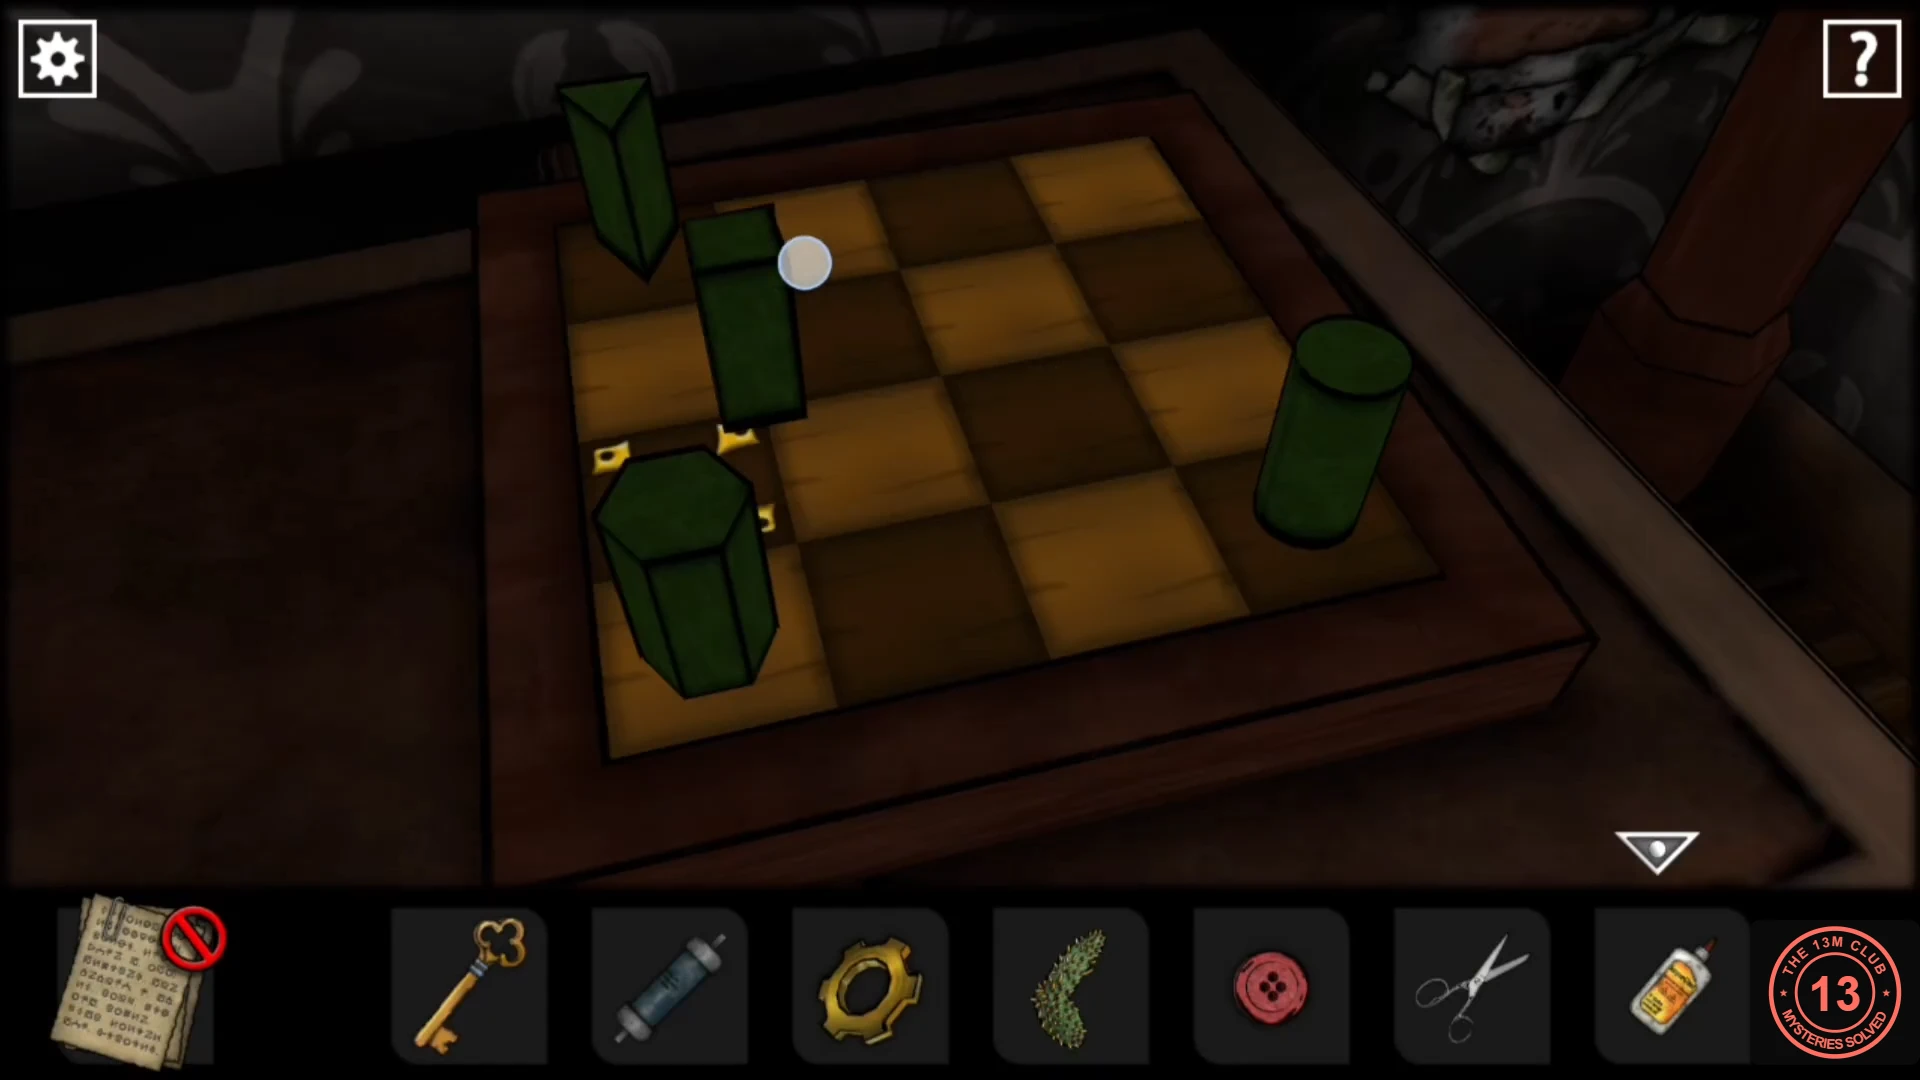
The locked double door at the start shows where four green shapes belong on the board at the right end of the study desk.
- Return to the starting view and look at the double door. Each of its four panels is a 4x4 grid with one marked cell. Counting rows from the top and columns from the left: the top-left panel has a hexagon at row 2 column 4, the top-right panel a triangle at row 2 column 3, the bottom-left panel a square at row 2 column 2 and the bottom-right panel a circle at row 3 column 3.
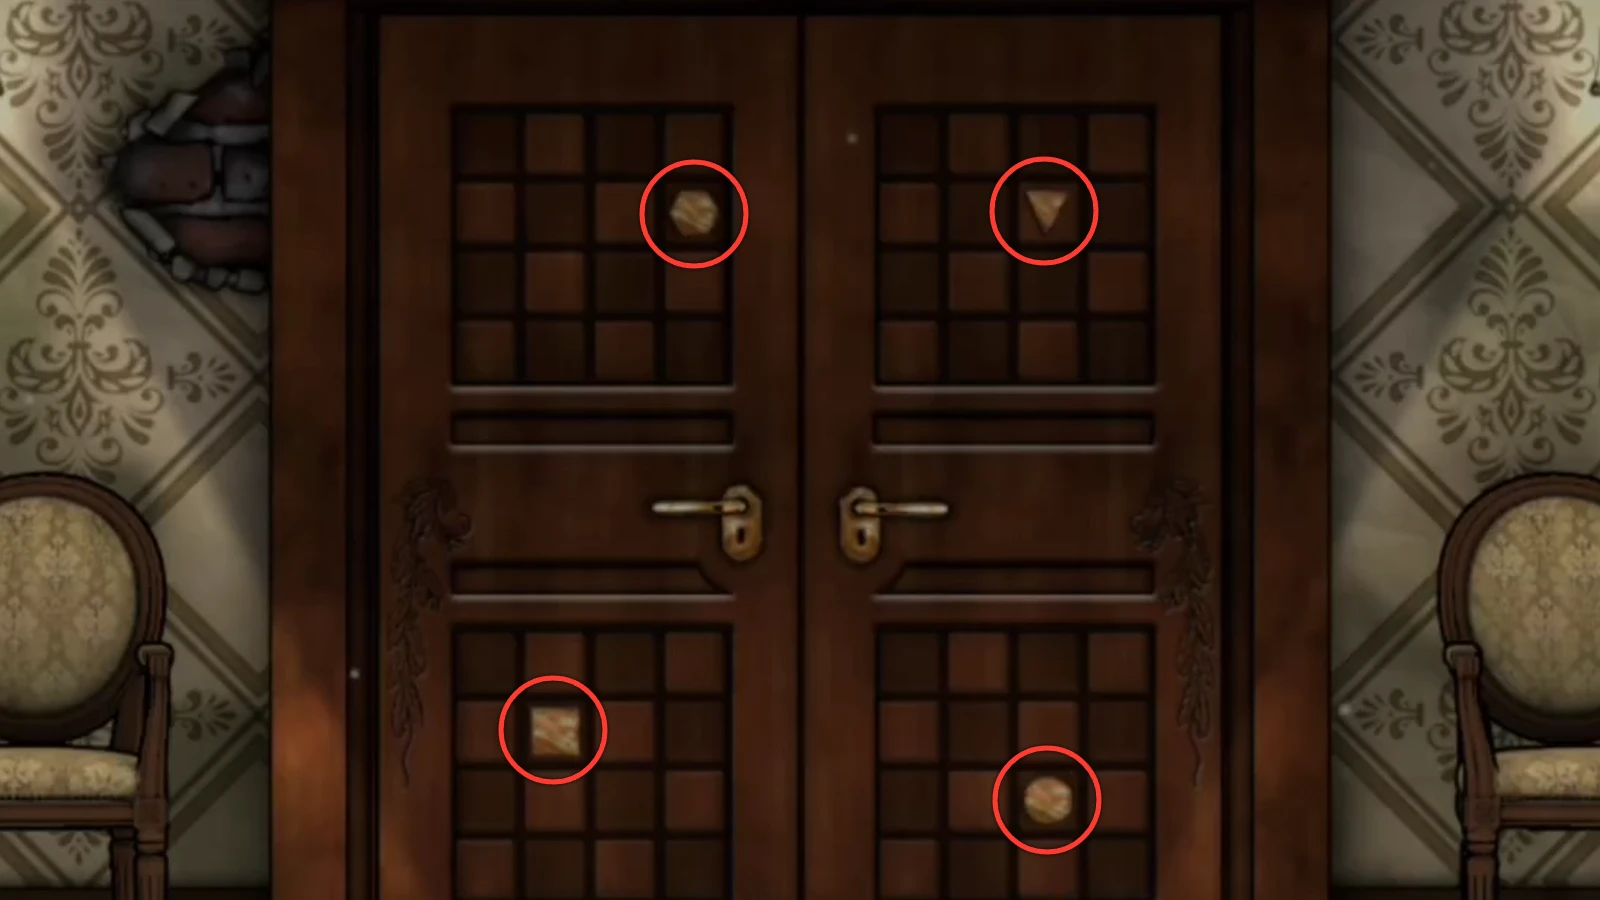
Clue: each door panel marks where one shape goes. - In the study, tap the right end of the desk to open a 4x4 board with four green prisms: hexagonal, triangular, square and round (a cylinder). Drag a prism to move it; yellow arrows show where it can go.
- Place the hexagonal prism at row 2 column 4, the triangular prism at row 2 column 3, the square prism at row 2 column 2 and the cylinder at row 3 column 3. Row 1 is the edge of the board farthest from you.
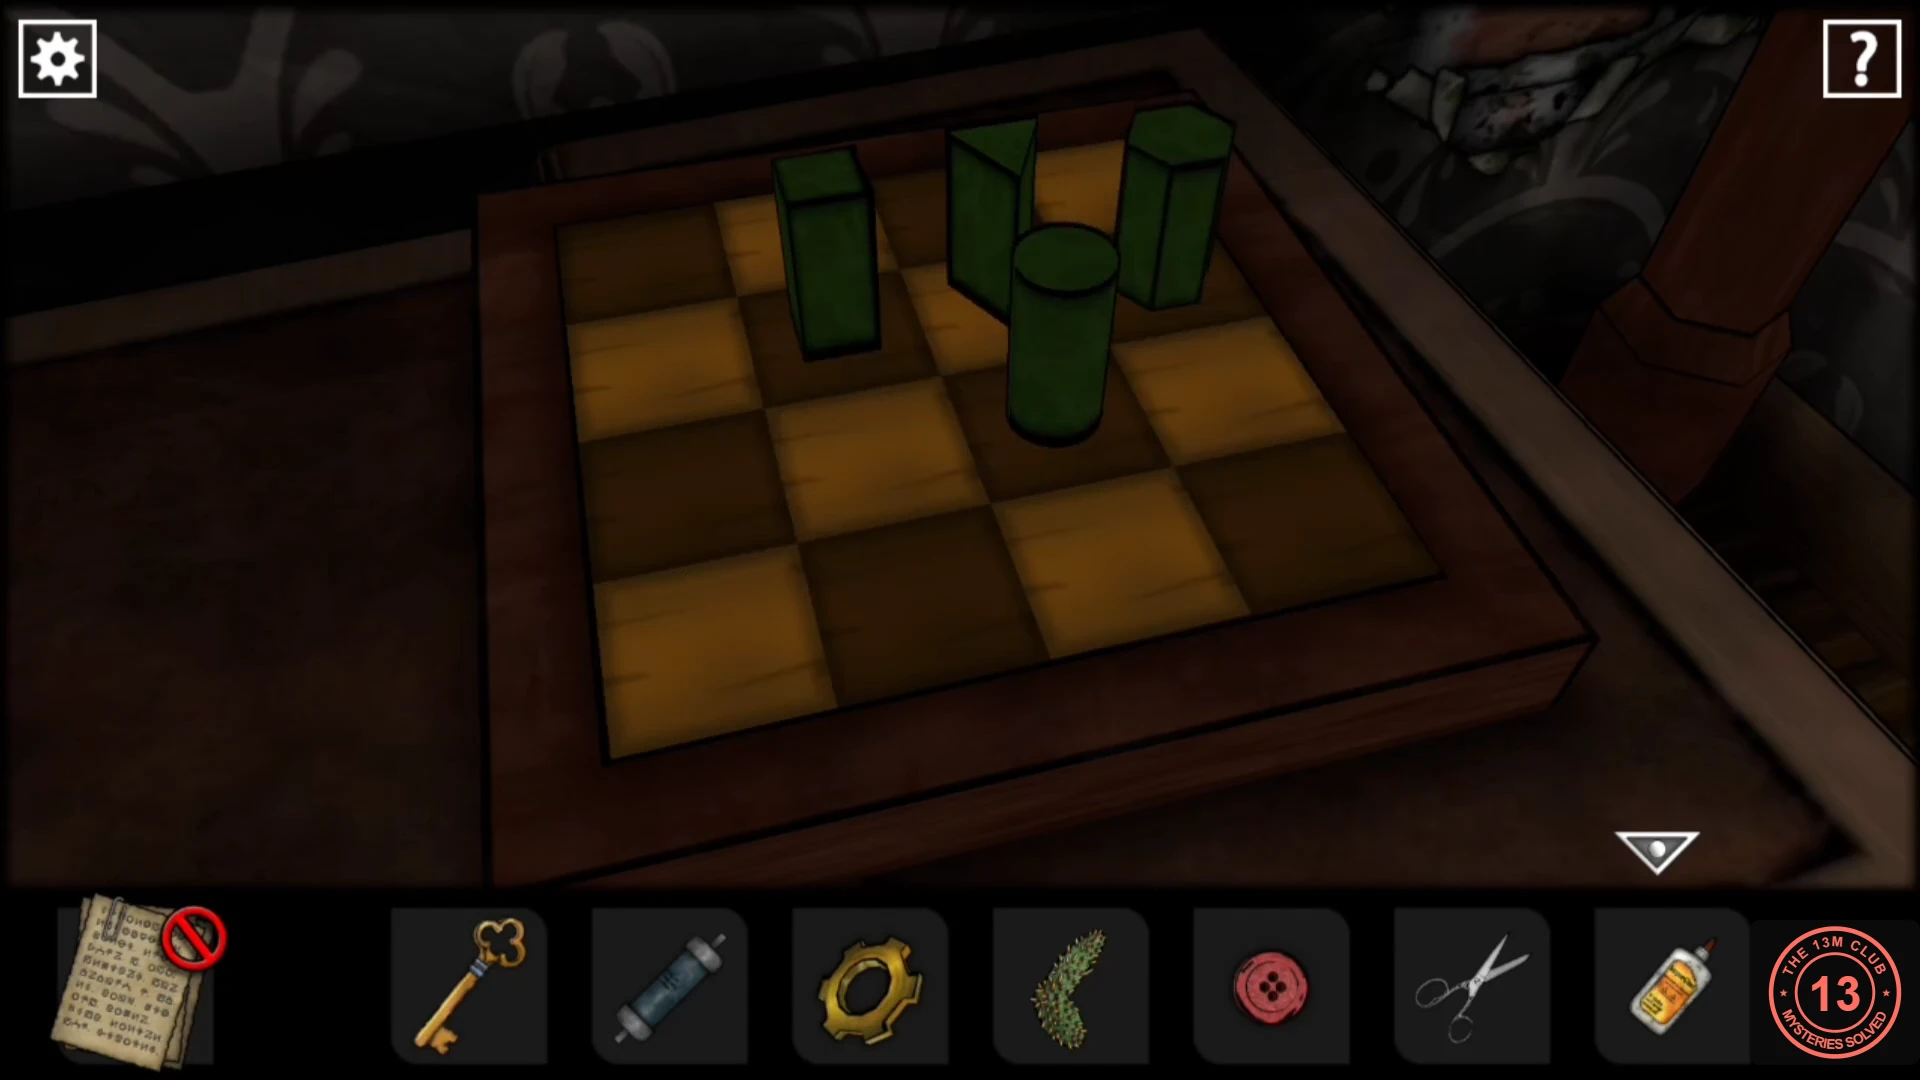
Solved: the prisms copy the door panels. - A tray beside the board opens. Take the second gear and a piece of paper showing a strip of four symbols.